WHEN YOU QUOTE
or heavily reference information from another source, as when writing
an article or report, you should indicate the source of the information.
Word enables you to identify sources using either footnotes or
endnotes. Each footnote appears at the bottom of the page holding the cited information, while endnotes appear together at the end of the document.
|
The information and punctuation
used in a footnote or endnote is defined by its style. Teachers,
instructors, publishers, and some other organizations often require you
to use a particular style, such as the MLA style established by the
Modern Language Association.
|
Back in the typewriter
era, you had to change the carriage position to create the superscript
footnote number, and then leave room at the bottom of the page for the
footnote itself. If you planned wrong and didn’t leave room for a
subsequent footnote on the page, you would have to retype the entire
page.
That’s what makes
Word’s automated footnote and endnote capabilities so beneficial. Word
properly numbers and formats footnotes and endnotes, adjusts the page
break based on the number of footnotes on the page, and compiles
endnotes in the correct order for you.
Creating a Footnote or Endnote
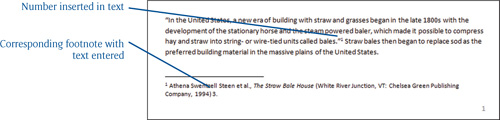
It takes mere moments to
create a footnote or end-note. Start by typing in the quoted or
paraphrased text from the source. With the insertion point directly to
the right of the last character in the information or closing quotation
mark, choose References > Footnotes > Insert Footnote or
References > Footnotes > Insert Endnote. Word inserts the number
for the footnote or endnote in the text, and then moves the insertion
point to the location for the corresponding footnote or end-note. Type
the text for the note in the proper style. Figure 1 shows an example footnote.
Copying Notes
If
a source is really good, you might quote or paraphrase its contents
multiple times in the same document. Word saves you the need to retype
the same footnote or endnote information by enabling you to reuse an
existing note. To do so, you copy and paste the note number that’s
placed just after the sourced text (not the footnote or endnote itself).
Drag over the note number to
select it, and then copy it with either Ctrl+C or Home > Clipboard
> Copy. Then click just to the right of the next quotation or
paraphrased material, and paste using Ctrl+V or Home > Clipboard >
Paste. That’s it. Word automatically assigns the correct number to the
pasted note both in the text and in the note itself.
Moving Notes
If you move text marked with a
footnote or end-note in the document, the note “travels” with the text.
That means Word automatically renumbers all notes as needed to reflect
the new location of the sourced text relative to other sourced text.
If you inserted a footnote
or endnote at the wrong location, a simple cut and paste solves the
problem. Drag over the note number to select it, and then cut it with
either Ctrl+X or Home > Clipboard > Cut. Then click in the correct
location for the note and paste using Ctrl+V or Home > Clipboard
> Paste.
Converting Between Note Types
Back in the typewriter
era, it was extremely important to understand whether footnotes or
endnotes were required for a particular document. If you used the wrong
type of note, you would have to retype the entire document. Word’s
reference capabilities don’t lock you in to one note type or the other.
You can convert a footnote to an endnote and vice versa at any time. To
do so, right-click anywhere in the footnote or endnote itself. In the
shortcut menu that appears (see the example in Figure 2), and click Convert to Endnote (or Footnote).
