|
If you plan to deliver variations of the same presentation to different
audiences, you should prepare one presentation containing all the slides you are
likely to need for all the audiences. Then you can select slides from the
presentation that are appropriate for a particular audience and group them as a
custom slide show. When you need to deliver the presentation for that audience,
you open the main presentation and show the subset of slides by choosing the
custom slide show from a list.
For example, suppose you need to pitch an idea for a new product or service to
both a team of project managers and a company’s executive team. Many
of the slides would be the same for both groups, but the presentation to the
executive team would include more in-depth competitive and financial analysis.
You would develop the executive team’s presentation first and then
create a custom slide show for the project managers by using a subset of the
slides in the executive presentation.
During a presentation, you might sometimes want to be able to make an
on-the-spot decision about whether to display a particular slide. You can give
yourself this flexibility by hiding the slide so that you can skip over it if
its information doesn’t seem useful to a particular audience. If you
decide to include the slide’s information in the presentation, you can
display it by pressing the letter H or by using the Go To Slide command.
In this exercise, you’ll select slides from an existing presentation
to create a custom slide show for a different audience. You’ll also
hide a slide and then see how to display it when necessary.
On the Slide Show tab, in the
Start Slide Show group, click the
Custom Slide
Show button, and then click Custom Shows.

The Custom Shows dialog box opens.
Click New.
The Define Custom Show dialog box opens.
The default custom show name is selected in the Slide
Show Name box.
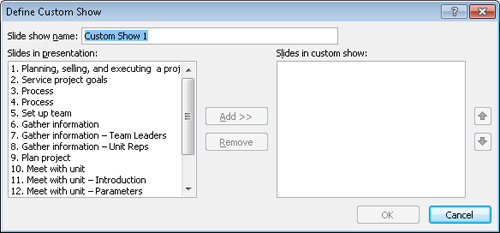
In the Slide show name box, type
Managers.
In the Slides in presentation list,
click slide 1, and then click
Add.
Slide 1 appears as Slide 1 in the Slides In Custom Show box on the
right.
In the Slides in presentation list,
click slide 2, hold down the Shift
key, and click slide 6. Then click
Add.
The slides appear in sequential order in the Slides In Custom Show box
on the right.
You can change the order of the slides by clicking the
Up or Down arrow to the right of the Slides In Custom Show
box.
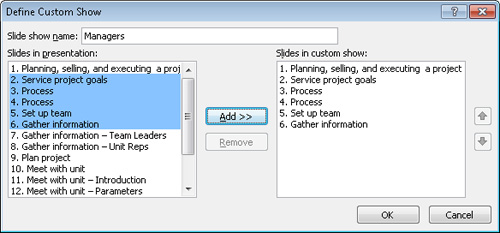
Add slides 9, 10, and 14 through 16, and
then click OK.
Of the 16 slides in the presentation, you have chosen 11 to show to
managers.
In the Custom Shows dialog box,
click Show to start the custom slide
show.
Click the mouse button to advance through all the slides, including
the blank one at the end of the show.
In Normal view, on the Slide
Show tab, in the Start Slide
Show group, click the Custom
Slide Show button.
The Managers custom show has been added to the list. Clicking this
option will run the custom slide show.
In the list, click Custom
Shows.
In the Custom Shows dialog box,
verify that Managers is selected, and
then click Edit.
The Define Custom Show dialog box opens.
In the Slides in custom show list,
click slide 3, and then click
Remove.
PowerPoint removes the slide from the custom slide show, but not from
the main presentation.
Click OK to close the Define Custom Show dialog box, and then
click Close to close the Custom Shows dialog box.
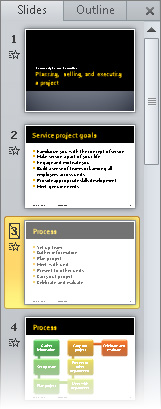
On the Slides tab of the Overview pane, click slide 3, and then in the Set Up group, click the Hide
Slide button.

On the Slides tab, PowerPoint puts a box with a diagonal line around
the number 3, and dims the slide contents to indicate that it is
hidden.
Slide 3 is hidden.
Tip:
Tip
You can also right-click the slide thumbnail and then
click Hide Slide.
Display slide 2, and switch to
Reading view. Then click the Next
button.

Because slide 3 is hidden, PowerPoint skips from slide 2 to slide
4.
Click the Previous button to move
back to slide 2.

Right-click anywhere on the screen, point to Go to Slide, and then click (3)
Process.
The number is in parentheses because the slide is hidden. When you
click it, the hidden slide appears in Reading view.
Press Esc to return to Normal view.
Note:
Save the ServiceShows presentation, and then close it.
|