2. Removing a Project from a Master Project
If
you no longer need an inserted project in your master project, then you
can delete the inserted project task while keeping the original
subproject file. Suppose another project manager takes over one of your
several projects, so you no longer need to see that project. Simply
delete it from your master project. The new project manager works on the
original Project file. That's it.
To remove an inserted project, do the following:
In the Gantt Chart view, select the ID cell for the inserted project summary task.
Project selects the entire task, not just the task name.
Press Delete. Or you can right-click the task and choose Delete Task on the shortcut menu.
The Planning Wizard dialog box appears and asks you to confirm that you want to delete a summary task and all its subtasks.
Make sure the Continue option is selected, and then click OK.
Project
removes the inserted project from the master project but leaves the
original subproject file where it is. If you change your mind, click
Cancel instead.
3. Linking Tasks in Different Projects
Maybe
only a few tasks in one project link to tasks in another project. For
example, your advertising firm has an office move planned, but the
partners are adamant that packing won't start until the "Who Needs
Pants?" ad campaign is complete. You don't have to insert these two
projects into a master project to link their tasks. The easiest way to
link tasks in different projects is to open both projects and then
create an external task dependency.
To create an external task dependency, follow these steps:
In Project, open the projects that contain the predecessor task and the successor task.
Project opens each Project file in its own window, but these windows are initially on top of each other.
To view both projects at the same time so you can see the tasks you want to link, choose View→Window→Arrange All.
Project positions the windows for the two projects one above the other, as you can see in Figure 3.
Select the task that's the successor in this external task dependency.
Because the Task Information dialog box includes a Predecessors tab, you must begin the external link from the successor task.
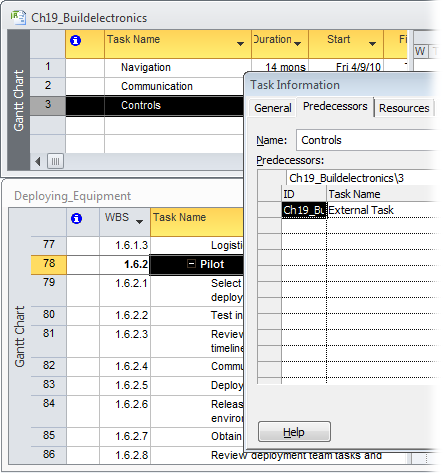
To
open the Task Information dialog box, press Shift+F2 (or choose
Task→Properties→Information), and then select the Predecessors tab.
The Name box shows the successor task.
Click
the first blank ID cell, and then type the name of the project that
contains the predecessor task, followed by a backslash and the task ID.
To see the name of the project, look at the title bar of the project's window. In Figure 3, the predecessor task's project is Ch19_Buildelectronics. The full ID is Ch19_Buildelectronics\3, which appears in the text entry box above the Predecessors table.
Press Enter to save the external task dependency.
Project
fills in the Task Name, Type, and Lag cells with "External Task," and
you can't change any of these values. Don't panic. After you click OK to
complete the link, you can edit the dependency to change the task
dependency type and lag value.
Click OK to complete the link.
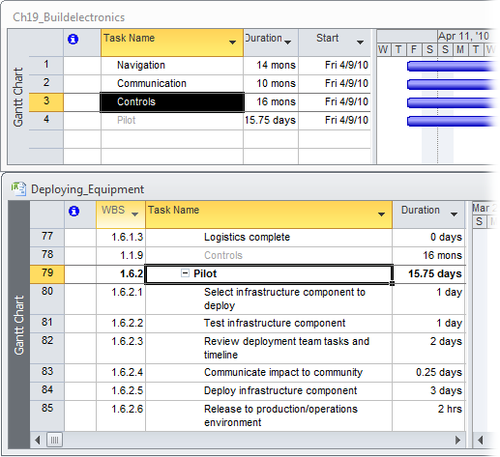
In
the project that contains the successor, the external predecessor
appears formatted in gray and immediately above the successor task in
the Gantt Chart table area, as shown in Figure 4.
To change the type of task dependency or to set lead or lag time, select the successor task once more, and then press Shift+F2.
The
Task Information dialog box opens. This time around, the name of the
predecessor task appears. The Type is set to Finish-to-Start and the Lag
is set to 0d. To change the type or lag, click the corresponding cell
in the row for the external task, and then type the new value. For
example, if the predecessor and the successor start at the same time,
you can choose Start-to-Start.
Note:
When you open a Project file that contains external task dependencies, the Links
Between Projects dialog box opens, which shows all the external
predecessors and external successors to the file. You can see the
effects to your schedule and choose which changes you want to accept. To
see the links between projects at any time, choose
Project→Properties→Links Between Projects. You can also set options to
control the appearance of cross-project links. Choose File→Options. In
the Project Options dialog box, choose Advanced. In the "Cross project
linking options for this project" section, you can turn off the "Show
external successors" and "Show external predecessors" checkboxes
(they're on by default) to hide external tasks. If you don't want the
Links Between Project dialog box to open automatically, then turn off
the "Show 'Links Between Project' dialog box on open" checkbox.