A BIBLIOGRAPHY LISTS SOURCES
cited indirectly in a document (that is, sources you do not directly
quote or paraphrase but from which you have drawn key conclusions,
ideas, or concepts). You first must insert each citation, or reference,
to the sources in the text where appropriate. Like footnotes and
endnotes, citations follow a particular style, such as MLA or the Chicago Manual of Style,
so you need to find out which style to use for your class, school,
professional discipline, or organization. Word formats each citation you
add according to the selected style. For example, a citation in the MLA
style might have just the author last name or author last name and
cited page number in parentheses, as in (Smith) or (Smith 235).
To also include other
sources that you’ve drawn on even more indirectly in the bibliography,
you have to add those sources separately. Note that you should also
check on the style of your school or organization with regard to
including footnoted/endnoted sources in the bibliography. Most styles
call for you to also include footnoted/endnoted sources in the
bibliography, in which case you must add the sources manually, while
some instructors may consider footnotes/endnotes and a bibliography
separate elements. Some styles frown on using both footnotes/endnotes
and parenthetical citations, so you should use citations and a
bibliography only in that instance.
Once you’ve completed all the citations and sources, you can compile the bibliography.
Adding Citations
Start by selecting the citation style and inserting citations in the document, like this:
Choose References > Citations & Bibliography > Style, and then click the style you want in the list, as shown in Figure 1.

Click to position the insertion point where you want the citation to appear in the document.
Choose
References > Citations & Bibliography > Insert Citation >
Add New Source. The Create Source dialog box appears.
Select
the type of publication or source that you’re citing from the Type of
Source list. Then, fill in the rest of the text boxes with the
information about the source. The dialog box will automatically adjust
to prompt you for different information based on the citation style you
selected in Step 1 and the Type of Source choice.
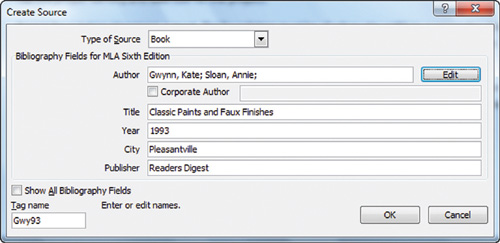
Click OK to finish adding the source and creating the citation.
|
When the insertion point is in a
text box in the Create Source dialog box, an Example field at the bottom
of the dialog box shows you how to type the information for that text
box. For help entering multiple authors, click the Edit button. Enter
the name for each author as prompted in the Edit Name dialog box, and
then click Add. Click OK to finish adding authors and return to the
Create Source dialog box.
|
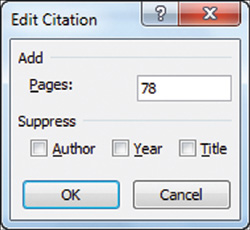
To
add a page number for the citation, right-click it and click Edit
Citation. In the Edit Citation dialog box, type a page number or range
in the Pages text box, as shown in Figure 3.
To suppress information from appearing in the citation, click the
appropriate check box under Suppress. Click OK to finish editing the
citation.
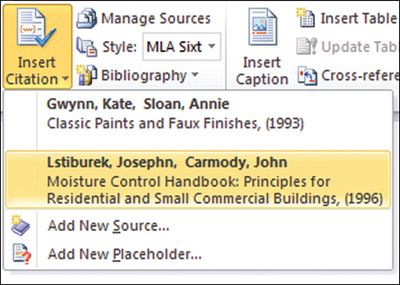
Repeat
Steps 2 through 6 to add citations from new sources. Or, if you’ve
already added the source, choose References > Citations &
Bibliography > Insert Citation, and then click the source name in the
menu, as shown in the example in Figure 4. You can then add a page number to the subsequent citation as described in Step 6.
Adding a Source
You also can include sources
in the bibliography that you haven’t directly cited. Doing this is a
good practice, as it both ensures you’ve given proper credit to other
authors whose ideas you’ve drawn upon, as well as providing your peers
and readers a comprehensive reading list so they can verify the
information you presented or learn more about a particular topic.
Use these steps to create additional sources for the bibliography:
Choose References > Citations & Bibliography > Manage Sources. The Source Manager dialog box appears.
Click the New button to open the Create Source dialog box. It looks and works just like the Create Source dialog box shown in Figure 2.
Select
the type of publication or source that you’re citing from the Type of
Source list. Then fill in the rest of the text boxes with the
information about the source and click OK.
Repeat Steps 2 and 3 to create additional sources. They will be added to the Current List area at the right (see Figure 5). Note that you also can click a source in the Current List area and use the Delete or Edit buttons to remove or change it.
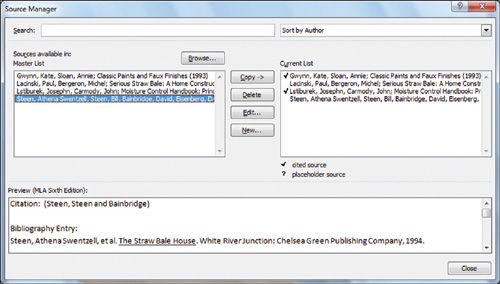
Tip
Sources you cited in other
documents appear in the Master List area at the left side of the Source
Manager dialog box. To add a source to the current document so that you
can use it in citations, click the source in the Master List at the
left, and then click the Copy button.
Click Close to finish working with sources.
Generating the Bibliography
Once you’ve added and
edited all the citations and have included additional sources that you
did not specifically cite, you can create the finished bibliography.
Once again, Word properly formats the bibliography based on the style
you selected in the Citations & Bibliography group of the References
tab.
Follow these steps to finish creating the bibliography:
Press
Ctrl+End to go to the end of the document (assuming you haven’t already
created the index, in which case you should insert the bibliography on a
new page before the index).
Press Ctrl+Enter to insert a hard page break.
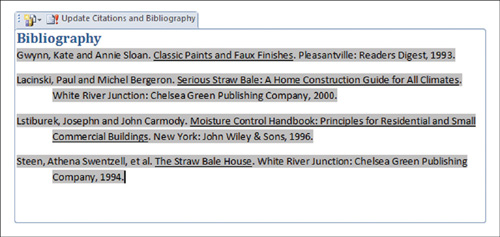
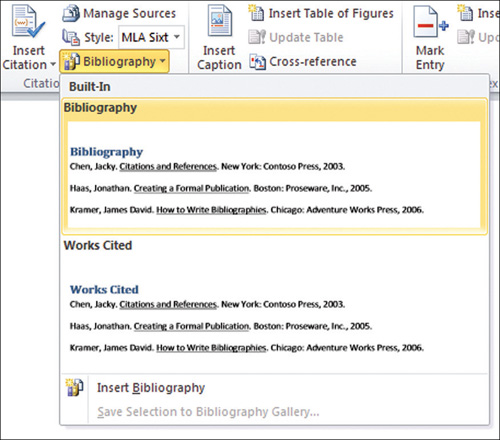
Choose References > Citations & Bibliography > Bibliography, and click the Bibliography choice under Built-In. (See Figure 6.) The Bibliography immediately appears in the document.
To update a
bibliography after you change sources, click in the bibliography, then
click Update Citations and Bibliography in the tab above it, as shown in
Figure 7.