People usually work on more than one project for more
than one project manager. If each project manager creates a resource to
represent the same worker in each Project file, then overallocated
resources and resource squabbles are soon to follow. The solution in
Project Standard and Professional is a resource pool,
which is a Project file dedicated to resource information—the pool of
resources who work on projects, their cost, availability, and most
important, how much time they're already allocated to tasks. (A resource
pool in Project follows the same idea as the enterprise resource pool
in Project Server, although Project Server includes a few more tools for
finding the right resources.)The
beauty of a resource pool is that resource information is in one place.
Project managers who use those resources simply link their projects to
the resource pool. Assigning resources works exactly as it does when
resources are contained in the project file. The only difference is that
you can see how much of the resources' time is allocated to tasks from
all linked projects.
1. Creating a Resource Pool
The
simplest way to set up a resource pool is to create a new Project file,
which does nothing but act as a resource pool. Although you can use a
Project file with tasks in it as the resource pool, you may run into
problems if you want to work on the tasks and someone else wants to work
on resource information.
Tip:
If an existing project contains all the shared resources in your organization, you don't have to build a resource
pool from scratch. Open the existing project, and then choose File→Save
As to save a copy of the project. Open the copy, delete all the tasks,
and then save the Project file. (To quickly delete all tasks, display
the Gantt Chart view. Click the Select All cell immediately above the
first ID cell, which selects all tasks. Then press Delete.) Voilà—you
have a Project file suitable for a resource pool.
To create a standalone resource pool, do the following:
Choose File→New. Under Available Templates, double-click "Blank project".
A blank project opens.
Choose View→Resource Views→Resource Sheet.
The Resource Sheet is home to all the data about your resources.
Fill in information about your shared resources.
Typically,
you fill in resource names, their standard charge rates or cost, and
the maximum availability for work resources. If you want to include
other information like work group, overtime rate, or cost per use, fill
in those fields, too.
Choose File→Save, and then name the project something meaningful (like "Resource Pool").
Be
sure to save the resource pool in a location that all project managers
can access. Saving the resource pool to your laptop, for example, won't
help other project managers who need to link to the file. Save the
resource pool to a network drive or shared folder.
Tip:
If
you have resource information in Microsoft Outlook or a human resources
database, then you can import that information into Project.
2. Connecting a Project to a Resource Pool
Before
you can assign resources from a resource pool to project tasks, you
must link the file to the resource pool. Any Project file that uses a
resource pool is known as a sharer file. With the project–resource pool connection in place, the resource pool resources act as if they're part of your project file.
To connect a project to the resource pool, do the following:
In Project, open the resource pool.
Since
many project managers may share the resource pool, open the resource
pool Project file as read-only so you don't lock anyone out of the file.
To do that, when you choose File→Open, select the resource pool
filename. On the Open button, click the down arrow, and then choose Open
Read-Only.
Open the Project file that you want to access the resource pool.
If
you have several projects to share with the resource pool, you can open
them all at the same time and then cycle through to connect each one to
the resource pool.
With the Project file active, choose Resource→Assignments→Resource Pool→Share Resources.
The Share Resources dialog box shown in Figure 1 opens.
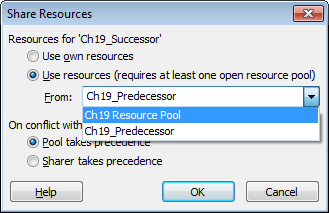
Select the "Use resources" option and then, in the From drop-down list, choose the resource pool.
If you have several projects open, the From drop-down list shows open projects except those that aren't already sharer files.
Under
"On conflict with calendar or resource information", select an option
to tell Project how you want to resolve resource information
discrepancies.
The
best choice is to let the resource pool take precedence (select "Pool
takes precedence"), because the resource pool then has the final say
about resource information. When the resource pool takes precedence,
changes made in the resource pool overwrite resource information in the
sharer file. For example, suppose someone else opens the resource pool
and updates everyone's standard and overtime rates. When you open a
sharer file, the project automatically uses the new updated rates. In
turn, if you change resource information in your project file, the
resource pool is immune to those changes.
If
you select "Sharer takes precedence", then resource information you
change in your project overwrites information in the resource pool. This
approach is fine if you use a resource pool for resources dedicated to
only your projects. With this option selected, you can change resource
information in a project and update the resource pool when you save the
project. If you share the resource pool with several other project
managers, though, the "Sharer takes precedence" option usually leads to
unwanted resource changes, as each project manager tries to modify
resources.
Click OK.
The project now obtains its resource information from the resource pool.
3. Opening and Saving Sharer Projects
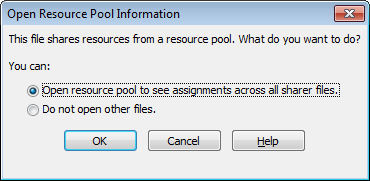
When you open a sharer file, Project asks whether you want to open the resource pool (if it's not open), as shown in Figure 2. In almost every case, you want to open the resource pool, because you'll see all the resources
from the resource pool in your project's Resource Sheet. All resource
assignments (from all sharer files) appear in the Resource Usage view,
so you can see all the tasks on which a resource works. To open the
resource pool, select the "Open resource pool to see assignments across
all sharer files" option (see Figure 2).
Tip:
Because
an open resource pool shows all assignments for a resource, your
Resource Usage view is likely to have a lot more tasks than you
remember. The problem is you can't tell which assignments are from your
project and which come from other projects. To identify the project an
assignment belongs to, right-click the heading row in the Resource Usage
table area, and then choose Insert Column. In the drop-down list,
choose Project. The Project cell for an assignment shows the sharer file
that made the resource assignment.
Opening
the resource pool also means that the resource assignments you make in
your project affect the resource's availability in the resource pool.
When you save a sharer file with the resource pool open, Project asks if
you want to update the resource pool. To save the resource changes to
the resource pool, click OK. (Click Cancel to save the sharer file
without saving the resource pool, for example when you're testing
what-if scenarios and haven't decided which one you're going to use.)
Note:
If other sharer projects are open, updating
the resource pool saves the resource changes from all open sharer
projects. Before you update the resource pool, be sure to close any
sharer files that contain resource changes you don't want in the
resource pool just yet. When those sharer files are ready for prime
time, open them with the resource pool, and then save the project and
update the resource pool.
If you select the "Do not open other files" option, then only the resources
already assigned to tasks in your project appear in the Resource Sheet.
Likewise, you see only the assignments from your project. When you save
the sharer file, the resource pool doesn't receive the resource assignments you make.
Tip:
To
make sure you're up to date with the most recent changes in the
resource pool, choose Resource→Assignments→Resource Pool→Refresh
Resource Pool. Project immediately shows the most current information
from the resource pool. Similarly, if you've made scads of resource
assignments, then you can update the resource pool immediately by
choosing Resource→Assignments→Resource Pool→Update Resource Pool.
4. Detaching a Sharer Project from the Resource Pool
You
can disconnect a sharer file from the resource pool, which is perfect
if your project gets canned before it gets started. On the other hand,
if a project contains a lot of assignment information, keeping the
sharer file and the resource pool connected helps you report on all
resource assignments at once. For example, if you want to evaluate
resource usage for the past year, you want to keep all projects—active,
completed, and discontinued—connected to the resource pool.
To remove a project from the resource pool:
Choose Resource→Assignments→Resource Pool→Share Resources.
The Share Resources dialog box opens.
Select the "Use own resources" option, and then click OK.
Any
resources assigned to tasks remain in the project and appear in the
Resource Sheet. Other resource pool resources disappear from the
Resource Sheet. In addition, the assignments from the detached sharer
file (now back to a regular Project file) no longer appear in the
resource pool.
5. Editing Resource Pool Information
When
you open a resource pool after it's connected to at least one sharer
file, you have three choices for opening the pool. Sometimes you just
want to see what's in the resource pool. Sometimes you need full
read-write access—for example, when you're updating everyone's cost
rates or work calendars.
When
you open a resource pool file, the Open Resource Pool dialog box
appears with options that win the prize for longest option labels.
Here's what your choices are, and when to use each one:
Read-only.
The "Open resource pool read-only allowing others to work on projects
connected to the pool" option opens the resource pool as read-only.
Although the resource pool is opened as read-only, saving your sharer
files updates the resource pool with assignments you've made. The
benefit of opening a resource pool as read-only is that everyone else
who uses the resource pool can continue to work on their projects at the
same time.
Read-write.
If you must make changes to resources in the resource pool, select the
"Open resource pool read-write so that you can makes changes to resource
information (like pay rates, etc.), although this will lock others out
of updating the pool with new information" option. By selecting this
option, you can modify fields like costs and resource calendars. Of
course, you want to use read-write mode for as short a time as possible,
because no one else can access the resource pool while you're using it.
That means other project managers can't see resource assignments and
availability across all sharer files. If they open their Project files,
they have to do so without opening the resource pool.
Create master project.
The "Open resource pool read-write and all other sharer files into a
new master project file. You can access this new master project file
from the View tab, Switch Windows command" option combines the resource
pool and all sharer files into a brand-new master project. If you work
on several projects of your own, this is an easy way to build a master
project. However, this master project is also useful when you want to
produce reports that span all the projects your organization performs.
Remember that the resource pool is read-write, so other project managers
can't open their sharer files connected to the resource pool while you
have it open.