You can define your own custom color themes and font
themes, and save them for reuse in other presentations. By default these
are saved in the personal folders for the logged-in user on the local
PC, and they remain available to that user regardless of the theme or
template in use.
These custom color and font
themes are also included if you save the overall theme as a separate
theme file (.thmx),so
that you can take those settings to another PC or send them to some
other user.
1. Creating a Custom Color Theme
A custom color theme
defines specific colors for each of the 12 color placeholders (including
the two that you can't directly use — the ones for hyperlinks). To
create a custom color theme, first apply a color theme to the current
presentation that is as close as possible to the color theme you want.
This makes it easier because you have to redefine fewer placeholders.
Then follow these steps:
On the Design tab, open the Colors list and choose Create New Theme Colors. The Create New Theme Colors dialog box opens.
Type
a name for the new color theme in the Name box, replacing the default
name (Custom 1, or other number if there is already a Custom 1).
Click a color placeholder and open its menu. See Figure 1.
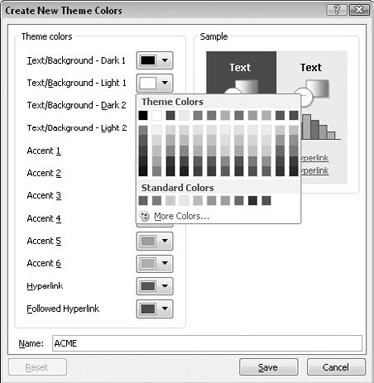
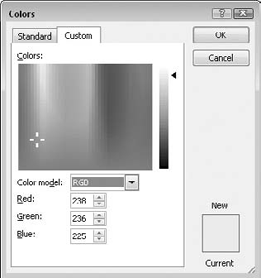
Click a color. Alternatively, you can click More Colors, select a color from the Colors dialog box (see Figure 2),
and click OK. The Colors dialog box has two tabs: The Standard tab has
color swatches, and the Custom tab enables you to define a color
numerically by its RGB (Red Green Blue) or HSL (Hue Saturation
Lightness).
Redefine any other colors as needed.
Click Save. The color theme is saved, and now appears at the top of the Colors gallery, in the Custom area.
2. Sharing a Custom Color Theme with Others
A custom color theme is
available only to the currently logged-in user on the PC on which it is
created. If you want to share it with another user on the same PC, you
can copy it into his or her user folder in Windows Vista or Windows 7:
C:\Users\username\AppData\Roaming\Microsoft\Templates\Document Themes\Theme Colors
where username is that user's login name.
In Windows XP:
C:\Documents and Settings\username\Application Data\Microsoft\Templates\Document Themes\Theme Colors.
The default color themes are located in:
C:\Program Files\Microsoft Office\Document Themes 14\Theme Colors regardless of the operating system version.
Another way to share a custom
color theme is to create the new color theme and then save the (overall)
theme to a theme file (.thmx).
3. Deleting a Custom Color Theme
A custom color theme remains
until you delete it from the Theme Colors folder for your user profile.
To delete a theme color, use Windows Explorer to navigate to this
folder:
C:\Users\username\AppData\Roaming\Microsoft\Templates\Document Themes\Theme Colors
where username
is your login name, and you'll find an .xml file for each of your
custom color themes. Delete the files for the color themes that you want
to delete. You can also right-click the color theme in the Gallery,
click Edit, and then click the Delete button in the Edit Theme Colors
dialog box.
|
If you don't want to delete a
custom color theme, but you also don't want it showing up on your
Colors menu in PowerPoint all the time, move the file to a folder
outside of the Document Themes folder hierarchy. For example, create an
Unused Themes folder on your hard disk and move it there until you need
it. When you want to use the custom color theme again, move the file
back to its original location
|
|
If you don't want to exit
from PowerPoint to delete the color theme, you can take advantage of the
fact that you can use most dialog boxes in PowerPoint that save or open
files to manage files in general. Follow these steps:
Open
any dialog box that saves or opens files. For example, on the Design
tab, open the Themes gallery and choose Browse for Themes.
Navigate to the location of the color themes:
C:\Users\username\AppData\Roaming\Microsoft\Templates\Document Themes\Theme Colors
Open the File Type list and choose All Files so that all of the files appear.
Select the file for the color theme that you want to delete and press the Delete key on the keyboard.
Click Cancel to close the dialog box.
4. Creating a Custom Font Theme
You can create your own
custom font themes, which are then available in all presentations. A
custom font theme defines two fonts: one for headings and one for body
text. To create a custom font theme, follow these steps:
On
the Design tab, open the Fonts list and choose Create New Theme Fonts.
The Create New Theme Fonts dialog box opens, as shown in Figure 3.
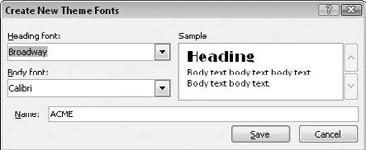
Type a name for the new font theme in the Name box, replacing the default text there.
Open the Heading Font drop-down list and select the desired font for headings.
Open the Body Font drop-down list and select the desired font for body text.
Click Save. The font theme is saved, and now appears at the top of the Fonts list, in the Custom area.
5. Sharing a Custom Font Theme with Others
A custom font theme is
available only to the currently logged-in user on the PC on which it is
created. If you want to share it with another user on the same PC, you
can copy it into his or her user folder:
In Windows Vista or Windows 7:
C:\Users\username\AppData\Roaming\Microsoft\Templates\Document Themes\Theme Fonts
where username is that user's login name.
In Windows XP:
C:\Documents and Settings\username\Application Data\Microsoft\Templates\Document Themes\Theme Fonts
You can also share a custom
font theme by creating it and then saving the (overall) theme as a new
theme (.thmx) file. Then you can share that theme file with others via
e-mail, disk, or other distribution methods.
6. Deleting a Custom Font Theme
A custom font theme remains
until you delete it from the Theme Fonts folder for your user profile.
To delete a font theme, use Windows Explorer to navigate to this folder:
In Windows Vista or Windows 7:
C:\Users\username\AppData\Roaming\Microsoft\Templates\Document Themes\Theme Fonts
In Windows XP:
C:\Documents and Settings\username\Application Data\Microsoft\Templates\Document Themes\Theme Fonts
where username
is your login name, and you'll find an .xml file for each of your
custom font themes. Delete the files for the font themes that you want
to delete.
You can also delete it from
within PowerPoint by browsing for the file with any dialog box that
saves or opens files, or by right-clicking the font theme in the
Gallery, clicking Edit, and then clicking Delete in the Edit Theme Fonts
dialog box.
NOTE
Deleting a custom font theme from a dialog box is essentially the same as deleting a custom color theme. See the section "Deleting a Custom Color Theme" for more details.