As a review, to enter Slide Master view, display the
View tab and click Slide Master. One or more slide masters appear in the
left pane, with its own subordinate layout masters. A slide master has
five preset placeholders that you can individually remove or move
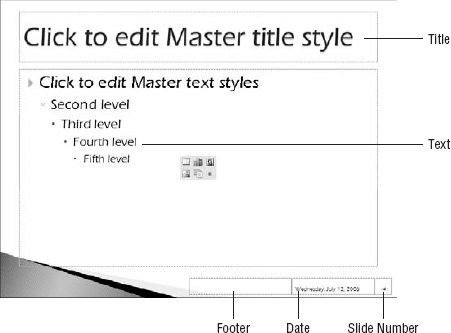
around. Figure 1 points them out on a slide master with the Concourse theme applied, but they might be in different locations in other themes:
Title: The placeholder for the title on each slide
Text: The main content placeholder on each slide
Date: The box that displays the current date on each slide
Slide number: The box that displays the slide number on each slide
Footer: A box that displays repeated text at the bottom of each slide
These elements are all
enabled by default, but the Footer is empty by default so it is not
visible on individual slides unless you type some text into it in Slide
Master view or add text to it using Insert Header and Footer. Each of
these elements trickles down to the layout masters beneath it, so
formatting, moving, or deleting one of these elements from the slide
master also changes it on each of the layouts. See Figure 1 for an example of the various placeholders.
1. Formatting a Placeholder
You can format the text in each
of the placeholders on the slide master just like any regular text, and
that formatting carries over to all slides and layouts based on it. For
example, if you format the code in the Slide Number box with a certain
font and size, it will appear that way on every slide that uses that
slide master. You can also format the placeholder boxes just like any
other text boxes. For example, you can add a border around the page
number's box, and/or fill its background with color.
|
If you want to make all of the
text in a heading all-caps or small-caps, use the Font dialog box. From
the Home tab, click the dialog box launcher in the Font group and select
the Small Caps or All Caps check box there.
|
|
2. Moving, Deleting, or Restoring Placeholders
You can move each of the
placeholders on the slide master or an individual layout master. For
example, you might decide you want the Footer box at the top of the
slide rather than the bottom, or that you want to center the slide
number at the bottom of the slide:
To move a placeholder, click it to select it and then drag its border.
To
delete one of the placeholders on the slide master, select its box and
press the Delete key on the keyboard. Deleting it from the slide master
deletes it from all of the associated layouts as well.
To
remove all three of the footer placeholders at once (Date, Footer, and
Slide Number) display the Slide Master tab and deselect the Footers
check box.
To
restore deleted placeholders on the slide master, display the Slide
Master tab and select the Footers check box. If any of the footer
placeholders (Date, Footer, or Slide Number) were previously deleted,
they reappear.
NOTE
Restored placeholders
might not appear in the same spots as they did originally; you might
need to move them. To put the placeholders back to their original
locations, reapply the theme from the Themes button on the Slide Master
tab.
Here are some more details you should remember about deleting and restoring:
On an individual
layout master, you can quickly delete and restore the Title and Footer
placeholders by selecting or deselecting the Title and Footers check
boxes on the Slide Master tab. The "footer" that this check box refers
to is actually all three of the bottom-of-the-slide elements: the actual
footer, the date box, and the slide number box.
You
can also individually delete the placeholders from a layout master, the
same as you can on a slide master. Just select a placeholder box and
press the Delete key.
You
can restore all of the placeholders, except Text, by selecting the
aforementioned check boxes on the Slide Master tab. Whenever any of the
three footer boxes are missing, the Footers check box becomes cleared,
and you can restore the missing box or boxes by re-selecting the check
box.
You
cannot restore the Text placeholder, however, on an individual layout
master. You must recreate it with the Insert Placeholder command.
3. Displaying the Date, Number, and Footer on Slides
Even though the placeholders
for Date, Number, and Footer might appear on the slide master, they do
not appear on the actual slides in the presentation unless you enable
them. This might seem counterintuitive at first, but it's actually a
benefit. PowerPoint enables you to turn the date, number, and footer on
and off without having to delete, recreate, or reformat their
placeholders. You can decide at the last minute whether you want them to
display or not, and you can choose differently for different audiences
and situations.
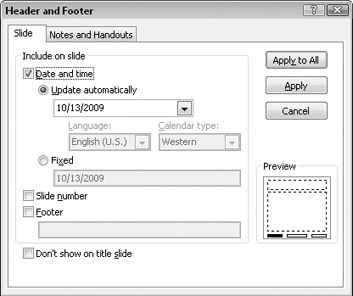
You can control all three
areas from the Header and Footer dialog box. To open it, from the Insert
tab click Header and Footer. (Clicking Date and Time or clicking Number
opens the same dialog box.) Then on the Slide tab, select the check
boxes for each of the three elements that you want to use, as shown in Figure 2.
3.1. Date and Time
You can set Date and Time either to Update Automatically or to Fixed:
Update
Automatically pulls the current date from the computer's clock and
formats it in whatever format you choose from the drop-down list. You
can also select a language and a Calendar Type (although this is
probably not an issue unless you are presenting in some other country
than the one for which your version of PowerPoint was developed).
Fixed
prints whatever you enter in the Fixed text box. When Fixed is enabled,
it defaults to today's date in the m/dd/yyyy format.
|
In addition to (or instead
of) placing the date on each slide, you can insert an individual
instance of the current date or time on a slide, perhaps as part of a
sentence. To do so, position the insertion point inside a text box or
placeholder and then on the Insert tab, click Date and Time. Select the
format you want from the dialog box that appears and click OK.
|
|
3.2. Slide Number
This option shows the slide
number on each slide, wherever the Number placeholder is positioned. You
can format the Number placeholder on the master slide with the desired
font, size, and other text attributes
By default, slide numbering starts with 1. You can start with some other number if you like by following these steps:
Close Slide Master view if it is open. To do so, click the Close button on the Slide Master tab.
On the Design tab, click the dialog box launcher in the Page Setup group. The Page Setup dialog box opens.
In the Number Slides From box, increase the number to the desired starting number.
|
You can insert the slide
number on an individual slide, either instead of or in addition to the
numbering on the Slide Master. Position the insertion point, and then on
the Insert tab, click Slide Number. If you are in Slide master view,
this places a code on the Slide Master for the slide number that looks
like this: <#>. If you are on an individual slide, it inserts the
same code, but the code itself is hidden and the actual number appears.
|
|
3.3. Footer
The footer is blank by
default. Select the Footer check box, and then enter the desired text in
the Footer box. You can then format the footer text from the slide
master as you would any other text . You can also enter the footer text in the Header and Footer dialog box's Footer text box.
3.4. Don't Show on Title Slide
This check box in the Header
and Footer dialog box suppresses the date/time, page number, and footer
on slides that use the Title Slide layout. Many people like to hide
those elements on title slides for a cleaner look and to avoid repeated
information (for example, if the current date appears in the subtitle
box on the title slide).