IT tutorials
 
Office
 

Using OneNote Web App : Finding Out Who Wrote Notes & Using OneNote Web App in Office 365

- Free product key for windows 10
- Free Product Key for Microsoft office 365
- Product Key Free : Microsoft Office 2019 – Serial Number
12/15/2011 5:56:02 PM

1. Finding Out Who Wrote Notes

Any number of people can coauthor a notebook on Windows Live. What’s more, they can write notes at the same time. And some of them can be working in OneNote Web App and others in OneNote 2010.

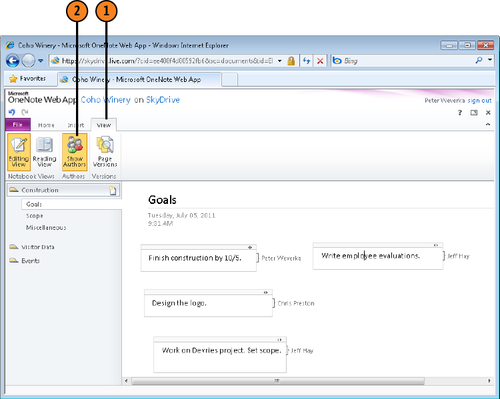
When several people coauthor a notebook, how can you tell who wrote which note? Go to the View tab and click the Show Authors button. The names of authors appear beside notes.

1.1. Find Out Who Wrote Notes

  1. Click the View tab.

  2. Click the Show Authors button.


2. Using OneNote Web App in Office 365

Microsoft Office 365 is a subscription service from Microsoft that permits you to store files on the Internet and collaborate with others using Office Web Application software (OneNote Web App included). Users have email capability, can use a calendar, and can keep a Contact list.

To run Office Web App software with Office 365, you open your web browser, go your Office 365 site, and give commands through your browser to operate the software.

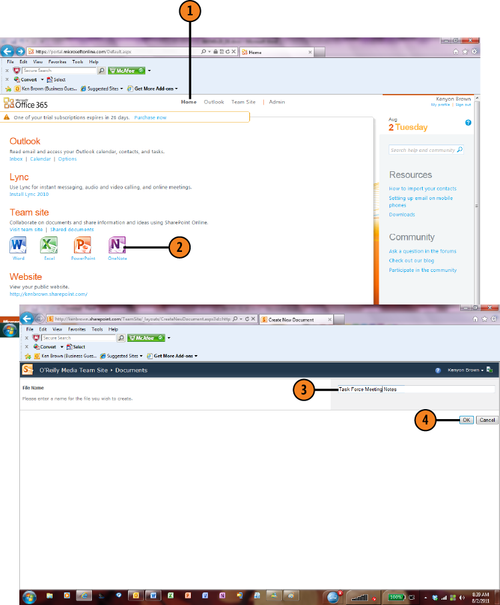
2.1. Creating a Notebook

To create a notebook, start on the Home page and go to the Teams Site section. Then click the OneNote icon, enter a name for the notebook, and click OK.

Notebooks you create at Office 365 are available automatically for sharing. You don’t need to choose an option to share notebooks with others.

Use these techniques to open and close notebooks:

  • Open a notebook: On the main Office 365 page, click Shared Documents and then click the notebook’s name.

  • Close a notebook: Click the File button and choose Close.

2.2. Create a Notebook

  1. Go to the Home page.

  2. Click the OneNote Icon.

  3. Enter a name for the notebook.

  4. Click OK.


2.3. Exploring OneNote Web App in Office 365

OneNote Web App in Office 365 doesn’t offer all the commands found in OneNote 2010. Nevertheless, if you need a favorite command from OneNote 2010, you can open your notebook in OneNote 2010 starting in the OneNote Web App.

To write a note, double-click on the screen and start typing.

OneNote Web App offers three tabs on the ribbon: Home, Insert, and View. Create a new page or section starting on the Insert tab (or click the New Page button on the Navigation bar to create a page).

Starting in OneNote Web App in Office 365, open a notebook in OneNote 2010 with one of these techniques:

  • On the Home tab, click the Open in OneNote button.

  • Click File and choose Open in OneNote.

  • On the View tab, click Reading View and then click the Open in OneNote button.

 
Others
 
- Microsoft PowerPoint 2010 : Creating and Managing Custom Color and Font Themes
- Microsoft PowerPoint 2010 : Changing Colors, Fonts, and Effects
- Microsoft Access 2010 : Preventing Database Problems
- Microsoft Access 2010 : Securing Databases for Distribution
- Microsoft Word 2010 : Inserting a Preformatted Header or Footer
- Microsoft Word 2010 : Inserting Preformatted Page Numbers
- Microsoft PowerPoint 2010 : Applying a Theme
- Microsoft PowerPoint 2010 : Understanding Layouts and Themes
- Microsoft Excel 2010 : Confidence Intervals and the Normal Distribution (part 3)
- Microsoft Excel 2010 : Confidence Intervals and the Normal Distribution (part 2)
 
 
Top 10
 
- Microsoft Visio 2013 : Adding Structure to Your Diagrams - Finding containers and lists in Visio (part 2) - Wireframes,Legends
- Microsoft Visio 2013 : Adding Structure to Your Diagrams - Finding containers and lists in Visio (part 1) - Swimlanes
- Microsoft Visio 2013 : Adding Structure to Your Diagrams - Formatting and sizing lists
- Microsoft Visio 2013 : Adding Structure to Your Diagrams - Adding shapes to lists
- Microsoft Visio 2013 : Adding Structure to Your Diagrams - Sizing containers
- Microsoft Access 2010 : Control Properties and Why to Use Them (part 3) - The Other Properties of a Control
- Microsoft Access 2010 : Control Properties and Why to Use Them (part 2) - The Data Properties of a Control
- Microsoft Access 2010 : Control Properties and Why to Use Them (part 1) - The Format Properties of a Control
- Microsoft Access 2010 : Form Properties and Why Should You Use Them - Working with the Properties Window
- Microsoft Visio 2013 : Using the Organization Chart Wizard with new data
Technology FAQ
- Is possible to just to use a wireless router to extend wireless access to wireless access points?
- Ruby - Insert Struct to MySql
- how to find my Symantec pcAnywhere serial number
- About direct X / Open GL issue
- How to determine eclipse version?
- What SAN cert Exchange 2010 for UM, OA?
- How do I populate a SQL Express table from Excel file?
- code for express check out with Paypal.
- Problem with Templated User Control
- ShellExecute SW_HIDE
programming4us programming4us