|
The WBS codes built into
Project are simple outline codes with a number for each level in the
outline hierarchy. For instance, a WBS code of 2.1.3 might represent the
second phase of the project, the first summary task in that phase, and
the third work package for that summary task. If your organization uses custom codes, you can build a tailored numbering system—called a code mask—to
specify each level of your WBS code. If you use abbreviations for
phases, numbers for summary tasks, and letters for work packages, say, a
customized WBS for the design phase of a project might look like this:
Dsn 1.a. To define a custom WBS code, follow these steps: On the Project tab, click WBS, and then choose Define Code. The
WBS Code Definition dialog box appears. Although any existing WBS codes
show numbers for each level with a period as a separator, the boxes in
the WBS Code Definition dialog box are empty until you specify a custom
scheme for your WBS codes.
Note: If you assemble several projects into a single master project ,
you can make WBS codes unique for each project, even if they use the
same code mask. If you work with multiple projects, set up the code mask
for a new project before you get too deep into defining the project's
tasks. That way you don't have to renumber all your tasks later. In the
Project Code Prefix box, type a prefix for the current project, like
"PRJ01." Project then inserts this prefix at the beginning of the WBS
codes for the tasks in the project; for instance, PRJ01.1.4.1.
In
the "Code mask" section's first Sequence cell, choose the type of
characters you want to use for the top level of the hierarchy, as shown
in Figure 1 top. You
can choose from Numbers (ordered), Uppercase Letters (ordered),
Lowercase Letters (ordered), and, for the most flexible coding,
Characters (unordered). With ordered numbers and letters, Project
automatically increments the numbers or letters as you add tasks to the WBS, proceeding, for example, from 1.1 to 1.2. to 1.3. In the first Length cell, choose a number (from 1 to 10) for the length of the top level's mask. Project
initially selects Any, which means the entry for the level can be of
any length. If the level uses a number, Project increments the number
beginning at 1 and continuing to 10, 100, or 1000, if necessary. If the
level uses letters, then you can type a code of any number of characters
at that level. Choosing a number limits the entry
to between one character and the length you specify. If you limit a
numeric entry to one character, Project cycles through the numbers 1
through 9, moves to 0, and then repeats. In the Separator cell, choose the character that separates the top level from the next level. Your only choices for separators are periods (.), minus signs (-), plus signs (+), or slashes (/). Repeat steps 2–4 for each additional level of the code mask. You
can specify dozens of levels in a code mask (in fact, a WBS code can be
as long as 255 characters), but being miserly with levels makes the
schedule easier to comprehend. After
you've defined all the levels in the code mask, be sure that the
"Generate WBS code for new task" checkbox is turned on if you want
Project to automatically assign a WBS code to new tasks you create. The only time you might want to turn this checkbox off is when you plan to renumber all the WBS codes after you've organized your tasks and don't want to be distracted by the interim codes that Project assigns. To
ensure that your WBS codes are unique, keep the "Verify uniqueness of
new WBS codes" checkbox turned on. Click OK, and then review the
refreshed WBS codes in the task list, as shown in Figure 2.
Although Project adds WBS codes to tasks when the "Generate WBS code
for new task" checkbox is turned on, sometimes you want to type WBS
codes manually, and that can lead to duplicate WBS codes. The only time
you might turn off the "Verify uniqueness of new WBS codes" checkbox is
if you're planning to renumber tasks later and you get tired of the
warnings Project displays. As the box on Renumbering Task WBS Codes explains, you can renumber the WBS codes for tasks to correct or reorder your project. 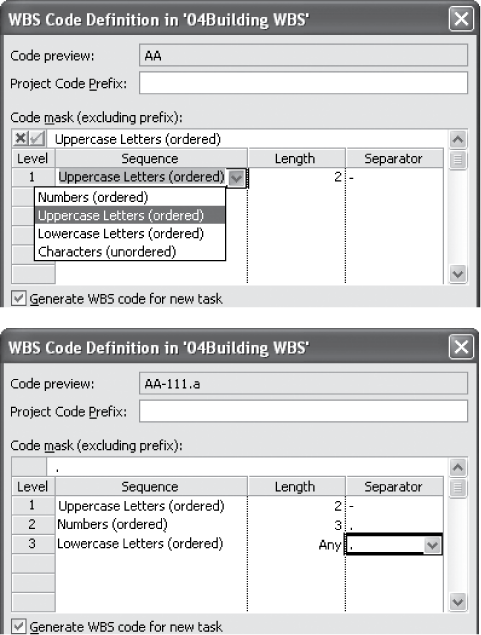
If the WBS column isn't visible in the current view, add it so you can verify that the code is set up the way you want. Right-click the Task Name heading and, from the shortcut menu, choose Insert Column. In the new column, type WBS and then press Enter.
Congratulations! You've customized your WBS codes. 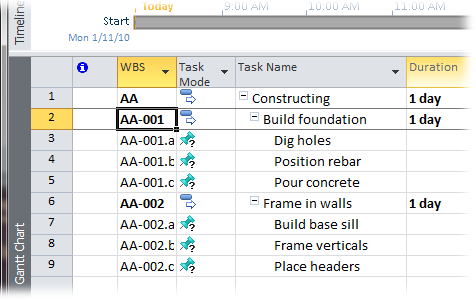
When you customize
WBS codes, the "Generate WBS code for new task" checkbox tells Project
to automatically assign WBS codes to new tasks you create, whether you
insert tasks within the outline or add new tasks at the end. With this
setting, as soon as you press Enter to save a new task, the WBS code
pops into the WBS cell, maintaining the sequence you've defined. Moving
tasks around also adjusts WBS codes and, before you know it, your WBS
sequence can be a mess. The alternative is to turn off
this checkbox, and then, after a heated session of adding or modifying
the task order, renumber the WBS codes all at once. Fortunately, that's
pretty easy to do. When the WBS is the way you want it, do the
following: If you want to renumber only some of the tasks in the Project file, select them. On the Project tab, click WBS, and then choose Renumber. In
the WBS Renumber dialog box, select the "Entire project" option to
renumber all your tasks. If you want to renumber only the selected
tasks, choose the "Selected tasks" option instead. Click OK. Project reapplies the WBS code scheme to the tasks, alphabetizing ordered letters and incrementing ordered numbers.
When
you start to build other documents that reference your WBS codes (like
work package Word files), you don't want Project to change the existing
codes. That's another time to turn off the "Generate WBS code for new
task" checkbox. As you type in new WBS codes manually, leave the "Verify
uniqueness of new WBS codes" checkbox turned on so Project will warn
you if you've duplicated an existing WBS code.
|