Many small projects can get by without full-blown
project scheduling. For a handful of tasks and a couple of resources,
you can probably manually schedule your tasks without breaking a sweat.
Even so, as a project manager, you still need to communicate with your
team and vice versa. That's where the new "Sync
with Tasks List" feature in Project 2010 may be able to help. You can
synchronize tasks in a Project 2010 file with a SharePoint 2010 Tasks
list to easily exchange
project tasks and status with your team. This section explains what you
can do with Project and SharePoint, if you don't use Project Server.
Note: If your organization requires enterprise project management (coordinating an entire stable of projects and sharing
enterprise resources, for example), this simple synchronization feature
won't cut it. You need Project Server and SharePoint for those types of
project management activities. In fact, when Project Professional is
connected to Project Server, Sync with Tasks List is disabled.
1. Sharing Tasks with Your TeamSynchronizing
tasks between a Project schedule and a SharePoint Tasks list can
simplify communication with your project team. Start a task list in
Project and publish it to a SharePoint Tasks list for all to see, or
brainstorm with your team in SharePoint to create a list of tasks and
pull the tasks into Project to build a schedule. Either way, the first
step is to create the connection between your Project file and a
SharePoint Tasks list. Then, you can push changes from your Project file
to SharePoint to keep your team informed or pull the progress updates
your team enters in SharePoint tasks into your Project file. SharePoint doesn't have the scheduling prowess Project does. Before you dive into synchronizing tasks, determine whether Sync with Tasks List satisfies your needs: You must manually set your task start and finish dates. SharePoint can't calculate project schedules, so tasks you synchronize appear in SharePoint Tasks lists as manually scheduled.
If you synchronize auto-scheduled tasks, SharePoint warns you that it
will convert them to Manually Scheduled mode. That means you must
specify the start and finish dates for all tasks, manage links between
tasks as dates change, and resolve resource overallocations that occur. Resources assigned to tasks must be members of the SharePoint site.
The only resources you can see in a SharePoint Tasks list are people
who are members of the SharePoint site. If you assign other resources to
tasks, the Resources cells for those tasks are blank. Custom fields that use formulas don't synchronize. The good news is that custom fields without formulas do synchronize to SharePoint. See Section 1.3
for adding fields to the SharePoint Tasks list. The formula limitation
is probably not a big hurdle, because you're not likely to customize too
many fields with formulas if you're manually scheduling a project. The Notes field doesn't synchronize. One way to work around this limitation is to add notes to a custom Text field, which does synchronize.
1.1. Publishing Project tasks to SharePointIf you build a task list in Project, here's how to publish it to a SharePoint Tasks list: Open the Project file you want to synchronize, and then choose File→Save & Send→Sync with Tasks List. The Sync with Tasks List page appears in the Backstage. In the Site URL box, type the address for the Tasks list site, as shown in Figure 1. Click Validate URL. Don't
include the name of the Tasks list in the URL. For example, if your
SharePoint site is called "ProjectCollaboration," type the URL for the
site, something like http://sharepoint/sites/ProjectCollaboration/. In the "Select an existing tasks list, or enter a new name" box, choose the Tasks list you want to use. When
you validate the site URL, any existing Tasks lists on that site appear
in the drop-down list. To create a new Tasks list, type a name for the
new list. (SharePoint creates the Tasks list when you perform step 4.) 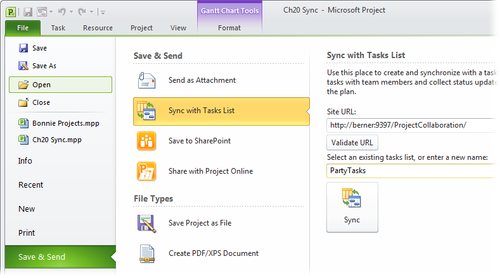
Click Sync. A SharePoint
Synchronization message box shows progress. If you try to synchronize
auto-scheduled tasks, a warning tells you that those tasks will change
to manually scheduled. Click OK to continue. Click Cancel to keep the
tasks auto-scheduled and cancel the synchronization. If
any of the resources you've assigned to tasks don't exist within the
SharePoint server, a warning tells you that those resources won't be
published. Although you won't see the resource names in the SharePoint
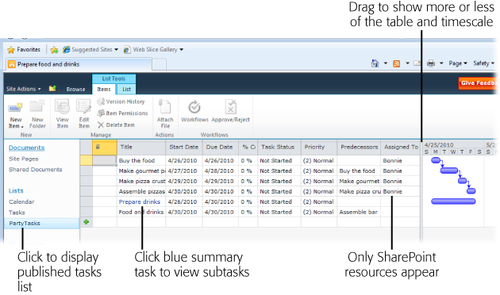
Tasks list, the assignments remain in your Project file. To see your tasks in SharePoint navigate to the site in your browser. Tasks lists appear on the site home page under the Lists heading. Click the name of the Tasks list, for example "Party Tasks," as shown in Figure 2. If
the project has summary tasks, you initially see only the top-level
summary tasks. Summary task names appear in blue text to indicate that
you can click them to display their subtasks.
1.2. Saving a SharePoint Tasks list to ProjectYou
can build a list of tasks in SharePoint and then bring those tasks into
Project. When you add tasks to a SharePoint Tasks list, you can specify
predecessors, assigned resources, and other task information. Here are the steps: In SharePoint, create a new Tasks list. Click
the Lists heading, and then click Create. On the Create page, under
Tracking, click Project Tasks. In the Name box, type the name of the
list and then Create. SharePoint adds the list to the navigation bar on
the left side of the page. In the navigation bar, click the Tasks list name—for example, Tasks. If any tasks already exist, they appear on the list page. To add a task to the list, click "Add new item". The Tasks - New Item window appears, as shown in Figure 3. 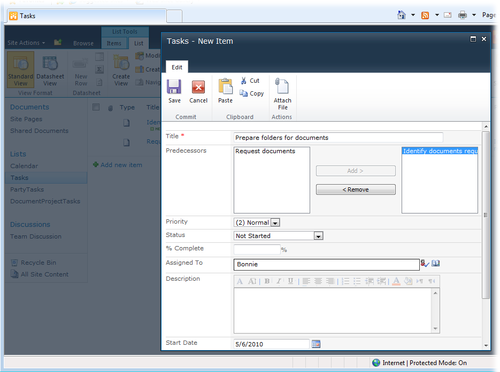
In the Title box, type the name of the task. Specify any other task information you want. To
link the task to a predecessor, select the predecessor and click Add.
To assign a resource, in the Assigned To box, type the name of the
resource. In the Start Date box, type a date. Click Save. The task appears in the list. Repeat steps 3 and 4 for each task you want to create. In Project, create a new blank Project file and choose File→Save. In the Save As dialog box, name the file and click Save. To sync the blank Project file to the Tasks list, perform the steps in Section 20.3.1.1
on page 535. In the "Select an existing tasks list, or enter a new
name" box, choose the Tasks list you created on the SharePoint site. When
you validate the site URL, any existing Tasks lists on that site appear
in the "Select an existing tasks list, or enter a new name" drop-down
list. Click Sync. The tasks appear in your Project file.
1.3. Managing the fields in a SharePoint Tasks listOnce a connection exists between
a Project file and a SharePoint Tasks list, you can specify the fields
that appear in the SharePoint Tasks list. For example, you can add the
WBS field, a cost field, or a custom field to the SharePoint view. The
box on Keeping Tasks in Order tells you why adding the WBS field can be helpful. Here's how you specify the fields that sync to a SharePoint Tasks list: In Project, choose File→Info. Once
a Project file is linked to a SharePoint Tasks list, the Info page
includes a Sync button. You can also choose File→Save & Send and
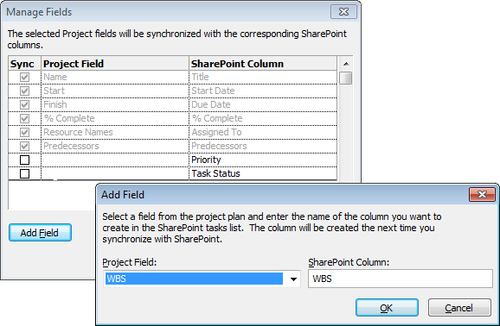
then choose Sync with Tasks List. Below Sync with Tasks List, click Manage Fields. The Manage
Fields dialog box opens, showing the fields in the Project table and in
SharePoint. A checkmark in the Sync column indicates that a field
synchronizes between the two programs. In the Manage Fields dialog box,
some fields are grayed out, which means you can't change whether they
synchronize. For example, the Name, Start, Finish, % Complete, Resources
Names, and Predecessors fields are automatically synchronized. To
add a field, click Add Field. In the Add Field dialog box, choose the
Project field you want to add, such as WBS (as shown in Figure 4), and then click OK. Click OK to close the Manage Fields dialog box. The checkmark in the Sync column is turned on automatically. Click Sync. You must click Sync to send the WBS information to SharePoint. In the SharePoint Tasks list, choose List Tools→List. On the List tab, choose Manage Views→Modify View. The Edit View page appears. To display a field in the view, turn on the field's checkbox. Click OK. To
reorder the columns in a view, position the pointer over a column
heading. When the pointer turns into a four-headed arrow, drag to the
new location.
"Sync
with Tasks List" has an annoying idiosyncrasy. Sometimes when you
synchronize tasks, they come across in seemingly random order. Links to
predecessors don't help. In Project, you can easily sort the list
by ID number, the WBS code, or any other field to order the task list
the way you want. You can do the same thing in SharePoint by adding the
WBS field to a SharePoint Tasks List view. Then you can sort the Tasks
list to match the order in your Project file. Here are the steps: Synchronize your Tasks list to transfer the field values to SharePoint (Section 20.3.1.3). In the SharePoint Tasks list, choose List Tools→List. On the List tab, choose Manage Views→Modify View. Turn on the WBS field's checkbox and click OK. Click the down arrow to the right of the WBS heading, and then choose Sort A on Top.
|
1.4. Updating the Tasks listYou
and your team members can view and edit values in SharePoint. For
example, team members can change values in the % Complete field or
change a finish date for a task. Then you can synchronize the changes
(in Project, choose File→Info→Sync) to bring them back into Project. To
edit a value in a SharePoint Tasks list, click the cell and type or
choose the new value.
Note: If
you and someone on your team both modify the same field—one in Project
and the other in SharePoint—when you synchronize, Project displays a
Conflict Resolution dialog box. The dialog box has a Project Version
column and a SharePoint Version column. The fields that differ between
the two are highlighted. To keep the values from Project, click Keep
Project Version. To use the values from SharePoint, click Keep
SharePoint Version.
2. Saving a Project File to a SharePoint SiteStoring
files on a SharePoint site means you can share your files with others.
As long as they have access to the SharePoint site, they can download
the files stored there. A SharePoint site comes in handy in other ways.
Imagine you travel to another office and your laptop dies en route. You
can borrow a computer, go online, download the files you need from the
SharePoint site, and continue working with a minimum of interruption.
Although Project 2010 provides a command to save a Project file to a
SharePoint site, you can choose from three methods: Saving in Project.
Say you just added the finishing touches to a Project schedule and want
to store the file on a SharePoint site. You can do that right within
Project. Choose File→Save & Send→Save to SharePoint. Below the "Save
to SharePoint" heading on the right side of the page, click "Browse for
a location", and then choose the SharePoint site you want to use. Click
Save As. In the Save As dialog box, click Save, and Project dutifully
saves your file on the SharePoint site. Saving on the SharePoint site.
If you're already on the SharePoint site, there's no need to go back to
Project. On the SharePoint home page, choose Shared Documents or the
name of your document library. Then, on the Shared Documents page, click
"Add new document". In the Shared Documents - Upload Document dialog
box, click Browse. In the Choose File to Upload dialog box, navigate to
the folder with the file you want to save, select the file, and click
Open. Back in the Shared Documents - Upload Document dialog box, click
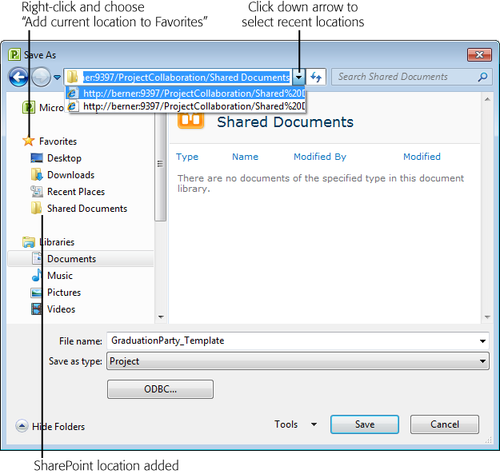
OK. The Save As command.
You can also specify the URL for a SharePoint site in Project's Save As
dialog box. Choose File→Save As. In the Save As dialog box, copy the
URL for the SharePoint site into the folder path box, as shown in Figure 5, and click the arrow to navigate to the site. For example, if the Documents Library URL is http://sharepoint/sites/ProjectCollaboration/Shared%20Documents/Forms/AllItems.aspx, copy http://sharepoint/sites/ProjectCollaboration/Shared%20Documents into the box. When the SharePoint document library appears in the dialog box, click Save.
|