3. Grouping Resources
You can sort tasks or resources into groups, based on
the entries in one or more of the fields, by using the Group By
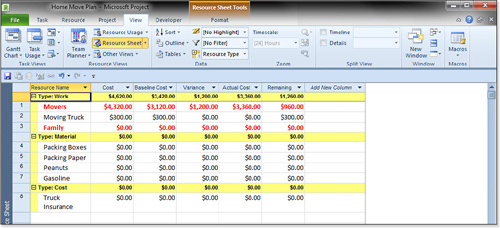
command. For example, you could group resources by resource types (see Figure 5) or by entries in the Group field.

Note
Project displays the resource
list in outline format by outline code number if you define a custom
outline code for resources and use that field for the Group By order. |
A difference between sorting and grouping is that in
grouping, a Group By record is inserted at the start of each group.
Project calculates totals for any numeric fields in this record for the
records grouped beneath it. In Figure 8.16,
the cost table has been applied and the fields show various
measurements of the cost of assignments for the resources. You can see
that the total cost of assignments for work resources is $4620.00,
whereas the total cost of assignments for material resources is zero.
The inserted grouping rows have no resource ID or row number, and they
disappear when you remove the grouping.
To group resource records on the resource type as in Figure 5,
select the View tab and choose More Groups from the Group by drop-down.
Select Work vs. Material Resources. To remove the grouping, choose
Project, Group By, No Group, or press Shift+F3.
Tip
If you create a custom outline
code for resources—perhaps outlining them geographically by divisions,
cities, departments, and job codes—you will find that grouping on that
outline field produces a hierarchical outline with rolled-up costs that
can be very useful. If you use a custom text field
to identify resource skills, you can insert the Work column in the
table and then group by the skills and by start dates to see the total
amount of work needed for each skill per week or month. If you insert
the Peak column (which shows the maximum number of units assigned for a
resource at any moment during a given time period), you could forecast
the number of units of a skill that are needed per time period. |
You can change the sort order while the resources are
grouped. The sort settings are applied within each group. In other
words, resources do not move to a different group as a result of the new
sort order. The resource list in Figure 8.15
is sorted by cost, in descending order. You can also apply filters
while the resources are grouped, which is discussed in the next section.
4. Filtering Resources
Use filters to select all the resources that meet
some condition that you specify. For example, you might want to select
all your material resources. This condition—that the resource type must
be Material—is called the filter criterion. Project has a built-in
filter named the Resources–Material filter that implements this
criterion for you, as shown in Figure 6.

After Project selects the resources that meet the
criteria, it normally changes the display to show only the selected
resources, temporarily hiding all those that do not meet the criteria.
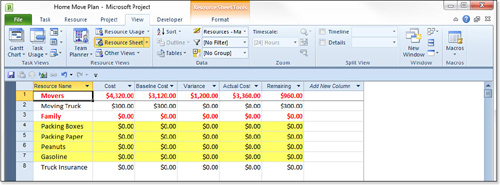
However, you can also choose to use a highlight filter, and Project
simply highlights the selected resources, without hiding all the others.
In Figure 7, the Resources–Material highlight is applied as yellow fill for each row.

Tip
Filtering for specific
resources is a great way to isolate only the resources that meet
specific criteria that you have defined and to temporarily omit the
other ones. By doing so, you can save a lot of time by applying a single
change that affects an entire group of resources instead of having to
change each one independently. |
When you finish using the filtered display, you must
apply either the [No filter] or [No Highlight] options to return to the
normal display, or simply press the F3 key.
Another useful filter for reviewing how you
categorized your resources is the Group filter. You can quickly filter
the list to show all the resources that have a specific keyword if you
have entered keywords in the Group field. For example, if you entered
department names in the Group field, you could
filter the list for “Design” to identify all the resources that are
managed by the Design department. If you used job titles, you could use
the filter to isolate resources who might qualify for a certain resource
assignment.
Project 2010 lets you filter the list of resources to
be displayed in the Assign Resources dialog box. This dialog box is
especially useful for substituting one resource for another. Usually,
you want to substitute resources that have the same skill set. If you
use a custom text field to enter skill keywords, you can filter the
resource list to see all resources that might be appropriate
substitutes. If you include a comma-separated list of multiple skills,
you need to define a special filter for this purpose.
Tip
Project 2010 also lets you use
the Assign Resources dialog box to do availability-based scheduling.
Highlight a task and check the Available to Work check box, and Project
will show you only resources that have a specified amount of
availability during the time a task is scheduled. This technique is
extremely helpful when trying to find the right people to work on a
schedule that has inflexible dates. |
You can use filters to quickly check the status of
resources after work on the project has begun to see at a glance where
problems might lie. The following partial filter listing illustrates how
useful filters can be in managing a project and enables you to identify
specific categories of resources:
Use the Overallocated Resource filter to
focus on resources that are assigned to more work than they can possibly
finish in the scheduled time period.
Use the Cost Overbudget filter to find resources whose scheduled costs are more than you had budgeted.
Use the Work Complete filter to find resources that have finished all their work.
Use the Slipping Assignments filter to see which resources are taking longer than planned to finish their assignments.
Use the Resource/Assignments with Overtime filter to see which resources have been assigned overtime work.
Note
You can apply filters only to
full-screen views or views that are in the top pane of a combination
view. The bottom-pane views are already filtered for the task or
resource that is selected in the top pane. Thus, you cannot apply
filters to views in the bottom pane. |
You can apply a filter by selecting the View tab. For
example, if you want to display only material resources in a resource
view, you would follow these steps:
1. | Display one of the resource views that has a table of resources in the top pane.
|
2. | Click the Filter drop-down to display the drop-down list of resource filters, and then click Resources–Material.
|
Project hides everything but the resources that have Material in the resource’s Type field.
Tip
To use a filter that is on the menu as a highlight filter, use the Highlight drop-down. If
you have applied a filter and then made changes that might alter which
resources are selected by the filter, use Ctrl+F3 to reapply the filter. |