5. Using the Grid, Ruler, and Guides
Visio
has a few other elements that are useful for keeping diagrams straight
and orderly. The grid, ruler, and guides have been around since the
first release of Visio and are starting to be considered old-fashioned.
Although the newer Dynamic Grid and Auto Align &
Space features are snazzy and impressive, they are most useful for
connected diagrams. The grid, ruler, and guides are still great for
measured drawings, block diagrams, user-interface mockups, and other
unconnected drawings.
You can show or hide the grid, ruler, and guides
using check boxes in View, Show. Let’s discuss what they are used for
so you can better decide whether to turn them on or off in the first
place.
Grid
Visio’s grid gives you quick visual and tactile
feedback for aligning shapes and maintaining consistency. As you draw
and resize shapes, your cursor snaps to the grid.
This feature makes it easy to create shapes that
have identical or similar sizes, and makes it easy to abut shapes
against each other. Because Visio doesn’t have any kind of abutting
function, “designing shapes that fit the grid” goes beyond a compulsion
for senseless order and makes it easy to place them against each other.
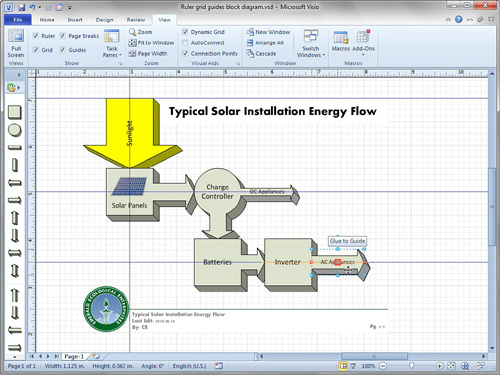
The blocks in Figure 12
demonstrate the usefulness of fitting to the grid. Because all the
squares are exactly 1 inch × 1 inch, it is easy to snap the arrow
shapes against their edges. If the squares had nongrid sizes like 1.05
inch × 1.2875 inch, it would be difficult to accurately slide the
arrows against them, and the diagram would look sloppy.
You should be aware of a few quirks about the grid.
When you zoom in and out, the grid changes such that you always see
roughly the same number of squares. Because of this, it is easy to
forget how far in you are zoomed. To keep your perspective, pay
attention to the numbers on the ruler and the size of selected shapes
in the status bar.
If you really want a fixed grid, click the dialog
box launcher for the View, Show group. There, you can specify custom
fixed units for both the ruler and the grid, and the grid won’t vary as
you zoom in or out.
Just because the grid is visible doesn’t
mean that you will snap to it. This is usually the case, but you can
turn grid snapping on and off via the Snap & Glue dialog. You
access it by clicking the dialog box launcher in the View, Visual Aids
group.
Ruler
The
ruler appears along the left and top sides of the drawing window and
helps you maintain perspective while zooming in and out. The ruler
displays coordinates from the lower-left corner of the page, in the
size and units of the drawing scale, not the size of the paper.
You can change the zero point of the ruler by
Ctrl+dragging from the top-left corner where the rulers intersect to
any point on the page. This capability is useful for measured drawings
such as office plans, site layouts, or mechanical drawings. You can
reset the origin by double-clicking the ruler intersection.
Guides
Guides are used to provide visual cues for
horizontal and vertical alignment and as tools for repositioning shapes
aligned in columns and rows.
You pull guides out of the rulers, as needed. They
look like blue, dashed infinite lines in the horizontal or vertical
directions. They don’t print, and you can glue shapes to them.
In Figure 12,
the four guides are just barely visible. Three are horizontal and one
is vertical. They help to highlight the major axes of the diagram but
also make adjustments easier because shapes are glued to the guides. In the figure, the AC Appliances arrow is being glued to the guide.
Gluing Shapes to Guides
1. | Start a new diagram using the General, Block Diagram template.
|
2. | Double-check that the grid, ruler, and guides are visible. If they aren’t, go to View, Show and check the corresponding boxes.
|
3. | Drag
a horizontal guide onto the page by dragging from the ruler at the top
of the page. You see a horizontal blue dashed line on the page.
|
4. | Drag
the 2D Double Arrow master onto the page and glue it to the guide. As
you position the shape over the guide, note the red handles that
appear. These indicate that you can glue the shape to the guide. You
can glue the center or the edges of the shape to the guide.
|
5. | Drag
the 1D Double Arrow onto the page and glue it to the guide, too. This
shape is 1D and has different handles than the 2D Double Arrow you
dropped in step 4, but they nevertheless glue to the guide.
|
6. | Move the guide up and down. Note how the shapes follow along.
|
7. | Pull
one end of the 1D Double Arrow off the guide. Notice that the handle is
now blue instead of red. It is no longer over the guide and, therefore,
no longer glued to the guide.
|
8. | Move the guide up or down again. Only one end of the 1D shape follows along, but the 2D shape remains glued.
|
9. | Add a vertical guide by dragging from the ruler at left.
|
10. | Drag
an Arrow box master onto the page and glue it to both guides. You can
glue any corner of the box or its center to both guides at the same
time. You see red handles indicating glue in both directions.
|
11. | Move
both guides. If you’ve properly glued the Arrow box to both of them, it
should follow the guides in the horizontal and vertical directions. |