Dynamic glue is a wonderful automatic
feature for drawings like flowcharts and network diagrams.
Luckily, you can easily add connection points to shapes—after you’ve learned the less-than-obvious way to do it!
Adding and Removing Connection Points to Shapes
1. | Start a new drawing from the Maps & Floorplans, Directional Map template.
|
2. | Make sure that connection points are visible. Go to View, Visual Aids and check the Connection Points box.
|
3. | From the Road Shapes stencil, drop the Road Square shape on the page.
|
4. | From the Landmark Shapes stencil, drop a Factory shape on the page.
|
5. | Return
to the home tab and select the Connection Point tool from the Tools
group. When you select this tool, connection points on shapes become
visible. Note that the road shape has two connection points (little blue
Xs) at either end, but the Factory shape has none.
|
6. | Click
on the Factory. Note that the shape has a light blue dashed line to
indicate it is selected but the normal resize handles are not visible.
Selected shapes look different when you are using the Connection Point
tool. It is easy to overlook the selection box and inadvertently add
connection points to the wrong shapes.
|
7. | To
add a connection point to the Factory, hold down the Ctrl key while
clicking locations on the shape. Wherever you click, you should see a
little blue X. In Figure 1, connection points are being added to the smoke stacks.

|
8. | Add
connection points to both smoke stacks of the Factory. To get more
accurate positioning, try zooming way in (You can use the Ctrl+Shift+
Left/Right mouse click shortcuts even with the Connection Point tool).
|
9. | Practice
removing a connection point. Make sure the Factory shape is still
selected and that you are still using the Connection Point tool.
|
10. | Click
on one of the existing connection points, without holding down any
modifier keys. The X should turn red. If you hold down the Shift key,
you can click on more points to select several at once.
|
11. | Once the connection points are selected, press Delete to remove them.
|
12. | Re-add the points you deleted, using the technique in Step 8.
|
13. | To
move an existing connection point, select one as you did in Step 10.
Once the connection point is selected (highlighted in red), you can
click and drag it to a new position. This can be a bit tricky at first.
Just remember: click the shape, click the point, then click-and-drag
once the point is highlighted.
|
14. | Take
your new creation for a test-drive. Using the Connector tool, glue some
connectors to your shape, and perhaps create an illustration like the
one shown in Figure 2.
|
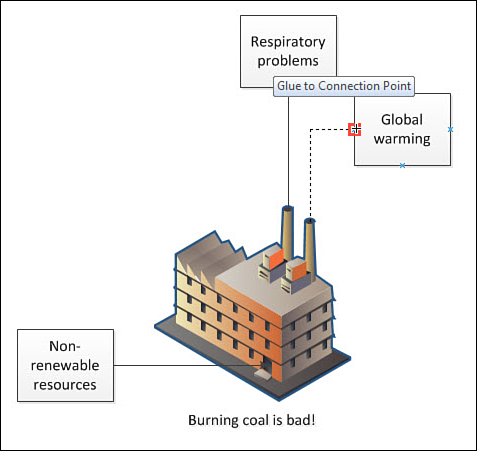
Note that connection points on subshapes
inside groups are still accessible outside the group. If you’re creating
a complex shape that has many repeated elements, it is easier to create one connection point on one elemental subshape than to add several to the top-level group!