You’ve already seen a few different ways to
connect shapes. Between the Connector tool and AutoConnect arrows, you
should be able to get the job done.
There is, however, an astonishing variety of ways to
connect shapes. Let’s look at the full laundry list, and point out each
method’s advantages and disadvantages. Depending on your working style,
you might like some methods more than others.
How Do I Connect Thee? Let Me Count the Ways
1. | Start a new drawing from the Basic Flowchart template.
|
2. | Drop several shapes on the page.
|
3. | Work through the methods of creating connections described in the rest of this section .
|
Connector Tool
You’ve seen the Connector tool in action a few times
by now. Located in the Tools group on the Home tab, you simply click on
one shape and drag to another to create a connection. Red highlights
help you to choose between dynamic glue or point-to-point glue
connections.
AutoConnect Arrows
AutoConnect arrows that appear around a shape are
subtle and unassuming, but they pack quite a punch when it comes to
connection features. You’ll be amazed how many different ways you can
use them to create connections!
Connecting to Shapes in the Mini-Toolbar
Pausing over an AutoConnect arrow reveals the top
four shapes in the active stencil. Click one of the four shapes, and it
is immediately dropped and connected.
If the active stencil has no shapes appropriate for
connecting, you don’t see the mini-toolbar. If it has no Quick Shapes,
then the first four masters will be displayed.
If no stencils are open, then you won’t see the mini-toolbar at all when hovering the cursor over an AutoConnect arrow.
Clicking an AutoConnect Arrow
Clicking an arrow causes one of two things to happen:
If there is empty space in the direction the
arrow points, a new shape is dropped and connected. If a master is
selected in the stencil, it is added. Otherwise, the first shape in the
stencil is used.
If there is a neighboring shape, a connection is made from the current shape to the neighbor.
Dragging from an AutoConnect Arrow
You can click and drag from an AutoConnect arrow, and
pull a connector out of the shape. While you drag, it is as if you were
using the Connector tool. Just drag to any target shape to complete the
connection. When you release the mouse button, there’s a shiny new
connector, and your cursor reverts to whatever tool you were using.
Drop on AutoConnect Arrow
You
can drop shapes on AutoConnect arrows to create connections. Just drag
shapes from a stencil or elsewhere on the page, and pause over the shape
to which you want to connect. When the AutoConnect arrows appear, you
can release your shape over one of them.
The shape you dragged gets connected to the shape
that you dropped it on. Plus, Visio neatly offsets it in the direction
of the blue arrow that you targeted so your diagram stays orderly and
organized.
Dragging, Splitting, and Deleting
There are several interesting operations that affect how connectors already on the page behave.
Dragging Connectors to Shapes
Just like any other Visio shape, you can drag an
entire connector around the page by clicking on its line and dragging.
Instead of just one end being repositioned, the whole connector moves,
and any existing glue is broken.
While you drag, if either of the connector’s ends
passes over other shapes or other shapes’ connection points, you see red
highlighting. This lets you know that you can glue the connector to
these shapes.
Dragging Shapes to Connectors
You can also drag shapes to unconnected connectors,
which is the reverse of dragging connectors to shapes. If you have a
connector with a free end, you can drag a shape to the free end of the
connector and create a glued connection. While you drag, you see red
highlighting on the connector as your shape nears the unconnected end.
If the connector’s end is over the middle of the shape, you see solid
red squares on the connector. These indicate that a dynamic glue
connection will be made. If the connector’s end is near a connection
point on the shape, you see open red squares, indicating imminent
point-to-point glue.
Splitting Connectors
If you need to insert a step into a flowchart, Visio
2010 helps. Drag a new shape over a connector between two steps. You see
solid red squares at either end of the connector, which indicate that
the shape can split the connector. Figure 1 shows how this looks during the drop and afterward.
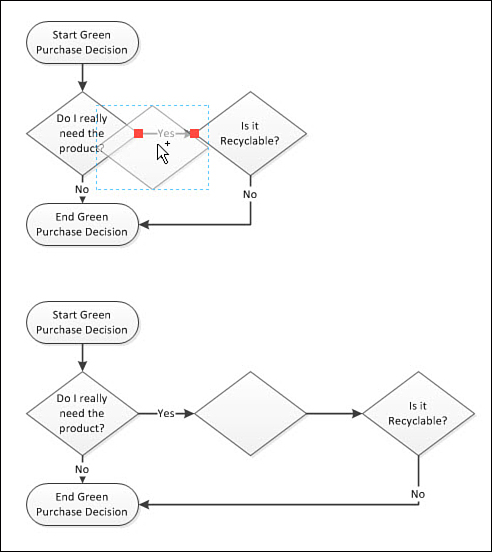
|
Not
all templates have connector splitting enabled. For example, the shapes
in the Basic Network Diagram template do not split connectors.
For power users interested in enabling connector
splitting, note that both the page and shapes need to be configured for
splitting to work.
|
Deleting Connected Shapes
When you delete a shape that is connected, any
connectors glued to it are also deleted. However, existing connectors
that have text are not automatically deleted. Visio assumes they have
special status since you have added text to them, and doesn’t presume to
eliminate your hard work!
If you delete a shape in the middle of a process
flow, then Visio heals the gap for you automatically: the previous and
next shapes are connected.
For
some, auto deletion of connectors might be an annoyance. Not to worry,
you can turn it off by going to File, Options, Advanced, Editing
options, and unchecking Delete Connectors When Deleting Shapes.