Visio’s print, print zoom,
and page settings offer innumerable combinations for getting drawings
onto paper.
Instead, let’s look at a few scenarios and discuss what it takes to get the proper output for each of them.
1. Printing Part of a Diagram
While you work, you zoom in and out, and pan around
to get a better view of specific parts of your drawing. You can print
any view of your diagram—exactly what is showing in the drawing window,
and you can have it fill up an entire sheet of paper so your output is
as easy to see as possible.
Printing the Current View
1. | Start with any Visio drawing.
|
2. | Zoom and pan to a particular detail that you would like to print.
|
3. | Go
to Print Preview and then click Current View. You should see roughly
what was shown in the drawing window before you entered Print Preview.
|
4. | Click Print. The Print dialog appears.
|
5. | In the Page Range section, be sure to check Current View.
|
6. | You can send the output to a printer or just test by printing to the Microsoft XPS Document Writer.
|
When you print the current view, only a single page
of the document is printed, on a single sheet of printer paper. Also,
Visio automatically chooses a landscape or portrait orientation based on
the shape of the current drawing window.
2. Selectively Printing Elements in a Drawing
You’ve seen how you can print the current view, but
there are a few other granular options for printing subsets of a Visio
drawing.
Printing Specific Pages
The
Print dialog’s Page Range section enables you to print the current page
or a range of pages by specifying starting and ending page numbers.
However, you can’t print disjointed ranges of pages like you can in
Word.
Printing Background Pages
Normally, background pages don’t explicitly print on
separate sheets; they accompany the foreground pages to which they are
assigned. However, you can print a background page by selecting its page
tab in the drawing window and then selecting Current Page in the Page
Range section of the Print dialog.
Printing Selected Shapes
You can print just the shapes that are selected in
the active drawing window. To do this, choose Selection from the Print
dialog’s Page Range section.
Oddly, this option doesn’t work if you go through
Print Preview; Selection is disabled via this route. You have to use the
Backstage area and go to the Print dialog via File, Print, Print.
Printing Shapes by Layer
One layer
property is Print, which you can check or uncheck via Home, Editing,
Layers, Layer Properties.
Layers that have their Print property deselected do
not print, which is useful for simplifying drawings, focusing on
specific details, or hiding sensitive data.
You can also show and hide shapes of a layer using
the Visible layer property. It is important to note, however, that
invisible layers still print unless their Print attribute is unchecked.
This can lead to unwanted surprises, so be sure to check Print Preview
first.
Printing Gridlines
If you like to see the grid while you work, you can
turn it on via View, Show, Grid. You can also see gridlines in your
printed output. On the Print Setup tab of the Page Setup dialog, notice
the Gridlines check box in the bottom-left corner. Check this option to
make the grid print.
Printed
gridlines are great if you plan to pencil in some details on your hard
copy. They also help you estimate the sizes of objects in scaled
drawings, as well as align things horizontally and vertically.
Saving Ink by Not Printing Backgrounds
Fancy backgrounds and themes add flair to your
drawings but use up a lot of printer toner. You can ease the load on
your printer when printing drafts by turning off background page
printing.
The Print dialog has a No Background check box in the
top-right corner. Check this option to omit background pages from your
print job.
3. Printing Tiled Drawings
You’ve learned how to enlarge printed output by tiling a single page across several sheets of paper.
If you create flowcharts and other connected diagrams
using the AutoSize feature, you have a sort of flipped situation. As
your diagram grows, your drawing is tiled across several drawing pages,
and will print on several sheets of paper by default.
When you print such a diagram, you may choose to
accept the defaults and piece the tiled sheets of paper together, or you
might want to shrink the whole diagram to print on one sheet of paper.
Printing Drawings with Multiple Page Tiles
1. | Start a new diagram using Network, Basic Network Diagram template.
|
2. | Drop a Server shape in the middle of the page.
|
3. | Use AutoConnect to join two more servers to the first: one to the right and one below.
|
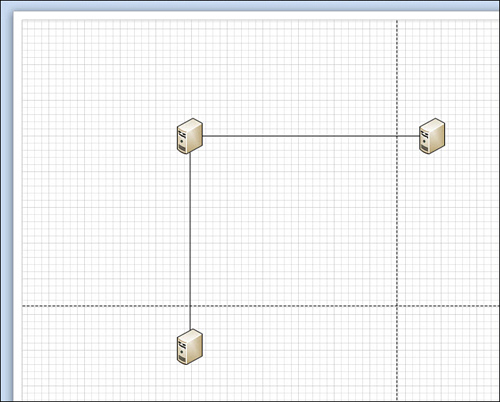
4. | Drag
the server on the right to the edge of the page until AutoSize inserts a
new page tile. (AutoSize is on by default for the Basic Network Diagram
template.)
|
5. | Similarly, drag the bottom server down until AutoSize adds another page tile beneath the original. Figure 1 illustrates how the diagram looks. Note that your drawing now spans four page tiles.
|
6. | Go to Print Preview.
|
7. | Click
the Whole Page button. You see dashed page-break lines that indicate
your drawing will print on four sheets. Move the mouse cursor across the
page and notice the four red highlight rectangles that appear. Click
any tile to zoom in on it. Click Whole Page to zoom back out. If you
print this drawing, your output will be tiled across four sheets of
paper, as expected.
|
8. | Click
the Page Setup button. In the Print Zoom section, set the output to Fit
to 1 Sheet Across by 1 Sheet Down and then click OK. Back in the Print
Preview window, notice that the page-break lines are now gone. Your
four-page diagram is reduced to print on just one sheet of paper.
|
9. | Click
Page Setup again. In the Print Zoom section, select Adjust to 100% and
then click OK. The page-break lines reappear, and your drawing again is
set to print across four sheets of paper.
|
AutoSize enables you to work freely, expanding the
drawing surface for you automatically as you draw. You don’t need to
worry about the size of the drawing surface or the size of your shapes
because you can enlarge or reduce at print time instead.
Understanding How AutoSize Affects Printing and Backgrounds
You should be aware of a few things about AutoSize, however, especially if you add backgrounds and titles to your drawings.
Visio expands the titles and backgrounds to
fit the entire drawing page surface, but sometimes there are problems
like the one shown in Figure 2.
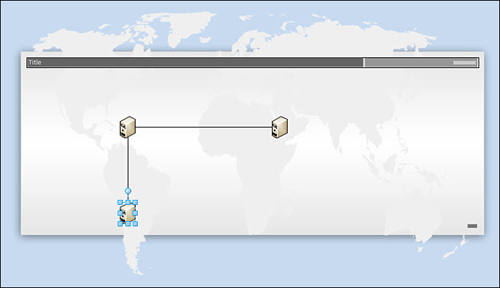
Backgrounds obscure page breaks and the grid.
Page
breaks are obscured by backgrounds in Print Preview as well, but you
can use the Single Tile, Next Tile, and Previous Tile buttons when you
aren’t sure how the drawing will be tiled.
Shapes on or near page breaks are printed on multiple sheets, as shown in Figure 3.
Because you need to trim away the blank margins on some of the sheet,
Visio prints with extra overlap so that you can be less precise in your
cutting.
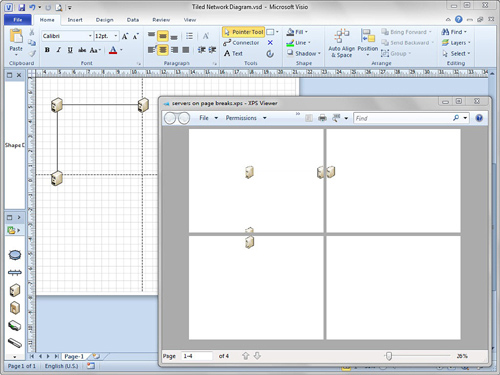
Page tiles are smaller than the chosen printer paper size in order to account for margins and page-tiling overlap. In Figure 3,
you see page breaks for a drawing that is tiled across letter-sized
paper (8.5 × 11 inches), but the tiles themselves are smaller because
Visio takes the print margins into account. In fact, if you have more
than three tiles in any direction, the inner tiles are smaller than the
outer tiles because they have overlap on both sides.