You can create a new Visio document in several ways.
You briefly saw the template gallery and used the Basic Flowchart
template . Now, take a look at templates and the
various other ways to start new diagrams.
Navigating the Template Gallery
When you start a new Visio
drawing, the first place to go is the Backstage area. Click File and
then select New from the list on the left, and you see Visio’s template
gallery, as shown in Figure 1.

Right away, you notice the
major areas of this screen. From top to bottom in the middle panel are:
Recently Used Templates, Template Categories, and Other Ways to Get
Started. On the right, there’s a big preview area, with a Create button
underneath that screams “Click Me!”
Templates that you frequently
access will appear in the Recently Used Templates at the top, but all
templates can be found using Template Categories in the middle.
One thing can be a bit confusing
at first. When you are at the top level, the icons in Template
Categories appear blue and have a “sheet of paper” look. These icons
serve as folders that contain more templates. Click one, and you drill
down into the folder and see a list of templates for that category.
Figure 2
shows the template icons inside the Maps and Floor Plans category for
Visio Premium. If you have the Standard edition, you see only three
templates.

Inside
a category, the blue icons and the Template Categories bar disappear.
In roughly the same place, you now see larger, more-detailed, full-color
icons that represent actual templates. It can take a bit of time to get
used to this difference: Big, colored icons represent actual templates;
smaller blue icons with document motifs represent template categories
at the higher level. Take a moment to contrast Figures 1 and 2.
When you click on a template icon,
the preview area shows a zoomed view of the icon, along with a
description of the template. This gives you a clear idea of what you can
create with the template. To start, just click the Create button or
double-click the template icon itself. A new, unsaved copy of a drawing
based on that template then appears in the Visio drawing window.
If the category doesn’t have
the template you need, you can go back one level by clicking the Back
button near the top of the page or by clicking the Home button. From
there you can dive into a different category of templates.
|
Just above the Create button
are two radio buttons: Metric Units and US Units. Most of the world
outside the United States uses A4-sized paper with millimeters or
centimeters as the measuring system, instead of 8½″ × 11″, letter-sized
paper measured in inches.
If you select Metric Units
before clicking Create, your template opens with a metric ruler and
grid, A4 paper, and shapes created to be metric friendly.
|
What Happens When You Start from a Template?
When you start a drawing from a template, a few things happen:
You get a new, “blank” document that is an unsaved copy of the original template.
The document’s rulers, grid, measuring system, and page size are appropriate to the drawing type and unit system you’ve chosen.
Several
stencils are opened that present you with palettes of shapes for
completing the drawing. Stencils are separate files in themselves but
are conveniently displayed in the Shapes area in docked, stacked panels.
A custom add-in Ribbon tab might be loaded. Some templates require extra functionality
from add-in modules. These modules often add an extra tab on the far
right of the Ribbon for accessing their functions. For example, the
Organization Chart and Cross-Functional Flowchart templates open with
custom Ribbon tabs that give you access to special features.
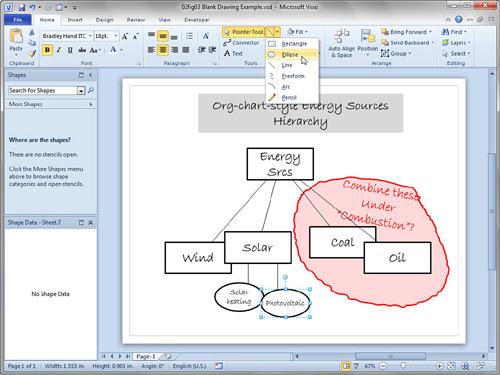
Creating a Blank Drawing
Sometimes you need to sketch a
quick concept with simple rectangles, circles, ellipses, and text. For
these quick rough-diagram situations, I often start with a blank drawing
and simply use the Rectangle and Ellipse tools in the Tools group on
the Home tab. No templates, no stencils!
Creating a Quick Sketch in a Blank Drawing
1. | Click the File tab to get to the Backstage area (refer to Figure 2.1).
|
2. | Click New in the left column.
|
3. | Double-click
Blank Drawing at the bottom of the screen, under Other Ways to Get
Started. You should see a new, blank drawing, which is unsaved and has
no stencils open.
|
4. | Locate the Drawing Tools in the Tools group on the Home tab, as shown in Figure 3.
The drop-down to the right of the Pointer Tool contains six drawing
tools: Rectangle, Ellipse, Line, Freeform, Arc, and Pencil.
|
5. | Create
shapes using the Rectangle and Ellipse tools. You use these tools by
clicking on the page and then holding down the mouse button while you
drag. When you release the mouse button, you’ve created a shape.
|
6. | To constrain rectangles to squares and ellipses to circles, hold down the Shift key while dragging with the corresponding tool.
|
7. | Select some of your shapes and then type some text on them.
|
8. | Use
the Connector Tool in the Tools group to connect your shapes together.
Notice the red highlighting around a shape when you mouse over it with
the Connector tool. This indicates that your connector will be glued to
the shape, so that the connector stays attached to the shape
automatically. To change a connector’s style, just right-click it. You
see choices for right-angled, straight, and curved.
|
9. | Experiment
with line, fill, and text formatting by right-clicking your shapes and
using the mini formatting toolbar. There are also plenty of formatting
options on the Home tab. The lines are also shapes, and you can change
the format of the line, including adding different line ends.
|
10. | Try
creating shapes using the Pencil and Line tools. These tools also work
with clicking and dragging. Repeatedly clicking and dragging adds more
line or curve segments to the shape. If you release the mouse button
near the starting point, Visio closes the shape so you can give it a
fill color
|
11. | Switch back to the Pointer tool as a matter of habit. This makes it easier to select shapes, move them and edit text.
|
I start blank drawings quite
often—whenever I need to sketch out some rough ideas and need a few
boxes, a circle or two, and some text. If my ideas solidify and a more
formal diagram is needed, I then move to a template to create a more
formal and structured diagram. If you bought Visio for a specific
purpose requiring a specific drawing type, you will probably start
templates. But it’s good to know how to create basic shapes using the
drawing tools.
Creating a New Drawing from an Existing Drawing
An alternative to starting
from a template is to use an existing drawing as a basis. Visio 2010
offers several ways to start new drawings from existing drawings,
creating new, unsaved copies for you and saving you the trouble of
copying files in Explorer.
Starting a New Drawing from an Existing Drawing
At the bottom of the New screen, just below Other Ways to Get Started, is the New From Existing icon, also shown in Figure 2.1.
Click it to open a file open
dialog in which you can browse for an existing Visio drawing on which to
base your new drawing. When you find a base file, double-click it, or
select and click the Open button.
Visio opens an unsaved copy of your original drawing. You can modify it as you like, without fear of overwriting the original drawing.
Starting a New Drawing from a Sample
The standard installation
of Visio comes with several sample drawings that you can use. You can
start new drawings from these samples, just as you can from existing
files.
Starting a New Drawing from a Sample Drawing
1. | Click File to get to the Backstage area.
|
2. | Click New in the left column.
|
3. | In the Other Ways to Get Started area at the bottom of the screen, click Sample Diagrams.
|
4. | From the Choose a Template panel, double-click Project Timeline.
|
You should now see an unsaved
copy of the Contoso Pharmaceuticals sample timeline. You can safely play
around with this drawing and experiment with the shapes without
damaging the original.
|
You can tell when you’ve
opened a copy of a drawing by looking at the title of the Visio window.
If you see “Drawing1,” “Drawing2,” and so on, your drawing is
unsaved—unless, of course, you’ve explicitly saved your drawing with a
name like “Drawing1.” I hope you usually give your files more meaningful
names!
|
Starting a New Drawing from a Recent Drawing
Another convenient way of
starting new drawings is to use the Recent feature. Instead of going to
the New page, click Recent in the Backstage area. You see a list of
files that you have previously opened.
If one of these files would
make a good starting point for your next drawing, just right-click the
item and choose Open a Copy, as shown in Figure 4.

|
If you like this way of starting from Recent, you can make sure that your favorite files never disappear from the Recent list. Figure 2.4
shows a tack icon on the right side of each item in the list. The tacks
let you pin files permanently to the list. Pinning recent files in this
manner effectively transforms your Recent list into a “Favorites” list.
Depending on your workflow, this may be a more efficient way to get
started. You might never visit the New screen or the template gallery
again!
|
Using Templates Online
A great feature in Visio 2010 is the web-integrated template-finding feature that enables you to pull templates straight from Office.com.
Under the Other Ways to Get Started area you will also find the Office.com templates icon, also visible in Figure 1. Clicking this button drills down into a hierarchy of templates stored and organized on Microsoft’s servers.
In contrast with the
content installed on your PC, the levels of online folders can be
several levels deep. The Back and Forward buttons at the top of the
window help you to retrace your steps and back out of subfolders. If you
get totally lost, click the Home button and just start over.
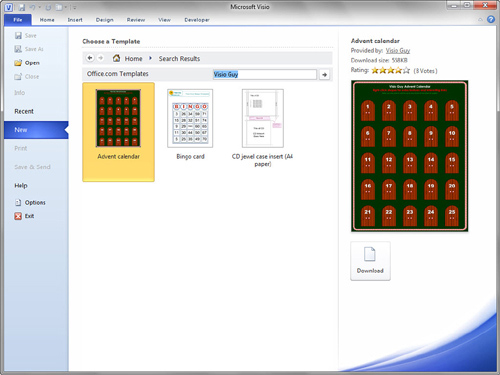
Figure 5
shows an online template that is several layers deep in the hierarchy.
The clickable breadcrumbs show the path you’ve followed: Office.com
Templates, More Templates, Case Inserts. At the end of the trail, you
find a template for creating inserts for CD jewel cases (created by some
joker named Visio Guy!).

If you can’t find what you want by browsing, there’s a handy search bar just right of the Office.com Templates heading. Figure 6 shows the template search in action.
Starting a New Drawing from an Office.com Template
1. | Click the File tab to go to the Backstage area.
|
2. | Click New in the list on the left.
|
3. | Click Home at the top of the window, under Choose a Template.
|
4. | Click Office.com templates at the bottom, under Other Ways to Get Started.
|
5. | By
either browsing or searching, see whether you can find some of these
templates. Go ahead and open them: explore and experiment!
|
6. | Remember
that when you open a template, you get an unsaved copy of the original.
So experiment, play, and mess around to your heart’s content, and have
fun. You won’t screw up the original!
|