2.4 Associate Content Types
The next step is to associate our content types with the lists that we’ve created. Do this:
Highlight
the Asset Notes list, and then select List Settings from the ribbon.
The list configuration page for the Asset Notes list will appear.
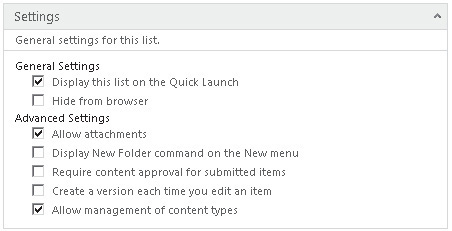
You’ll notice a section named Settings with a series of checkboxes, as
illustrated. Check the Allow Management Of Content Types checkbox. By
default, SharePoint creates simple lists and libraries that are bound
to basic system content types, such as Item and Document. Since we want
to bind the list to a specific content type, we must configure the list
to allow such binding. With this option selected, we are free to add
and delete content types as appropriate.
In
the Site Objects menu, select Content Types. Then click the Add button.
Select and add the Asset Note content type. Then highlight the Item
content type select Delete from the ribbon.
Click the Save icon in the title bar to save the changes.
Repeat
steps 1–3 for the On-Hire Assets list. This time, add the On-Hire Asset
content type instead of the Asset Note content type.
Repeat steps 1–3 for the Hire Contracts document library. This time add the Hire Contract content type.
2.5 Defining Relationships
We
now have a template site with each of our three content types bound to
a list or library. We could start entering data into these lists.
However, one thing that we haven’t considered is the relationships
between the various content types. In SharePoint, relationships are
defined by using lookup fields. Each lookup field is bound to a
particular column in a particular list (although other columns can also
be carried through if required). In relational database terms, the
lookup field works like a foreign key, holding a value that uniquely
identifies a record on the source list.
Note
It is possible to create lookups that can accept
multiple values, but for the purposes of defining this data structure,
we’re interested only in single value lookups.
Lookup columns target a specific list. While it is
possible to include lookup fields in content types, each time the
content type is used the lookup field is bound to the list that was set
when the content type was created, potentially causing security issues
if the list is in a separate site. For that reason, when using lookups
to define data structures, you should view them as a constraint to be
added on the list, as opposed to a field to contain data within the
content type. Adding lookups in a content type greatly reduces the
portability of the content type.
Our data structure requires two relationships:
To create these relationships, take the following steps:
In the Site Objects menu, select Lists and Libraries. Highlight the Asset Notes list. Select Edit Columns from the ribbon.
Select
Add New Column from the ribbon and then choose Lookup (information
already on this site) from the list of options that appears.
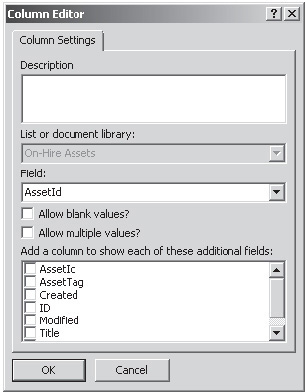
In
the dialog that appears (shown next), select On-Hire Assets from the
List Or Document Library drop-down. In the Field drop-down, select the
AssetId. Uncheck the Allow Blank Values checkbox. Click OK to create
the new column.
Once the column has been created, right-click the column name and select Rename. Change the column name by typing Asset Reference.
Click the Save button in the title bar to save the changes.
Repeat
steps 1–5 for the On-Hire Assets list. This time, bind the lookup
column to the Hire Contracts document library and set the field to
ContractId. Rename the new field Contract Reference.
2.6 Create a Site Template
We’ve now created a template web site for use by our
customers, complete with a data structure that’s logically identical to
the relational schema that we defined in Figure 1.
The final step that we need to take is to save this site as a template
so that we can easily create a new site for each customer as required.
To do this, do the following:
From the Site Objects menu, select Blank Site. In the ribbon, select Save as Template.
In the browser window that appears, enter Hire Sample Template in the File Name text box, and then in the Template Name text box, enter Hire Sample Template. Then click OK to create the template.
The new template will be stored in the User
Solutions Gallery, where it can be activated and used to create
additional sites as required. The solutions gallery is accessible from
the root site on any web application. So, for example, if your server
is named MyServer and you have a web application running on http://MyServer,
then the solutions gallery can be found at
http://MyServer/_catalogs/solutions/Forms/AllItems.aspx.