3. Changing the Website Location
The home folder (or home directory, as IIS calls it)
that you specified when you created a website isn’t necessarily
permanent. You may decide to move a website to a different home folder,
or you may decide to rename the existing folder. In either case, you
must use IIS Manager to specify the new home folder. Here are the steps
to follow:
1. | |
2. | Open the SERVER, Sites branch (where SERVER is the name of your Windows Home Server PC).
|
3. | Click the website you want to work with.
|
4. | In the Actions pane, click Basic Settings. The Edit Site dialog box appears.
|
5. | Either
type the full pathname (drive and folders) in the Physical Path text
box, or click Browse and use the Browse for Folder dialog box to either
select the folder or create a new folder.
|
6. | Click OK.
|
4. Setting the Default Content Page
A normal website URL looks like the following:
http://name/folder/file
Here, name is a domain name or hostname, folder is a folder path, and file is the filename of the web page or other resource. Here’s an example:
http://server/photos/default.htm
Intriguingly, you can view the same web page by entering the following address into the browser:
http://server/photos/
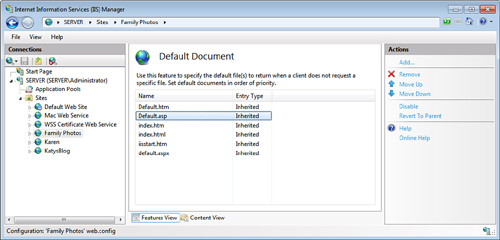
This works because IIS defines default.htm as one of its default content page filenames. Here are the others:
default.asp
index.htm
index.html
default.aspx
This means that as long as a folder contains a file
that uses one of these names, you can view the corresponding page
without specifying the filename in the URL.
Note, too, that these default content pages have an assigned priority, with default.htm having the highest priority, followed by default.asp, then index.htm, then index.html, and finally default.aspx. This priority defines the order in which IIS looks for and displays the default content pages. That is, IIS first looks for default.htm; if that file doesn’t exist in a folder, IIS next looks for default.asp, and so on.
For your own websites, you can add new content pages (for example, index.htm and index.asp), remove existing content pages, and change the priority of the content pages. Here are the steps to follow:
1. | Launch IIS Manager.
|
2. | Open the SERVER, Sites branch (where SERVER is the name of your Windows Home Server PC).
|
3. | Click the website you want to work with.
|
4. | Click Features View.
|
5. | Double-click the Default Document icon. IIS Manager opens the Default Document page, shown in Figure 3.
Tip
Using a default content page is usually a good idea
because it enables users to access your site without knowing the name
of any file. However, for security reasons, you might want to allow
access to the site only to users who know a specific filename on the
site (for example, through a URL that you’ve provided). In that case,
you have two choices: either don’t include a file that uses one of the
default content page names, or click Disable in the Default Document
page (which appears in the Actions pane when no default documents are
selected). Either way, be sure to deny directory browsing permission to
all users: In the site’s Home page in IIS Manager, double-click the
Directory Browsing icon and then make sure this feature is disabled.
|
6. | To
specify a new default content page, click Add to open the Add Default
Document dialog box, type the filename, and then click OK. IIS Manager
adds the new filename to the Default Document list.
|
7. | To delete a default content page, select it in the Default Document list and click Remove.
|
8. | To
change the default content page priority order, click the content page
you want to work with, and then click either Move Up or Move Down.
|
9. | Click OK to put the new settings into effect.
|
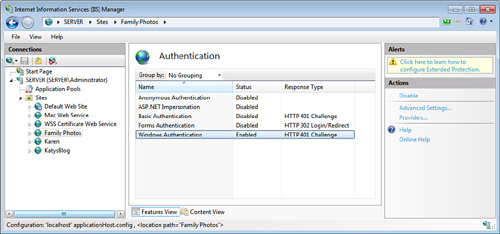
6. Disabling Anonymous Access
When
you create a new site, IIS Manager allows anonymous access to the site
by default. This is desirable for most websites because it enables
users to most easily access the site content. IIS provides anonymous
access via the IUSR accouπnt, which is a member of the Guest security
group, so it has read-only access to the site.
However, you might have a site with content that you
want to restrict to people who have user accounts on Windows Home
Server. In that case, you need to disable anonymous access for the
website and switch to Windows Authentication, which means IIS prompts
each user for a username and password before allowing access to the
site.
Follow these steps to disable anonymous access:
1. | Launch IIS Manager.
|
2. | Open the SERVER, Sites branch (where SERVER is the name of your Windows Home Server PC).
|
3. | Click the website you want to work with.
|
4. | Click Features View.
|
5. | Double-click the Authentication icon. IIS Manager displays the Authentication page.
|
6. | Click Anonymous Authentication, and then click Disable in the Actions pane. IIS Manager disables anonymous access to the site.
|
7. | Click
Windows Authentication, and then click Enable in the Actions pane. IIS
Manager enables Windows account access to the site, as shown in Figure 4.
|
Tip
Switching to Windows Authentication means
that any user with a valid account on Windows Home Server can access
the website. What if there are one or more users with Windows Home
Server accounts that you do not want
to view the website? In that case, you must adjust the security of the
website’s home folder directly. Use Windows Explorer to display the
website’s home folder, right-click the folder, and then click
Properties. In the Security tab, click Edit, click Add, type the name
of the user, and then click OK. Select the user, and then activate the
Full Control check box in the Deny column. This tells Windows Home
Server not to allow that user to view the folder, thus barring the user
from viewing the website.