4. Client Push Installation Wizard
The
Client Push Installation Wizard uses the same process as Client Push
Installation. The title makes it obvious that the only difference is
the wizard itself. It is highly recommended you test deployments using
the Client Push Installation Wizard prior to enabling Client Push
Installation, because you have more control.
To configure the Client Push Installation Wizard, simply configure the Accounts and Clients tabs (Figures 2 and 3, respectively). To use the wizard, perform the following steps:
1. | Right-click a collection or computer object and then select Install Client.
|
2. | Click Next to continue the Client Push Installation Wizard.
|
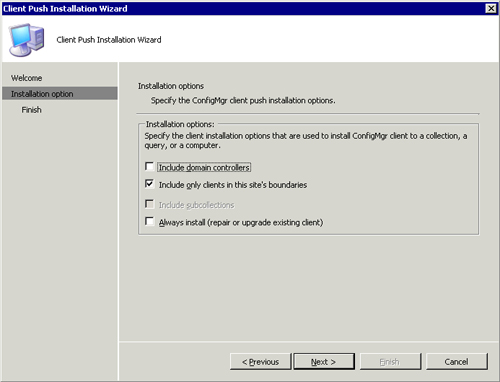
3. | Review the following options, as shown in Figure 4:
- Include domain controllers— This selection includes domain controllers.
- Include only clients in this site’s boundaries—
This is a default setting. Clear this check box to install the client
on systems discovered but not assigned to this site (clients that are
not included in your specified site boundaries).
- Include subcollections—
This check box is enabled if you are using the Client Push Installation
Wizard to target a collection. Enable this check box to target the
current collection and all subcollections.
- Always install (repair or upgrade existing client)—
This option allows you to force a reinstallation of the ConfigMgr
client. This option also helps when upgrading clients. If you install a
new service pack to ConfigMgr, Client Push Installation will not
automatically upgrade clients. Use the Client Push Installation Wizard
to upgrade clients or send using standard software deployment.

|
4. | Review
the Summary page to confirm that you have targeted the intended
collection or computer object, and then click Finish. Review ccm.log on
the site server for client installation information.
|
You
can use the Client Push Installation Wizard even after you have enabled
Client Push to force a reinstall on a client or multiple clients, or to
upgrade clients.