3. Branch Distribution Points
A
branch distribution point (BDP) is a distribution point on a site
system designed to provide distribution point functionality in those
locations where a server is not available, such as a small or
distributed office. You can install branch distribution points on
workstation or server-class systems, which gives ConfigMgr 2007 the
ability to distribute software from the local network without a local
distribution point. A branch distribution point requires a BITS-enabled
standard distribution point containing the content to be delivered to
the BDP. If a branch distribution point is communicating with a
protected standard distribution point, the boundaries of that standard
distribution point need to include the branch distribution point.
You
can define multiple branch distribution points for a location. This is
a recommended configuration, because workstations are more likely to be
rebooted during the day than server systems.
To
install a branch distribution point, the system must be an existing
ConfigMgr client that is not in a workgroup, running Windows 2000, or
configured to use an Internet-based management point. Perform the
following steps to add a branch distribution point:
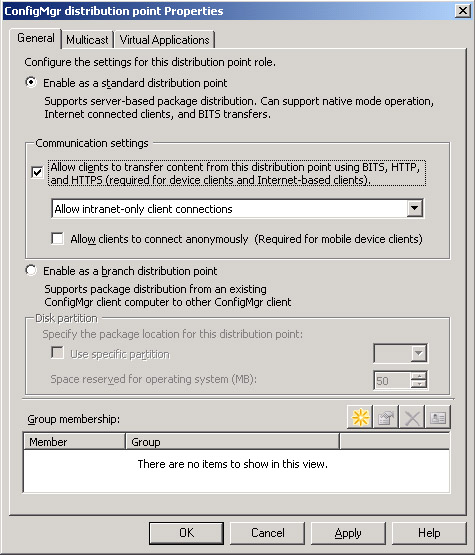
1. | Change the configuration for Wildflower so that it will be a BITS-enabled standard distribution point.
Set this by navigating in the ConfigMgr console to Site Database -> Site Settings -> <Site Code> <Site Name> -> Site Systems -> Wildflower -> ConfigMgr Distribution Point. Right-click and choose Properties.
|
2. | Check the Communication settings box (shown in Figure 6)
and set the drop-down option to Allow intranet-only client connections.
(There are no plans to allow Internet-based clients in this site.)

|
3. | Now
that there is a BITS-enabled standard distribution point, you will
create a branch distribution point to communicate with it. To create
the branch distribution point, navigate in the console to Site Database
-> Site Management -> <Site Code> <Site Name> -> Site Settings -> Site Systems. Then right-click and choose New -> Server.
|
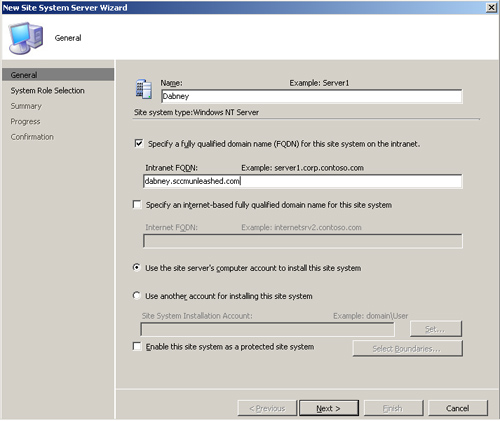
4. | Because the branch distribution point will be on the Dabney system, specify that system’s name and FQDN, as shown in Figure 7.
It is not a requirement in all cases to specify the FQDN on this page,
although this option is checked and may be filled in by default. You
must specify the FQDN if you will be using native mode and
Internet-based clients, if the site has clients in different domains
with automatic approval of clients, for IPv6-only environments, or for
environments not using WINS.

|
5. | When selecting the system role, check the distribution point role, similar to Figure 2.
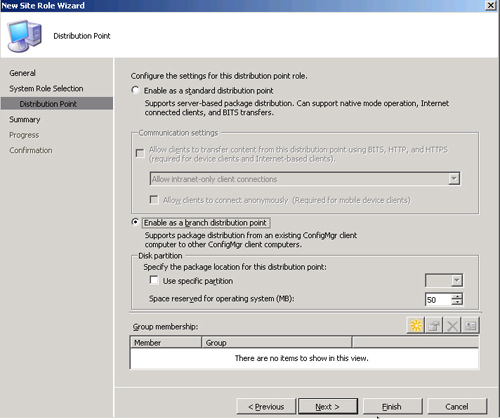
On the Distribution Point screen of the New Site Role Wizard, select
the option Enable as a branch distribution point, as displayed in Figure 8.

After checking this option, you can choose a partition on which to
store the branch distribution data, and specify an amount of space to
reserve for the operating system. If you do not specify a partition for
the branch distribution data, the wizard will automatically select the
drive with the largest amount of free space. In Figure 8, the amount of space to reserve for the operating system is kept at the default of 50MB.
|
After
you create the branch distribution point for Dabney, it is visible in
the console when specifying a distribution point to use for your
packages (Navigate to Site Database -> Computer Management ->
Software Distribution -> Packages -> <Package Name> -> Distribution Points). You can also see it under the site settings (Site Database -> Site Management -> <Site Code> <Site Name> -> Site Settings -> Site Systems -> <servername>).
In both cases, the console lists the standard distribution points as
type Server whereas the branch distribution points show as type Branch.
Branch
distribution points provide an effective way to minimize network usage
and increase performance when distributing software packages to
locations where a standard distribution point is not