Now that we’ve covered the essentials of basic and
dynamic disks, and tips for optimizing and organizing storage, this
section focuses on managing your computer’s disks.
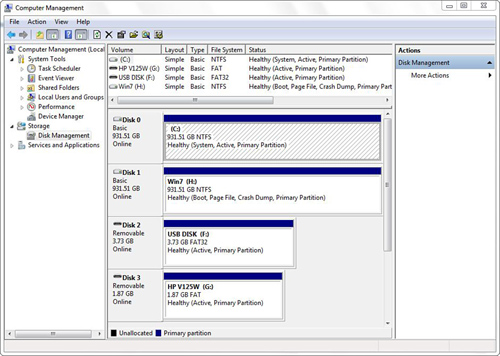
The Disk Management utility (shown in Figure 1)
is responsible for the creation, deletion, alteration, and maintenance
of storage volumes in a system. This tool is located within the Computer
Management interface of Administrative Tools (accessed through Start,
Control Panel, System and Security, Administrative Tools, Computer
Management, Disk Management). It is protected by User Account Control.
Another access method is right-clicking Computer and choosing Manage.
Using the Disk Management utility, you also can assign the drive letters
used by your DVD and hard disk drives.

Tip
You can change the way
specific types of volumes are displayed in Disk Management. To do this,
click View, Settings. From there, you can select the color you want to
use to represent any of the various disk states shown by Disk
Management. By selecting the Scaling tab from the Settings dialog box,
you can also change the way in which Disk Management shows the scaling
of each disk. This capability is particularly useful if you want the
scale display to be more representative of the actual physical sizes of
your disks. |
This single interface lets you
manage both local and remote computers using the various administration
utilities shown in the left pane. Using this interface, I’ll show you
shortly how to perform different procedures on your existing and new
hard disks. The process is quite simple for most of the operations
because you will be presented with a wizard to complete them.
Most
operations on disks can be performed by right-clicking the disk or
volume you want to affect. As usual, you are presented with a
context-sensitive menu from which you can perform any actions relating
to the volume or disk you click. From the graphical layout in the Disk
Management utility, you can also see what is going on with your disks at
any given time. As always, you can select the Help option from within
any right-click context menu or the menu bar along the top of the window
to get an explanation of the operations available to you.
1. Assigning Drive Letters and Joining Volumes
Windows automatically assigns letters to the
drives. However, this assignment might not suit your system; for
example, you might have already mapped a network drive to the same
letter that Windows assigns to a new drive.
Caution
Many MS-DOS-based and
Windows-based programs make references to a specific drive letter (for
example, environment variables). If you modify the drive letter of a
drive with these programs installed, they might not function correctly. |
Using Disk Management, you can easily assign
logical drive letters to your hard disks and removable drives such as
DVD or Iomega REV. You can’t change the drive letter of your boot drive
(usually the C: drive), but you can change any of the others.
To change the letter, right-click the disk
volume or drive in the bottom-right pane of Disk Management, and select
Change Drive Letter and Paths. A dialog box appears, listing the current
drive letter assignment. Click Change. Under Assign the Following Drive
Letter, choose the desired new letter. Click OK and confirm that you
really do want to make the change.
In
addition to or instead of assigning a drive letter to a disk drive or
partition, you can “graft” the disk volume onto another. Windows lets
you specify a folder that will become the mount point for the new drive.
For example, let’s assume you create a folder named C:\TEMP,
and you want it to have a lot of drive space. You could install a new
hard drive and, instead of assigning it a drive letter, tell Windows to
access it through C:\TEMP. Your C:\TEMP files and subfolders are then stored on the alternate drive.
Tip
By using a mount point,
you can add space to the folders under the mount point folder using an
available drive. This is a good way to add space in a controlled fashion
for a specific purpose, such as to store scratch files or web page
images. |
Grafting Versus Dynamic Disks
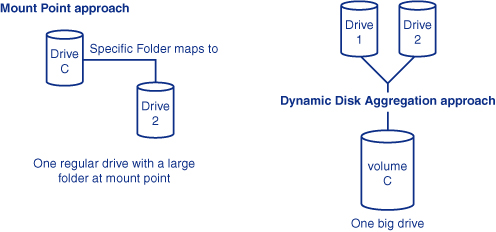
Assigning mount points is different from what
happens when you aggregate dynamic disks into one large volume. Although
dynamic disks and regular (basic) disks both support the use of mount
points, dynamic disks can create one large, apparently contiguous disk
space. Mount points graft subsequently added drives at a folder, similar
to grafting two trees by tying together a branch from each tree. Figure 2 illustrates the differences between the two approaches.

Note
You can graft new volumes or disks onto a folder only on an NTFS-formatted drive. The new volume can have any format, however. |
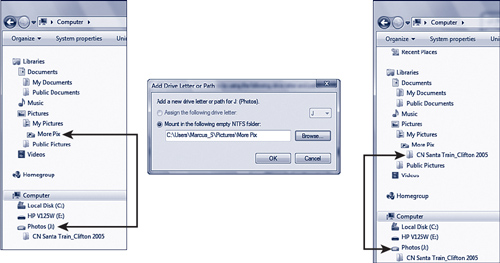
In Figure 3, I’ve grafted a hard disk containing digital photos (J:) into the mount point on drive C:\Users\Marcus_S\Pictures\More Pix.

Note
If the folder you
specify as the mount point already contains files, these are
inaccessible as long as the drive-to-path mapping exists because that
folder is now remapped into the new location. The original files
reappear if you delete the drive path. Therefore, it’s usually a good
idea to create a new folder as a mount point or delete all the contents
of an existing folder before establishing the mount point. |
Even if you have several hard drives and DVD
drives, you can graft them all together onto your C: drive, making it
appear as one big file system. It’s a great management concept: You can
add space to your file system by attaching new disk volumes directly
into the original folder structure. (UNIX users are probably smirking at
this point because the UNIX OS has worked this way since it was written
in the 1970s.)
Tip
When Windows Explorer
shows you free disk space on the original drive, it measures only the
space on the physical drive, not space on any grafted drives. You’ll
actually have more space than you think because files on the grafted
folders are stored on another volume. If you want, you can also assign a
drive letter to the added volume so that you can view and monitor its
free space directly. Alternatively, you can use the command prompt, change to the folder in the grafted volume, and use the DIR command, which lists free space on the actual current volume. |
If you mount a drive and assign it a drive letter, you can access it through both pathways.
To graft a disk volume to an existing file system, follow these steps:
1. | Create the folder that is to serve as the mount point for the new drive or volume.
|
2. | Highlight the new drive or volume in Disk Management.
|
3. | Right-click, select Change Drive Letter and Paths, and click Add.
|
4. | Select Mount in the Following Empty NTFS Folder.
|
5. | Enter the folder’s pathname, or click Browse to locate it.
|
6. | Click OK to save the path.
|
7. | Click OK to close the dialog box.
|
You
can assign a given drive or volume to only one drive letter but to an
arbitrary number of paths. (It’s a little strange to see the same files
appear in several different places, so we recommend that you not go nuts
with this feature.)
Tip
If you’re running out of
room on your C: drive, decide whether it makes sense in your situation
to add lots of space to just one folder (for example, Documents). If it
does, install and format a new hard drive, and assign it a letter. Copy
the original folder to the new drive; then add a path to the new hard
drive using the name of the original folder. This way, you can preserve
your original data and have room for |
By the way, this “grafting” technique works
with both basic and dynamic NTFS disks. Only Windows dynamic disks can
be “grown” by changing their partition size on the fly. If you use a
basic-formatted disk, as most users do, the grafting trick is a good one
to know.