If your computer has a recordable CD or DVD drive, you can copy — or burn
— files and folders to a recordable disc. This enables you to store a
large amount of data in a single place for convenient transport,
storage, or backup.
To burn files, your computer must have a recordable CD or DVD drive, and you must have a blank recordable CD or DVD disc.
Burn Files to a CD or DVD
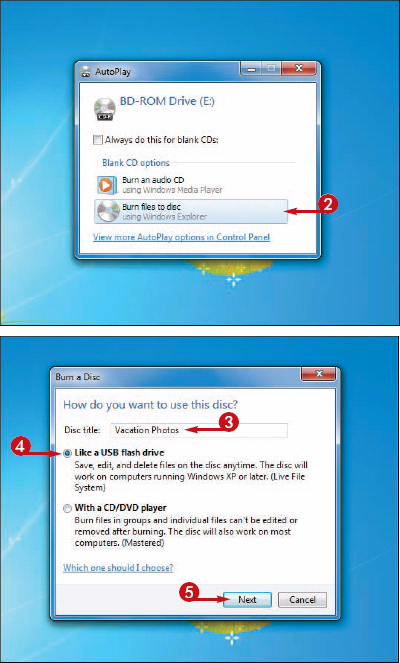
1 Insert a recordable disc into your recordable CD or DVD drive.
The AutoPlay dialog box appears.
2 Click Burn files to disc.
If you have never used the disc for burning files, the Burn a Disc dialog box appears.
3 Type a title for the disc.
4 Click Like a USB flash drive ( changes to
  ).
).
5 Click Next.

Windows 7 formats the disc and displays a dialog box to show you the progress.

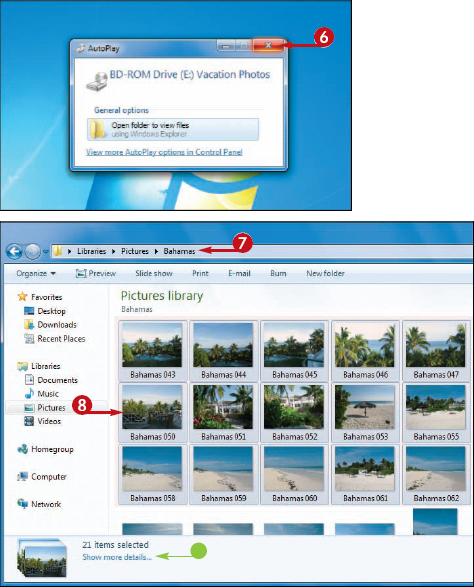
When the format is complete, the AutoPlay dialog box appears.
6 Click Close ( ).
).
7 Open the folder containing the files you want to copy to the disc.
8 Select the files.
• If you selected more than 15 files and you want to see the total size of the selection, first click Show more details.
|
Does it matter what type of recordable CD or DVD I use?
Not in Windows 7. Normally, CD-R and DVD-R discs
allow you to copy files to the disc only once. After you finalize the
disc, it is locked and you cannot copy more files to the disc, or
deletes files from the disc. However, Windows 7 uses a new system that
enables you to copy, recopy, and delete files with any type of
recordable disc.
How much data can I store on a recordable CD?
Most recordable CDs can hold about 650MB (megabytes)
of information. If a typical word processing document is about 50KB
(kilobytes), this means you can store about 13,000 files on a
recordable CD. For larger files, such as images, you can store about
650 1MB files on the disc.
|
With Windows 7's new
method for burning files to a CD or DVD, you only need to format the
disc once. After that, you can burn more files to the disc, delete
files from the disc, and generally work with the disc just like you
would a regular folder on your hard drive.
When you have finished
working with the disc, you must close the recording session to allow
Windows 7 to set up the disc for use on other computers and devices.
• If you clicked Show More Details, the Size number shows the total size of the selected files.
9 Click Burn.
NOTE
If you want to copy everything in the folder to the disc, do not select any file or folder and click Burn.
Windows 7 burns the files to the disc.
• Windows 7 opens the disc and displays the copied files.
10 Repeat Steps 7 to 9 to burn more files to the disc.

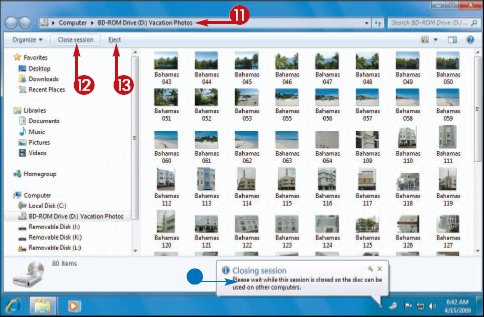
11 Open the disc folder.
12 Click Close session.
Windows 7 closes the disc session to allow the disc to be used on other computers.
• This message appears while the disc is being closed.
13 When the Closing Session message disappears, click Eject.
Windows 7 ejects the disc.

I want to start over with a CD-RW or DVD-RW disc. Is there an easy way to erase the disc?
Yes. Follow these steps:
1 Click Start.
2 Click Computer.
3 Right-click the disc icon.
4 Click Format.
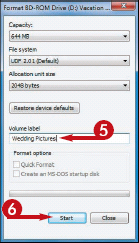
The Format dialog box appears.
5 Type a new name for the disc, if desired.
6 Click Start.
Windows 7 warns you that all data on the disc will be erased.
7 Click OK.
