3. Editing Keys and Values
Regedit has no Save or Undo menu items. Changes to the Registry happen immediately and permanently.
Additions, deletions, and changes are for real. This is the reason for
all the warnings to back up before you poke into the Registry.
Adding a Value
To
add a value to a key, select the key in the left pane and choose Edit,
New. Select the type of value to add; you can select any of the
supported Registry data types, which are listed by the “friendly” names
shown previously in Table 28.1. The instructions you’re following indicate which type of value to add. A new value entry then appears in the right pane.
Type the new value’s name and press Enter to edit the value:
For string values, enter the text of the desired string.
For DWORD values, choose Decimal or Hexadecimal, and enter the desired value in the chosen format.
For binary values, enter pairs of hexadecimal characters as instructed. (You’ll never be asked to do this, I promise.)
Changing a Value
If you want to change a value, double-click it
in the right pane to bring up the Edit Value dialog box. Alternatively,
right-click it and select Modify. Then make the desired change and click
OK.
Note
Many of the keys that control Windows itself have access restrictions and can be modified only by an Administrator. |
That is all you will likely ever need to do
with Regedit. However, in the extremely unlikely case that you want to
delete a value or add or remove a key, the following sections can help
see you through these processes.
Deleting a Value
If you’ve added a Registry value in the hope of
fixing some problem and found that the change wasn’t needed, or if
you’re instructed to delete a value by a Microsoft Knowledge Base
article or other special procedure, you can delete the entry by viewing
its key and locating the value on the right pane.
Caution
There is no Undo command
in the Registry Editor—when you delete a value, it’s gone for good. Be
sure you’ve made a Registry backup before editing or deleting Registry
keys and values. |
Select the value and choose Edit, Delete from
the menu, or right-click and select Delete from the context menu.
Confirm by clicking OK.
Adding or Deleting a Key
Keys must be added as subkeys of existing keys;
you can’t create a new top-level key. To add a key, select an existing
key in the left pane and select Edit, New, Key from the menu.
Alternatively, right-click the existing key and select New, Key from the
context menu. A new key appears in the left pane, where you can edit
its name. Press Enter after you enter the name.
You can delete a key by selecting it in the
left pane and choosing Edit, Delete from the menu, or by right-clicking
it and selecting Delete from the context menu. Click OK to confirm that
you intend to delete the key. Deleting a key deletes its values and all its subkeys as well, so without the protection of Undo (or a Registry Recycling Bin), this action is serious.
Renaming a Key
As you have probably guessed, the pattern for
renaming a key follows the Explorer model exactly: Choose the key in the
left pane and select Edit, Rename, or right-click the key and select
Rename. Finally, enter a new name and press Enter.
Caution
Don’t attempt to rename keys without a very good
reason—for example, because you mistyped the name of the key you were
adding. If Windows can’t find specific Registry keys it needs, Windows
might not boot or operate correctly. |
Using Copy Key Name
As you have probably noticed by now, the names
of Registry keys can be quite long, tortuous things. The Registry Editor
offers a bit of help to finger-fatigued Registry Editors (and authors):
Choosing Edit, Copy Key Name puts the name of the currently selected
key into the Clipboard so you can paste it elsewhere if you need to.
4. Editing Registry Entries for Another User
As an administrator, you might find it necessary to edit HKEY_USER entries for another user. For example, a startup program in HKEY_CURRENT_USER\Software\Windows\CurrentVersion\Run might be causing such trouble that the user can’t log on. If you can’t log on as that user, you can edit his HKEY_CURRENT_USER Registry keys in another way:
1. | Log on as an Administrator and run Regedit.
|
2. | Select the HKEY_USERS window.
|
3. | Highlight the top-level key HKEY_USERS.
|
4. | Select File, Load Hive.
|
5. | Browse to the profile folder for the desired user. For a local user account, this is in \Users\username.
(For a Windows Server domain, look in the folder used for user profiles
on the domain controller.) The folder name of this folder might have
the computer name or a domain name attached. For example, on one
computer, my profile folder name is bknittel.java.
|
6. | Type the filename NTUSER.DAT. (The file will most likely not appear in the Browse dialog box because it’s super hidden: marked with both the Hidden and System attributes.) Then click Open.
|
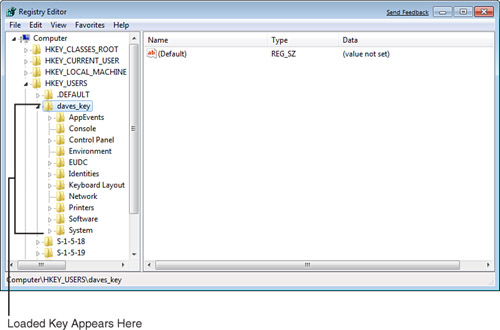
7. | A dialog box appears, asking you to enter a name for the hive. HKEY_USERS
normally loads user hives with a long numeric name, so I suggest that
you type the user’s logon name. Click OK. The user’s Registry data is
then loaded and can be edited, as shown in Figure 2.

|
8. | When you’re finished editing, unload the hive. Select the key you added under HKEY_USERS (for example, daves_key in Figure 28.2), and select File, Unload Hive. Confirm by clicking Yes on the warning dialog box.
|