The reputation Windows has as an audio playback and
editing platform has been, not to put too fine a point on it, abysmal.
There have been some improvements over the years. For example, the early
audio infrastructure (often called the audio stack)
seen in Windows 3.1 (16-bit) and Windows 95 (32-bit) supported only one
audio stream at a time, but Windows 98 enabled multiple playback
streams using the Windows Driver Model architecture. However, Windows
audio has always suffered from three major problems:
A poor interface for controlling audio and for troubleshooting audio problems—
Tools such as Volume Control, the Sound Recorder, and the Control Panel
Sounds and Audio Devices icon had difficult interfaces and limited
functionality, and clearly weren’t geared for the day-to-day audio tasks
that users face.
Poor quality playback and recording—
The Windows audio stack has always been merely “good enough.” That is,
audio in Windows—particularly playback—was constructed to give the
average user a reasonable level of quality. However, the default Windows
audio had nowhere near the fidelity audiophiles and professional audio
users require, so these users spent much of their time working around
inherent audio limitations (or giving up on Windows altogether and
moving to the Mac).
Poor reliability, to the point that audio glitches are one of main causes of system instability—
The problem here has been that much of the audio stack code runs in the
sensitive Windows kernel mode, where a buggy driver or process can
bring down the entire system.
To address these problems, the Vista audio team completely rewrote the
audio stack from the ground up. That’s good news for both regular users
and audiophiles because it means the Vista audio experience should be
the best yet. Completely revamping the audio infrastructure was a big
risk, but the aim was to solve the three previous problems. We’ll have
to wait and see whether Microsoft accomplished this ambitious goal, but
on paper, things look promising:
New tools for controlling the volume,
recording sounds, and setting sound and audio device properties
(discussed in the next three sections) offer a much improved user
interface geared toward common user tasks and troubleshooting audio
problems.
The new audio stack offers much higher sound quality.
Most audio code has been moved from kernel mode to user mode, which should greatly reduce audio-induced system instabilities.
Per-Application Volume Control
The Volume Control tool in previous versions of
Windows is a good example of poor audio system design. When you opened
Volume Control, you were presented with a series of volume sliders
labeled Master, Wave, Line In, CD Player, Synthesizer, Aux, and more.
For the average user,
most of these labels were, at best, meaningless and, at worst,
intimidating. What on earth does the Aux slider control? What’s the deal
with Line In? Most people ignored all the sliders except Master and
just used that slider to control playback volume. However, the Master
slider had problems of its own.
For example, suppose that you’re waiting for an
important email message, so you set up Windows Mail to play a sound when
an email message comes in. Suppose further that you’re also using
Windows Media Player to play music in the background. If you get a phone
call, you want to turn down or mute the music. In previous versions of
Windows, muting the music playback also meant muting other system
sounds, including your email program’s audio alerts. So, while you’re on
the phone, there’s a good chance that you’ll miss that important
message you’ve been waiting for.
The Windows Vista solution to this kind of program is called per-application volume control.
This means that Vista gives you a volume control slider for every
running program and process that is a dedicated sound application (such
as Windows Media Player or Media Center) or is currently producing audio
output. In our example, you’d have separate volume controls for Windows
Media Player and Windows Mail. When that phone call comes in, you can
turn down or mute Windows Media Player while leaving the Windows Mail
volume as is, so there’s much less chance that you’ll miss that incoming
message.
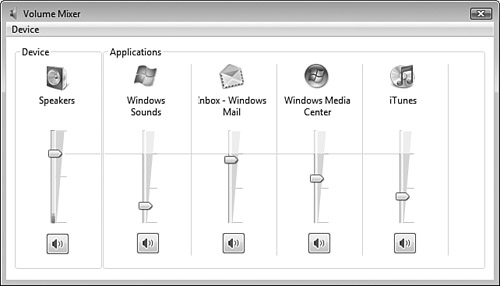
Figure 1
shows the new Volume window that appears when you click the Volume icon
in the notification area, and then click Mixer. The slider on the left
controls the speaker volume, so you can use it as a systemwide volume
control. The rest of the window contains the application mixer—this includes sliders and mute buttons for individual programs, and the program’s name and icon.

Note
How long an application’s slider remains in the
Volume Mixer window seems to depend on how often the application
accesses the audio stack. If a program just makes the occasional peep,
it will appear only briefly in the Volume Mixer and then disappear. If a
program makes noise fairly often, then it remains in the Volume Mixer
for much longer. So, for example, if you receive email messages all day,
you should always see the Windows Mail icon in the Volume Mixer.
In the old Volume Control tool, when you
adjusted the Master slider, the other volume sliders remained the same.
In the Vista Volume Control tool, when you move the speaker volume
slider, the program sliders move along with it. That’s a nice touch, but
what’s even nicer is that the speaker volume slider preserves the
relative volume levels of each program. So if you adjust the speaker
volume to about half its current level, the sliders in the application
mixer also adjust to about half of their current level.
Volume Control also remembers application
settings between sessions. So, if you mute Solitaire, for example, it
will remain muted the next time you start the program.
The new volume control also supports metering, in which the current audio output is displayed graphically on each slider (see Figure 7.3).
This metering appears as a green wedge that grows taller and wider the
louder the sound signal is. This is very useful for troubleshooting
audio problems because it tells you whether a particular program is
actually producing audio output. If you have no sound from a program but
you see the metering in program’s volume slider, the problem lies
outside of the program (for example, your speakers are turned down or
unplugged).
Note
Many notebook computers come with volume
controls that enable you to physically turn the computer’s speaker
volume up or down. Microsoft has talked about tying this physical volume
control into the Volume Control program so that if you turn down the
sound physically, the speaker volume slider would adjust accordingly.
This extremely useful feature was not implemented as I wrote this, but
it might appear in a later build of Windows Vista.
Sound Recorder
The Sound Recorder accessory first appeared in
Windows 95 and has remained a part of Windows ever since. Unfortunately,
the Sound Recorder in Windows XP is essentially the same program as the
original version, which means the program’s annoying limitations
haven’t changed, either:
Windows Vista comes with a completely new
version of Sound Recorder that does away with these limitations. For
example, you can save your recording using the Windows Media Audio (WMA) format, and there is no limit (other than available hard disk space) to the length of the recording.
Having no recording limit might sound dangerous
(long WAV files take up a lot of space), but the new Sound Recorder
captures WMA audio at a bit rate of 96Kbps, or about 700KB for a
one-minute recording. Compare this to a one-minute CD-quality recording
using the old Sound Recorder, which could easily result in a 10MB file!
Figure 2
shows the new Sound Recorder window (select Start, All Programs,
Accessories, Sound Recorder). Click Start Recording to begin your
recording; click Stop Recording when you’re done. Sound Recorder
displays the Save As dialog box so that you can choose the file
location, name, and format.

Audio Devices and Sound Themes
The Windows Vista replacement for the Control
Panel Sound and Audio Devices icon is the Sound dialog box (select
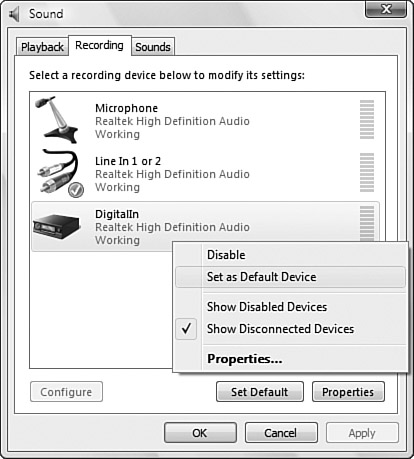
Start, Control Panel, Hardware and Sound, Sound), shown in Figure 3.

The
Playback and Recording tabs show the playback and recording devices on
your system. The first thing to notice is that you now have a visual
reminder of the default devices for playback and recording in the form
of a green check mark icon, shown in Figure 3.
The check mark means that the device is the default for all uses.
However, you can also designate a device as the default. As shown in Figure 3, you can right-click a device and then click Set as Default Device.
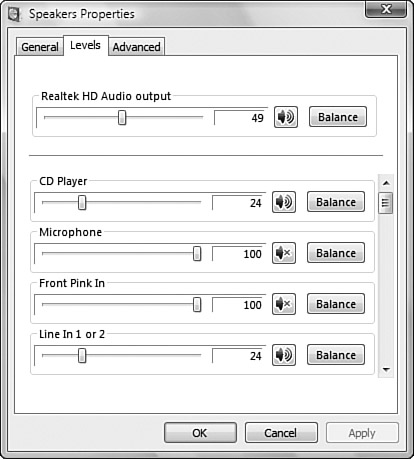
Windows Vista also implements a more extensive
collection of properties for each device. Double-clicking a device
displays a property sheet similar to the one shown in Figure 4.
The properties you see depend on the device. Here’s a summary of the
tabs you see when you open the default playback device (although note
that not all audio playback devices support all of these tabs):
General— Change the name and icon for the device and any jack information disclosed by the driver
Levels— Set the volume levels
Advanced— Set the default playback format and latency and options for allowing applications exclusive control over the device
