Adding and Removing Fields
When
viewing a query in Design view, you might decide to modify the fields
that you want to include in the query’s output. In other words, you
might want to add fields to or remove fields from the query grid. You
would do this if you have an existing query and you realize that it is
missing fields, if you have a new query and are adding fields for the
first time, or are working with an existing query and realize that you
no longer want to include a field in the query.
Adding a Field Between Other Fields
There are times when you need
to insert a field between two existing fields. To do so, you just drag
the field from the field list to the grid and drop it where you want it
to appear. The fields already included in the query then move over to
the right. For example, your query already contains City and Zip, and
you have decided to add the State field and place it between the City
and the Zip fields. You would drag the State field from the field list
to add it to the query.
Adding a Field to the End of the Query Grid
Sometimes you want to add a
field to the end of the list of existing fields. Fortunately, the
process is extremely easy. You just double-click in the field list on
the field that you want to add. Access adds the field at the end of the
existing field list. This is the technique that I use to add fields to a
new query as I build it. I generally double-click each field that I
want to add to the query. Access simply adds each field to the query
grid in the order that I select each field.
Adding a Group of Contiguous Fields to the Query Grid
It would be very tedious if
you had to add each field, one field at a time, to add a contiguous
group of fields from the field list to the query grid. Fortunately,
Access allows you to add the fields as a group. The process is simple:
This is a great technique to use when you are lucky because several of
the fields you want to include in the query appear together in the field
list:
1. | Click the first field that you want to add to the query.
|
2. | Scroll through the field list until you can see the last field that you want to add to the query.
|
3. | Hold down the Shift key as you click the last field that you want to add to the query.
|
4. | Drag the fields as a group to the query grid. The fields are placed on the query grid at the position where you dropped them.
|
Adding a Group of Noncontiguous Fields to the Query Grid
The process for adding a
noncontiguous group of fields from the field list to the query grid is
much simpler than adding the fields one at a time. You would add a
noncontiguous list of fields when there are several fields that you want
to add to the query, but they do not appear together in the field list.
Here’s what you do:
1. | Click the first field that you want to add.
|
2. | Hold down the Ctrl key as you click each additional field that you want to add.
|
3. | Drag
the fields to the query grid by clicking any of the selected fields and
dragging them to the query grid. Access adds the selected fields to the
query grid at the position at which you drop them. |
Modifying the Sort Order of a Query
You might want to modify the
sort order designated by the designer of a query. As described in the
following sections, you can sort on a single field or you can sort on
multiple fields and you can sort in ascending order or you can sort in
descending order. For example, you may want to sort in ascending order
by company name in a company table, but in descending order by sales
amount in a sales table so that the highest sales amount appears first.
An example where you may want to sort on multiple fields is employee
last name combined with employee first name.
Sorting on a Single Field
Sorting on a single field is a simple process. It works like this:
1. | Open the desired query in Design view.
|
2. | Click in the Sort row of the field you want to sort by.
|
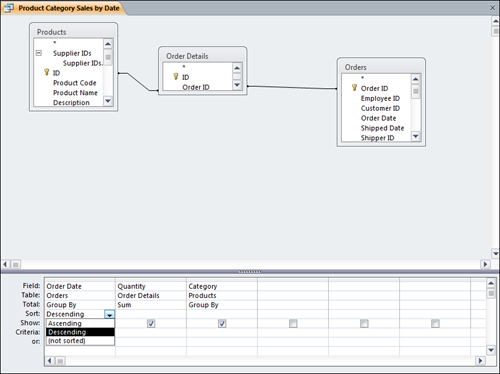
3. | Click the drop-down arrow button to display the choices for the sort order (see Figure 1).

|
4. | Select the sort order:
- Ascending— A to Z or 0 to 9
- Descending— Z to A or 9 to 0
- Not Sorted— No sorting
|
5. | Click the Run button. The data appears in the designated sort order.
|
Sorting on More Than One Field
The
process for sorting on more than one field is slightly more complicated
than the process of sorting on one field. It works like this:
1. | Repeat steps 1–4 in the previous section, “Sorting on a Single Field,” for the first field that you want to sort by.
|
2. | Click in the Sort row of the second field that you want to sort by.
|
3. | Click the drop-down arrow button to display the choices for sort order.
|
4. | Select the sort order.
|
5. | Click the Run button.
|
Moving a Field on the Query Grid
Access sorts the data in the
query grid from left to right, meaning that if the first name field
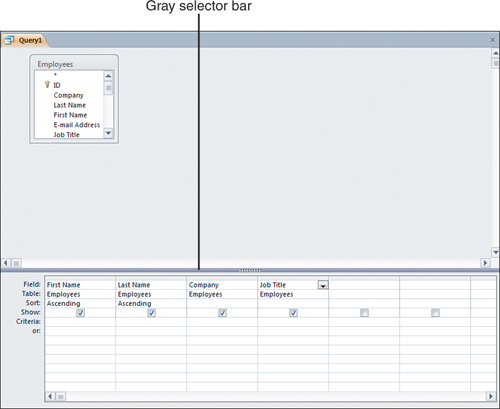
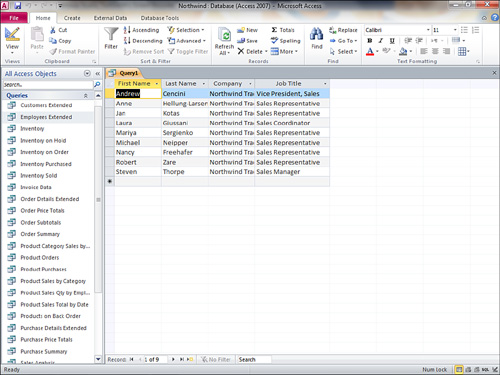
appears on the query grid before the last name field (see Figure 2), the data appears in order by first name and then within first name by last name (see Figure 3).
Because you probably want the data in order by last name and then by
first name, you need to move the Last Name field so that it appears
before the First Name field.


Use these steps to move a field on a query grid:
1. | Click the gray selector bar that contains the field name. This selects the entire column.
|
2. | Drag
the field to the new location. Access moves the field. (In this case,
the Last Name field is moved before the First Name field.)
|
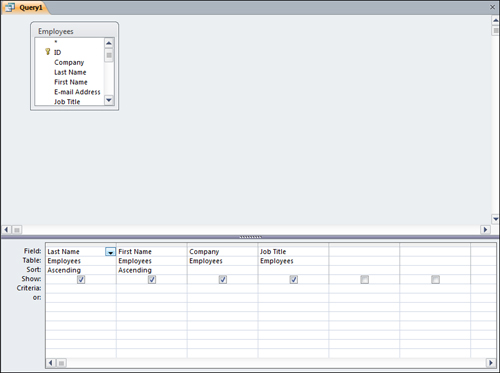
The resulting query grid is shown in Figure 4. The resulting output is shown in Figure 5.
