About Sections and Pages
One of the benefits of
OneNote over a paper-based notebook is that your electronic notebooks
have virtually no limit on the number of sections and pages that you can
create and use. As a notebook grows in size over time, you never need
to worry about transferring the information somewhere because you’ve
outgrown your notebook. In OneNote, each notebook can grow with the size
of the project or task it is associated with so you never run out of
room.
Another nice thing about
OneNote is the fact that it doesn’t force you to be organized. There’s
no note-taking system to learn or adhere to, and you can literally let
things fall as they may. OneNote won’t nag you to clean up your
notebooks.
Although
you don’t have to be terribly organized to use OneNote successfully, it
makes sense to at least give meaningful names to your sections and
pages, especially if you’re going to be using a notebook for a specific
project or goal. Section names and page titles are searchable, so the
more meaningful or descriptive they are in relation to the notes they’ll
contain, the easier and faster it will be for you to find specific
information within all of your notes.
Working with Notebook Sections
Let’s begin by learning the
basics about notebook sections. Whenever you create a new notebook, it
will automatically contain one section tab, and that section tab will
contain a single page. To begin using that first section, change its
name.
Naming and Renaming a Section
To name or rename a new notebook section, follow these steps:
1. | On
the navigation bar, click your “Using OneNote 2010” notebook,
right-click the section tab called New Section 1 and then click Rename.
|
2. | When the text in the section tab is highlighted, type a new name for the section. For this example, let’s call this section Trip Planning.
|
3. | Press Enter. The section is now called Trip Planning.
|
|
If you change your mind, you
can change the name of any section at any time. Just repeat the
preceding steps and type a different name.
|
If you already know how you will want to organize a new notebook, you can easily create additional sections at any time.
Creating a New Section
To create additional sections in your notebook, follow these steps:
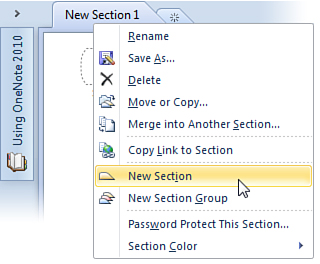
1. | Right-click any existing section tab in your notebook.
|
2. | On the menu that appears, click New Section (see Figure 1).
|
3. | While
the new section’s temporary name is highlighted, type a new name for
the section and then press Enter. A new section containing a blank,
untitled page is added to your notebook.
|
|
An even faster way to create a
new section is to click the small section tab with the little sparkle
icon, located just to the right of the last section tab at the top of
your notebook (see Figure 1).
|
Changing the Color of a Section Tab
OneNote randomly assigns a color to any new section you create. If you prefer, you can easily replace or remove a section color.
To replace a section color, follow these steps:
1. | Right-click the tab of the section whose color you want to change.
|
2. | On the menu that appears, click Section Color and then click the color you want to use for the selected tab.
|
|
The color you choose for a
section tab is also shown in the column where the page tabs appear. If
you don’t like a color you’ve chosen, simply repeat the previous steps
and make another choice. If you don’t like any of the available colors,
select None near the bottom of the menu.
|
Deleting a Section
If you no longer need a
section, you can delete it. If you delete a section from your notebook,
all of the pages and subpages in that section are also deleted.
To delete a section (and all of its pages and subpages), follow these steps:
1. | Right-click the tab of the section you want to delete.
|
2. | On the menu that appears, click Delete.
|
3. | When prompted whether you’re sure that you want to delete the section, click Yes.
|
Moving a Section Tab to a Different Location
Section tabs in OneNote can be
easily rearranged. This is useful when you want to reorganize or
prioritize information within your notebook.
To move a section tab, follow these steps:
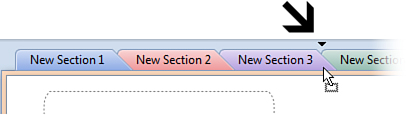
1. | Click the section tab you want to move and hold the left mouse button while dragging the tab to the left or the right.
|
2. | When the tab marker (a small, black, downward-facing arrow) appears in the location you want, release the mouse button (see Figure 2).
This covers the basics about sections, but there’s a lot more you can do
with them.
|