The Microsoft Exchange Server service in Outlook 2010 allows you
to use Outlook 2010 as a client for Exchange Server. Of all the
services supported by Outlook 2010, Exchange Server offers the
broadest range of functionality, providing excellent support for
collaboration, information sharing, group scheduling, and more.
Setting up an Exchange Server account in Outlook 2010 isn't
difficult, but it does require several steps, as follows:
If you are running Outlook 2010 for the first time, in the
Outlook 2010 Startup Wizard, go to the Choose E-Mail
Service page. To reach this page if you have run Outlook 2010
previously and your profile already includes a mail account, open
the Mail item from the Control Panel, select the profile, and then
choose Properties. Click E-Mail Accounts, and then click New on
the E-Mail tab in the Account Settings dialog box. If Outlook 2010
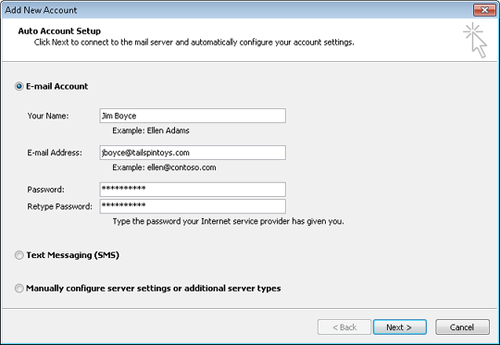
is already open, click File, Add Account. The Auto Account Setup page, shown in Figure 1, gives you a
place to specify your name, email address, and password. If
AutoDiscover is configured properly for your
Exchange Server environment, you can enter your name, email
address, and password as it is set on the server, click Next, and
have Outlook 2010 determine the necessary settings to connect to
your server. However, the following steps assume that you are not
able to use AutoDiscover and must configure the account
manually.

Note:
AutoDiscover requires that your computer be able
to resolve the autodiscover host in your domain. For example, if
your computer resides in the tailspintoys.com domain, your
computer must be able to resolve autodiscover.tailspintoys.com
to the servers on the tailspintoys.com network that are
providing AutoDiscover services. For more details on
AutoDiscover, see the Exchange Server 2010 documentation.
If you don't want to use AutoDiscover, choose Manually
Configure Server Settings Or Additional Server Types, and then
click Next. Choose Microsoft Exchange Or Compatible Service, and then
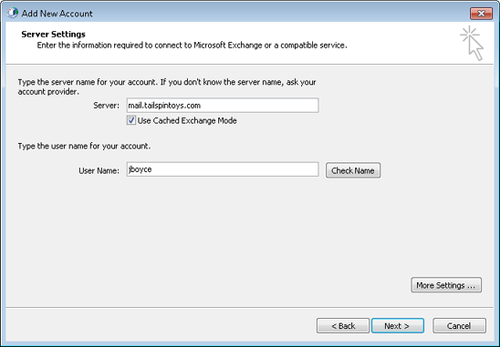
click Next. On the Server Settings page, shown in Figure 2, specify the
following information: Server Specify the
NetBIOS or Domain Name System (DNS) name of the
computer running Exchange Server, or its Internet Protocol
(IP) address. You don't have to include a double backslash
(\\) before the server name. Use Cached Exchange Mode
Select this check box to have Outlook 2010 create a locally
cached copy of your entire Exchange Server mailbox on your
local computer. Outlook 2010 creates an offline folder store
(.ost) file in which to store the mailbox and works from that
cached copy, handling synchronization issues
automatically. User Name Specify the
name of your mailbox on the server. You can specify your logon
account name or mailbox name. For example, you might use
chill or Chris Hill. Check Name After you
enter your logon or mailbox name, click Check Name to check
the specified account information against the information on
the server. If you specify your logon name, clicking Check
Name automatically changes the user name to your mailbox name.
Outlook 2010 indicates a successful check by underlining the
user name. If you are connecting to the server using Outlook Anywhere
(RPC over HTTP), do not click Check Name—you must configure
the connection first because Outlook 2010 must be able to
communicate with the server to check your name.

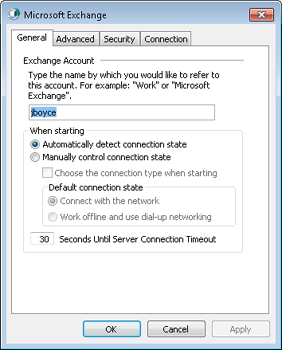
Click More Settings to open the Microsoft Exchange dialog
box, shown in Figure 3.

Use the information in the following sections to configure
additional settings if needed, and then click OK to close the
Microsoft Exchange dialog box. Click Next, and then click
Finish.
|