The background
is the color, texture, pattern, or image that is applied to the entire
slide (or slide master), on which everything else sits. By its very
definition, it applies to the entire surface of the slide; you cannot
have a partial background. However, you can have a background graphic
overlaid on top of the background. A background graphic is a graphic
image placed on the slide master that complements and works with the
background.
It's important to
understand the distinction between a background and a background graphic
because even though most themes contain both, they are set up
differently, and making the change you want to the overall appearance of
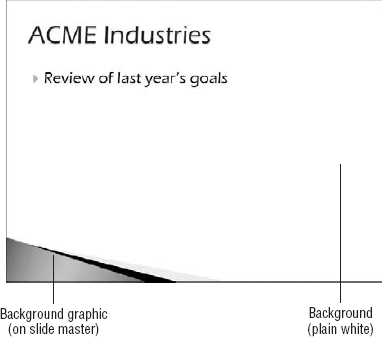
your slides often involves changing both. For example, Figure 1
shows the Concourse theme applied to a slide master. The slide
background is pure white, and a blue and black background graphic is
overlaid on it.

Most themes consist of both
background formatting (even if it is just a solid color) and a
background graphic. The background graphics included in the built-in
themes in PowerPoint are unique to those themes, and not available as
separate graphics outside of them. So, for example, if you want the
colored swoop shown in Figure 5-14,
the only way to get it is to apply the Concourse theme. Because the
decorative background graphics are unique to each theme, many people
choose a theme based on the desired background graphic, and then
customize the slide master's appearance to modify the theme as needed.
|
To use a background
graphic from one template with the look-and-feel of another, apply the
first theme to a slide, and then in Slide Master view copy the
background graphic to the clipboard. Then apply the second theme and
paste the graphic from the clipboard into the slide master.
|
|
1. Applying a Background Style
Background styles
are preset background formats that come with the built-in themes in
PowerPoint. Depending on the theme you apply, different background
styles are available. These background styles all use the color
placeholders from the theme, so their color offerings change depending
on the color theme applied.
To apply a background style, follow these steps:
(Optional)
To affect only certain slides, select them. (Or, to affect certain
layouts, go into Slide Master view and choose the layouts.)
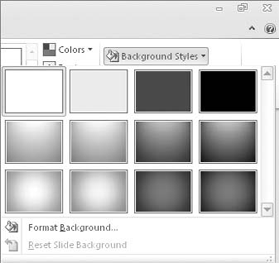
On the Design tab, click Background Styles. A gallery of styles appears, as shown in Figure 2.

Click
the desired style to apply it to the entire presentation.
Alternatively, you can right-click the desired style and choose Apply to
Selected Slides.
You cannot customize
background styles or add your own custom background styles; there are
always 12 of them, and they are always determined by the theme. If you
need a different background, you can choose Format Backgrounds and then
customize the background settings as described in the following
sections.
2. Applying a Background Fill
A custom background fill can include solid colors, gradients, textures, or graphics. This section covers how to specify your own background fill, which involves the following steps:
(Optional)
To affect only certain slides, select them.. (Or, to affect certain
layouts, go into Slide Master view and choose the layouts.)
On the Design tab, click Background Styles. The Background Styles gallery opens.
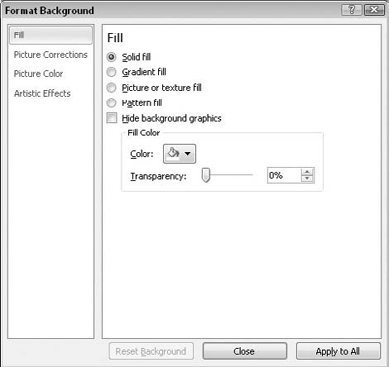
Click Format Background. The Format Background dialog box opens.
Choose the option button that best describes the type of fill you want. See Figure 3.
Set the options for the fill type that you chose. For example, in Figure 3, click the Color button and choose a solid color. The changes you make apply immediately.

(Optional)
To apply the change to all slides, click Apply to All. Otherwise the
change will apply only to the slides you selected in step 1.
(Optional)
To apply a different background to some other slides, select them and
repeat steps 4 and 5. The Format Background dialog box is non-modal, so
its changes are applied immediately and you can select things in the
presentation file without closing it.
Click Close to exit the dialog box.
3. Working with Background Graphics
In the preceding steps, one
of the fill types you could choose was Picture or Texture Fill. This
type of fill covers the entire background with the picture or texture
that you specify.
This is not a background graphic, however. A background graphic
is an object or a picture overlaid on top of the background on the
slide master. It complements the background, and it might or might not
cover the entire background.
NOTE
Some theme-provided background graphics actually consist of multiple shapes grouped together. You can ungroup them, so that you can modify or remove only a portion of the background graphic.
3.1. Displaying and Hiding Background Graphics
Sometimes a background graphic
can get in the way of the slide's content. For example, on a slide that
contains a large chart or diagram, a background graphic around the
border of the slide can overlap the content. You don't have to delete
the background graphic entirely to solve this problem; you can turn it
off for individual slides. To hide the background graphics on one or
more slides, follow these steps:
Select the slide or slides to affect.
On the Design tab, select the Hide Background Graphics check box.
Deselect the check box to redisplay the background graphics later as needed.
3.2. Deleting Background Graphics
The background graphics reside on the slide master, so to remove one, you must use Slide Master view. Follow these steps:
On the View tab, click Slide Master. Slide Master view opens.
Select the slide master or layout master that contains the graphic to delete.
Click the background graphic to select it.
Press the Delete key on the keyboard.
|
Some background graphics are on
the slide master itself, and others are on individual layout masters.
The background graphics on the slide master trickle down to each of its
layout masters, but can't be selected/deleted from the individual layout
masters.
To use a background
graphic only on certain layouts, cut it from the slide master to the
Clipboard (Ctrl+X), and then paste it individually onto each layout
master desired (Ctrl+V). Alternatively, turn on the background graphic
for the slide master and then use Hide Background Graphics on individual
layout masters that should not contain it.
|
|
3.3. Adding Your Own Background Graphics
You can add your own
background graphics, either to the slide master or to individual layout
masters. This works just like adding any other graphic to a slide, except you add it to the master instead of to an individual slide.
The basic steps for adding a background graphic:
Display the slide master or layout master on which you want to place the background graphic.
Do any of the following:
On the Insert tab, click Picture. Select a picture to insert and click Open.
On the Insert tab, click Clip Art. Search for a piece of clip art to use, and insert it on the master.
In
any application (including PowerPoint), copy any graphic to the
Clipboard by pressing Ctrl+C; then display the master and paste the
graphic by pressing Ctrl+V.
|
Most of the
background graphics that come with the built-in themes are either
semi-transparent or use one of the placeholder colors for their fill.
Therefore changing the color theme also changes the color of the
background graphic. Keep that in mind if you are creating your own
background graphics; it's better to use theme colors or transparency
than to use fixed colors that might clash with a color theme that you
later apply. |