Saving a Presentation as a Slide Show
When
you’re giving a professional slide show presentation, you might not
want your audience to see you start it from PowerPoint. Instead, you can
save a presentation as a PowerPoint Show to open directly into Slide
Show view. You can use the Save As dialog box to save a presentation as a
PowerPoint Show (.ppsx) or PowerPoint Macro-Enabled (.ppsm). After you
save a presentation as a PowerPoint Show file, you can create a shortcut
to it on your desktop and then simply double-click the PowerPoint Show
file to start it directly in Slide Show view. You need the Microsoft
PowerPoint Viewer—available free online at www.microsoft.com—or PowerPoint software installed on your computer to display the slide show.
Save a Presentation as a PowerPoint Show
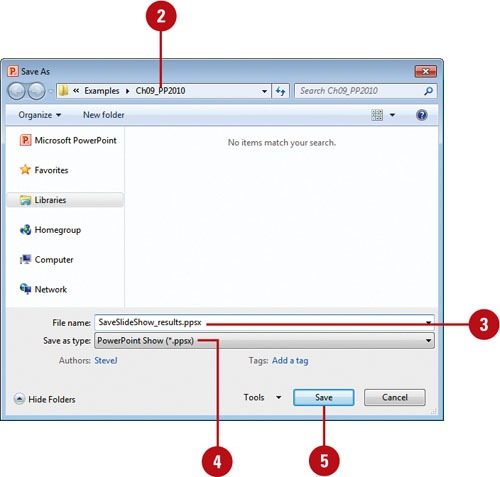
 Click the File tab, and then click Save As.
- You can also click the File tab, click Save & Send, click Change File Type, and then click PowerPoint Show (*.ppsx).
 Click the Save in list arrow, and then click the drive or folder where you want to save the file.
 Type a presentation show file name.
 Click the Save as type list arrow, and then click PowerPoint Show (*.ppsx) or PowerPoint Macro-Enabled Show (*.ppsm).
 Click Save.

Saving a Presentation as a Video
Sometimes
sharing a presentation as a video is the best approach. In PowerPoint,
you can save a complete presentation, including slide timings and
narration, as a Windows Media Video (.wmv). After you save a
presentation as a video file, you can share it with others on a Web
site, DVD, or network. It’s a single file that you can run on most
computers. If you need the video in a different video format, you need
to use a third-party conversation software to convert the Windows Media
Video file into another video format, such as MP4 or QuickTime.
Save a Presentation as a Video
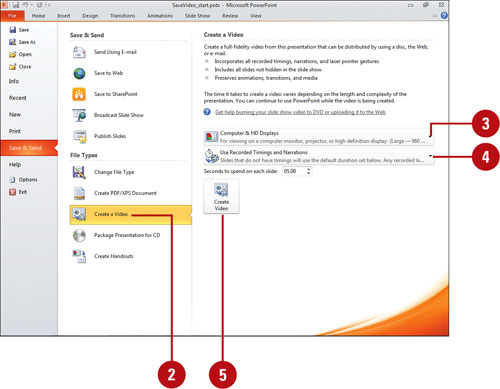
 Click the File tab, and then click Save & Send.
 Click Create a Video.
 Click the Resolution list arrow, and then select any of the following:
- Computer & HD Displays. Creates for large screen (960 × 720).
- Internet & DVD. Creates for medium screen (640 × 480).
- Portable Devices. Creates for small screen (320 × 240).
 Click the Timing list arrow, and then click Don’t Use Recorded Timings and Narrations or Use Recorded Timings and Narrations, and then specify a time.
 Click the Create Video button.
 Specify a name and location for the video.

 Click Save.