IT tutorials
 
Office
 

Microsoft OneOnte 2010 : Creating Sections & Creating Section Groups

- Free product key for windows 10
- Free Product Key for Microsoft office 365
- Product Key Free : Microsoft Office 2019 – Serial Number
10/6/2011 6:11:12 PM

1. Creating Sections

Within a notebook, create a section for each topic you want to address. Use these techniques to create a section:

  • Click the Create a New Section button (located to the right of the section tabs).

  • Press Ctrl+T.

  • Right-click a section or notebook name and choose New Section.

After you create a section, enter a name for it on the section tab. When you create a new section, OneNote creates the first page in the section automatically.

1.1. Create a Section

  1. Click the Create a New Section button (or press Ctrl+T).

  2. Enter a name for the section and press Enter.
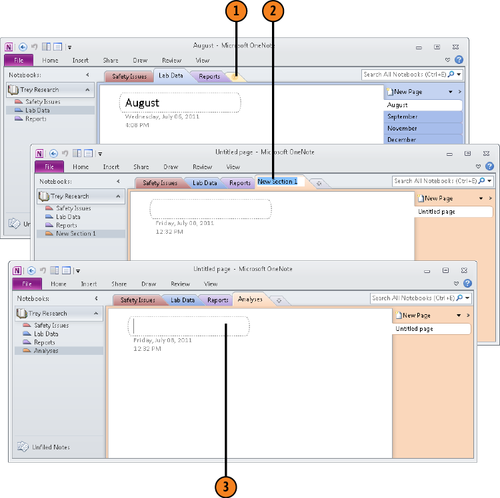
  3. Enter a page name.


Tip:

To rename a section, double-click its name in the section tab and type a new name.


Tip:

To change the position of sections on the Navigation bar or section tabs, drag a section. On the Navigation bar, drag a section name up or down; on the section tabs, drag a section tab left or right.


Note:

Try This!

Each section you create is stored in a Microsoft OneNote Section (.one) file in the notebook folder where data about your notebook is kept. To see the path to this file, move the pointer over a section tab. A ScreenTip shows the section name and path to its .one file.

2. Creating Section Groups

Think of a section group as a subfolder for storing sections. In the Navigation bar and section tabs, section groups always appear after sections. Place sections in a section group to organize sections better.

To create a section group, right-click a section tab or section in the Navigation bar and choose New Section Group. Then enter a name for the group.

After you create a section group, you can create sections for it or move sections into it.

On the Navigation bar and section tabs, section group names are marked with the section group icon, some stacked folders.

To open a section group, click its name on the Navigation bar or section tabs. After you open a section group, you see only section tabs belonging to the group in the section tabs area. Use these techniques to see all the sections in the notebook rather than the sections in a group:

  • Click the Navigate to Parent Section Group button (located to the left of the section group name in the section tabs).

  • Click a parent section in the Navigation bar.

2.1. Create a Section Group

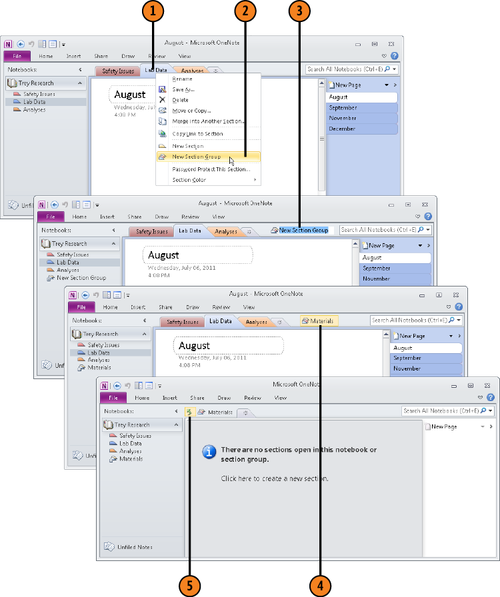
  1. Right-click a tab.

  2. Choose New Section Group on the shortcut menu.

  3. Enter a name and press Enter.

  4. Select the section group tab.

  5. Click Navigate to Parent Section Group.

 
Others
 
- Facilitating Your Plan with Microsoft Project 2010
- Microsoft Project 2010 : Understanding Project Management Basics
- Microsoft Access 2010 : Working with Table Data
- Microsoft Access 2010 : Working with an Existing Database
- Microsoft Visio 2010 : Sharing and Publishing Diagrams - Saving in Other File Formats
- Microsoft Visio 2010 : Sharing and Publishing Diagrams - Creating Graphics
- Microsoft Word 2010 : Customizing Word - Setting Editing Options
- Microsoft Word 2010 : Customizing Word - Setting Print Options
- Microsoft PowerPoint 2010 : Presenting a Slide Show - Annotating a Slide Show
- Microsoft PowerPoint 2010 : Presenting a Slide Show - Navigating a Slide Show
 
 
Top 10
 
- Microsoft Visio 2013 : Adding Structure to Your Diagrams - Finding containers and lists in Visio (part 2) - Wireframes,Legends
- Microsoft Visio 2013 : Adding Structure to Your Diagrams - Finding containers and lists in Visio (part 1) - Swimlanes
- Microsoft Visio 2013 : Adding Structure to Your Diagrams - Formatting and sizing lists
- Microsoft Visio 2013 : Adding Structure to Your Diagrams - Adding shapes to lists
- Microsoft Visio 2013 : Adding Structure to Your Diagrams - Sizing containers
- Microsoft Access 2010 : Control Properties and Why to Use Them (part 3) - The Other Properties of a Control
- Microsoft Access 2010 : Control Properties and Why to Use Them (part 2) - The Data Properties of a Control
- Microsoft Access 2010 : Control Properties and Why to Use Them (part 1) - The Format Properties of a Control
- Microsoft Access 2010 : Form Properties and Why Should You Use Them - Working with the Properties Window
- Microsoft Visio 2013 : Using the Organization Chart Wizard with new data
Technology FAQ
- Is possible to just to use a wireless router to extend wireless access to wireless access points?
- Ruby - Insert Struct to MySql
- how to find my Symantec pcAnywhere serial number
- About direct X / Open GL issue
- How to determine eclipse version?
- What SAN cert Exchange 2010 for UM, OA?
- How do I populate a SQL Express table from Excel file?
- code for express check out with Paypal.
- Problem with Templated User Control
- ShellExecute SW_HIDE
programming4us programming4us