1. Understanding Animation and Transitions
Like most of PowerPoint’s capabilities, animation can
be either simple or complex. It all depends on how creative and
sophisticated you want to make your presentation. Animation can
definitely enliven any presentation, but as with any special effect, be
careful not to overdo it. Too much animation can actually detract from
your presentation. Animation also increases presentation file size.
PowerPoint offers two main ways to animate and add motion to your presentation, as follows:
Slide transitions—
Determine how to change from one slide to the next in your
presentation. By default, when you move from one slide to another, the
next slide immediately appears. With animation, you can make the old
slide fade away to reveal the new slide or make the new slide move down from the top of the screen to cover the old slide.
Text and object animation—
Animate PowerPoint objects, such as text or shapes, using directional
effects similar to slide transitions. For example, you can use an
animation to wipe title text into your presentation. You can also
specify more sophisticated animation options, such as the order and
timing of multiple animation objects in one slide.
2. Setting Slide Transitions
Setting slide transitions is one of the most
common animation effects. You can apply a slide transition to the
entire presentation or just to the current slide. PowerPoint offers a
variety of transition options ranging from subtle to dynamic, including
the capability to fade, wipe, reveal, or even introduce a slide with a
honeycomb effect. If you aren’t familiar with these effects, you can try
them out on your slides before applying them. Most transitions enable
you to choose a direction as well. For example, you can wipe up, down,
left, or right.
As with so many PowerPoint features, use restraint
with slide transitions. For the most professional results, choose one
transition to use for every slide in a presentation. Or if you want to
highlight one or two particular slides, you can apply just the right
transition to those, but don’t apply custom transitions to the remaining
slides. Too many different transitions can make your presentation
confusing and inconsistent, detracting from your message.
Setting Up Presentation Slide Transitions
To set up slide transitions, follow these steps:
1. | Select
the slides to which you want to apply the transition in either Slide
Sorter view or on the Slides tab of Normal view. To select all slides,
press Ctrl+A.
|
2. | On the Transitions tab, choose one of the transitions that appears in the Transition to This Slide group.
|
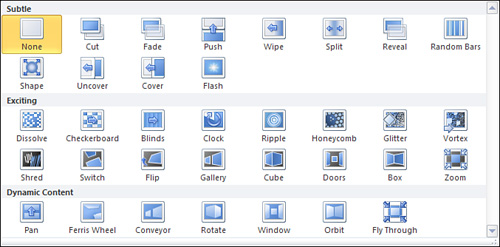
3. | For
more options, click the down arrow in the lower-right corner of the
group, and choose one of the transitions from the Transitions gallery. Figure 1 illustrates this gallery.
|
4. | Click
the Effect Options button to open a gallery of effects that determine
the direction your transition moves, such as from the top or from the
bottom-right. Options vary based on the transition you select, and each
includes an image that illustrates the direction.
|
5. | To
add a sound effect to your transition, select a sound from the Sound
drop-down list. If you want to use a sound stored on your computer,
choose Other Sound from the drop-down list to open the Add Audio dialog
box, select the sound to use, and click the Open button. If you want the
sound to continue playing until the presentation encounters another
sound file, select the Loop Until Next Sound option on the drop-down
menu.
|
Use sounds sparingly on slide transitions. They can unintentionally generate laughter or even annoyance in your audience.
|
|
6. | Select the amount of time (in seconds) you want the transition to take introducing each slide in the Duration field.
|
7. | Select
the On Mouse Click check box to advance to the next slide when you
click the mouse or press a key such as the spacebar, Enter, Page Up, or
Page Down. This is selected by default.
|
8. | If
you would rather have PowerPoint automatically change to the next slide
after a specified amount of time, select the After check box and enter a
specific time, in minutes and seconds, in the field beside it. Any
timings you’ve already added to your slide show display in this box.
|
9. | To preview your transitions, click the Preview button on the left side of the Transitions tab.
|
10. | Click the Apply to All button to apply the transitions to all slides in your presentation. |