|
Exchange maintenance and configuration tasks can be accomplished
utilizing either the Exchange Management Console or the Exchange
Management Shell. For simple, infrequent tasks, the GUI interface of
the Exchange Management Console will likely be the easiest and most
convenient interface to use. But for repetitive or frequently occurring
tasks, the command-line interface of the Exchange Management Shell will
prove very useful.
However, you should keep
in mind that although every task that can be accomplished in the
console can be accomplished in the shell, this does not go both ways.
Many configurations and settings cannot be accessed from the console
and can only be implemented utilizing the Exchange Management Shell.
1. Creating User Mailboxes
The
creation of a new user mailbox, either for an existing user or in
conjunction with the creation of a new user, is one task that can be
accomplished either from the Exchange Management Console or from the
Exchange Management Shell.
Creating a New Mailbox in the Exchange Management Console
Using the GUI interface is easy and familiar to those who have worked with previous versions of Exchange. To do so:
1. | Start the Exchange Management Console.
| 2. | In the console tree, click the Recipient Configuration node.
| 3. | In the action pane, click New Mailbox. The New Mailbox Wizard appears.
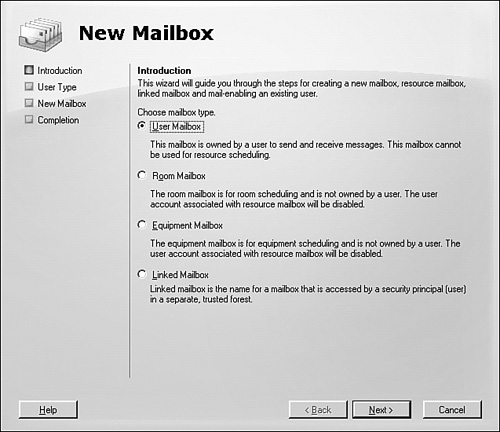
| 4. | On the Introduction page shown in Figure 1, click User Mailbox, and then click Next.

Note
Exchange
Server 2007 addresses several shortcomings of previous versions in the
area of resource management. When creating a Room or Equipment
mailboxes, the mailbox no longer needs to be owned by a user. There is
an associated user account with these resources, but the account is
disabled automatically when the resource mailbox is created.
| 5. | On the User Type page, click New User, and then click Next.
| 6. | On the Mailbox Information page, complete the following fields:
- Organizational Unit—
By default, the New Mailbox Wizard displays the Users container in
Active Directory. To change the default organizational unit (OU), click
Browse, and then select the OU you want.
- First Name— Type the first name of the user. This field is optional.
- Initials— Type the initials of the user. This field is optional.
- Last Name— Type the last name of the user. This field is optional.
- User Name— By default, this field is populated with the user’s first name, initials, and last name. You can modify the name in this field.
- User Logon Name (pre-Windows 2000)—
Also known as the Security Account Manager Account Name
(SAMAccountName), this name is used for Windows Internet Naming Service
(WINS) name resolution and must be unique within the domain. Typically,
the pre-Windows 2000 user logon name is the same as the user principal
name (UPN). This field is required.
- User Logon Name (User Principal Name)—
The name that the user will use to log on to the mailbox. The user
logon name consists of a username and a suffix. Typically, the suffix
is the domain name in which the user account resides.
- Display Name— By default, this field is populated with the user’s first name, initials, and last name. You can modify the name in this field.
- Password— Type the password that the user must use to log on to his mailbox.
- Confirm Password— Retype the password that you entered in the Password field.
- User Must Change Password at Next Logon— Select this check box if you want the user to reset the password.
| 7. | Click Next.
| 8. | On the Mailbox Settings page, complete the following fields:
- Alias—
By default, this field is populated with the user’s first and last
name, with no space between the names. You can modify the alias in this
field.
- Server— To change the default server, select the server you want from this list.
- Storage Group— To change the default storage group, select the storage group you want from this list.
- Mailbox Database— To change the default mailbox database, select the mailbox database you want from this list.
- ELC Mailbox Policy—
To specify an email life cycle (ELC) policy, select this check box, and
then click Browse to select the ELC mailbox policy to be associated
with this mailbox. For example, use this option if you want this
mailbox to adhere to an ELC policy such as the retention period for the
mailbox data. This is an optional field.
- Exchange ActiveSync Mailbox Policy—
To specify an Exchange ActiveSync mailbox policy, select this check
box, and then click Browse to select the Exchange ActiveSync mailbox
policy to be associated with this mailbox. This is an optional field.
| 9. | Click Next.
| 10. | On
the New Mailbox page, review the Configuration Summary. To make any
configuration changes, click Back. To create the new mailbox, click New.
| 11. | On
the Completion page, the summary states whether the mailbox was
successfully created. The summary also displays the Exchange Management
Shell command that was used to create the mailbox.
| 12. | Click Finish.
|
Creating a New Mailbox in the Exchange Management Shell
Although
there is no GUI interface in the Exchange Management Shell, tasks like
the creation of a new user mailbox can be quickly accomplished with a
single command line. However, bear in mind that there are many options
when creating a new user account and mailbox, and the command necessary
can be extremely complex.
The
following is a sample Exchange Management Shell command that was
automatically generated by the Exchange Management Console during a
routine user and mailbox creation:
New-Mailbox -Name:'Jack Y. Reddy' -Alias:'jyreddy' -OrganizationalUnit:
'COMPANYABC.COM/Users' -Database:'CN=Mailbox Database,CN= First Storage Group,CN=InformationStore,
CN=VMW-EXCHANGE1, CN=Servers,CN=Exchange Administrative Group (FYDIBOHF23SPDLT),
 CN=Administrative Groups,CN=335A1087-5131-4D45-BE3E-3C6C7F76F5EC, CN=Microsoft Exchange,
CN=Services,CN=Configuration, DC=COMPANYABC,DC=COM' -UserPrincipalName:'[email protected]'
-SamAccountName:'jyreddy' -FirstName:'Jack' -Initials:'Y' -LastName:'Reddy'
-Password:'System.Security.SecureString' -ResetPasswordOnNextLogon: $false
|