IT tutorials
 
Technology
 

InfoPath with SharePoint 2010 : Enhancing the User Experience - Make Screen Tips Informative for Validation, Notify the User of Successful Submission

9/29/2013 7:38:35 PM
- Free product key for windows 10
- Free Product Key for Microsoft office 365
- Malwarebytes Premium 3.7.1 Serial Keys (LifeTime) 2019

1. Make Screen Tips Informative for Validation

Scenario/Problem:You have fields on your form that have validation rules that require screen tip text.

Solution:Include the format that the field needs to conform to in the screen tip.

When using validation rules , the entered values must conform to the configured pattern. If users do not know the format expected, they can become frustrated, and you don’t want to leave them guessing.

Therefore, it is a recommended best practice to include the required format (of the value) within the screen tip to provide the user with the expected entry pattern, as shown in Figure 1.
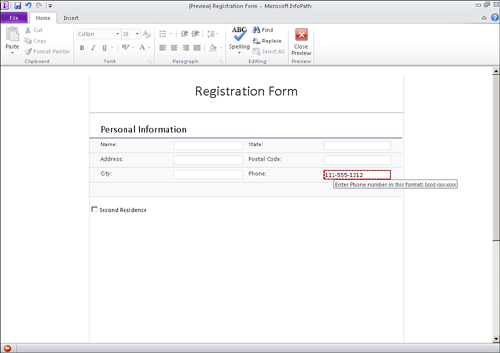
Figure 1. Including the required format of the value provides the user with expected entry pattern.

2. Notify the User of Successful Submission

Scenario/Problem:You want to notify the user that the form has been submitted successfully.

Solution:Use a confirmation view to notify the user of a successful submission.

After submitting a form, the user may or may not know that the information has been successfully received by SharePoint. Therefore, it is a best practice to create a confirmation view that is displayed after form submission.

The first steps required to create and configure a confirmation view is to set up the submit options:

1.
On the Data ribbon bar, click Submit Options. The Submit Options dialog appears.

2.
In the Submit Options dialog, select the Perform Custom Actions Using Rules option, as shown in Figure 2, to configure the submission of the form.
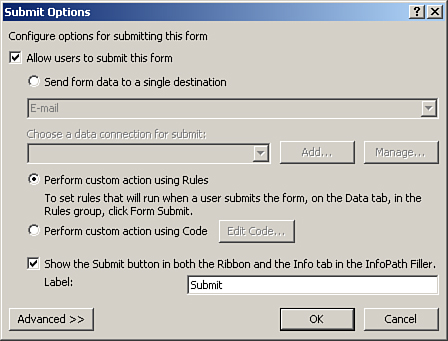
Figure 2. Submit options allow you to configure the submission of the form.


3.
For this example, click the Advanced button and change the After Submit to Leave the Form Open, as shown in Figure 3, to configure what occurs after submission.
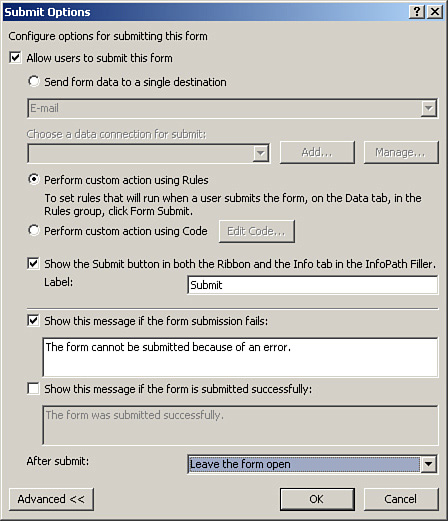
Figure 3. The After Submit option configures what occurs after submission.


4.
Click OK.

That takes care of the submit options, but now you need to configure the form submit rule. For this example, you will need to create a new view named Confirmation View, which should contain a submit confirmation message and a button that closes the form.

To enter the submit rule, follow these steps:

1.
On the Data ribbon bar, click Form Submit in the Rules section. The Rules pane appears.

2.
Click New and select Action.

3.
Enter Submit Form as the name of the rule.

4.
Click Add and select Submit Data. The Rule Details dialog appears, as shown in Figure 4, which allows you to configure the connection.
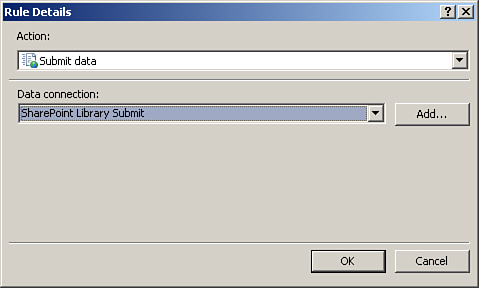
Figure 4. Configuring the connection determines where it will be submitted.


5.
Select the data connection to submit the form.Click OK. Your submit rule should look similar to Figure 5, which ensures the form will be submitted.
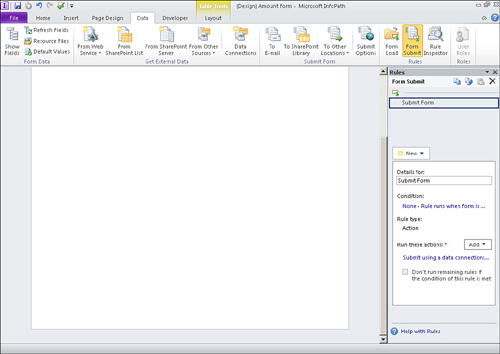
Figure 5. Configuring one rule to submit the form ensures it will be submitted.

6.
Click Add again to add another action. Select Switch Views. In the Rules Details dialog, change the view to the Confirmation View, as shown in Figure 6, to determine which view to be displayed. Click OK. Your form submit rule should now look similar to Figure 7, which implements two actions upon form submission.
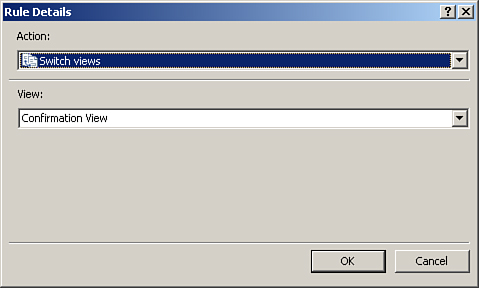
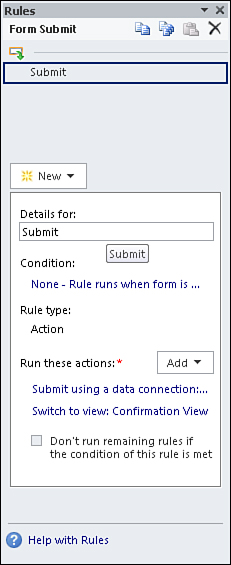

Figure 6. Selecting a view determines which one will be displayed.


Figure 7. The form submit rule implements two actions upon form submission.


7.
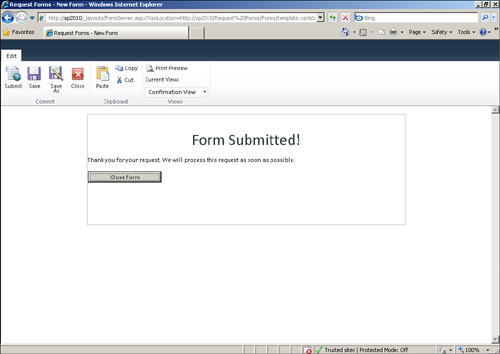
Save and Publish your form to SharePoint. Once your form is published to SharePoint, you may create a new instance and test the rules. Submitting the form displays the confirmation view, as shown in Figure 8.

Figure 8. Submitting the form displays the confirmation view.
 
Others
 
- InfoPath with SharePoint 2010 : Enhancing the User Experience - Configure Dynamic Sections
- InfoPath with SharePoint 2010 : Enhancing the User Experience - Display a Read-Only Value
- Windows 7 : Using a Windows Network - Sharing Resources (part 2) - Sharing Folders Independently
- Windows 7 : Using a Windows Network - Sharing Resources (part 1) - Sharing with a Homegroup
- Windows 7 : Using a Windows Network - Network Power User Topics (part 2) - Mapping Drive Letters
- Windows 7 : Using a Windows Network - Network Power User Topics (part 1) - Understanding the UNC Naming Convention
- Windows 7 : Using Printers on the Network
- Sharepoint 2013 : Automating tasks with workflows - Starting workflows on documents, Checking the status of a running workflow
- Sharepoint 2013 : Automating tasks with workflows - Associating workflows with content types
- Sharepoint 2013 : Automating tasks with workflows - Associating workflows with lists
 
 
Top 10
 
- Microsoft Visio 2013 : Adding Structure to Your Diagrams - Finding containers and lists in Visio (part 2) - Wireframes,Legends
- Microsoft Visio 2013 : Adding Structure to Your Diagrams - Finding containers and lists in Visio (part 1) - Swimlanes
- Microsoft Visio 2013 : Adding Structure to Your Diagrams - Formatting and sizing lists
- Microsoft Visio 2013 : Adding Structure to Your Diagrams - Adding shapes to lists
- Microsoft Visio 2013 : Adding Structure to Your Diagrams - Sizing containers
- Microsoft Access 2010 : Control Properties and Why to Use Them (part 3) - The Other Properties of a Control
- Microsoft Access 2010 : Control Properties and Why to Use Them (part 2) - The Data Properties of a Control
- Microsoft Access 2010 : Control Properties and Why to Use Them (part 1) - The Format Properties of a Control
- Microsoft Access 2010 : Form Properties and Why Should You Use Them - Working with the Properties Window
- Microsoft Visio 2013 : Using the Organization Chart Wizard with new data
Technology FAQ
- Is possible to just to use a wireless router to extend wireless access to wireless access points?
- Ruby - Insert Struct to MySql
- how to find my Symantec pcAnywhere serial number
- About direct X / Open GL issue
- How to determine eclipse version?
- What SAN cert Exchange 2010 for UM, OA?
- How do I populate a SQL Express table from Excel file?
- code for express check out with Paypal.
- Problem with Templated User Control
- ShellExecute SW_HIDE
programming4us programming4us