2. Creating Software Update Points
Software
update points play a key role in the process of distributing updates to
clients. They do not actually deliver the update files to clients like
a standalone WSUS server; rather, they download the update catalog from
Microsoft (or another upstream WSUS server) and make the update catalog
available to clients for compliance scanning. Therefore, adding at
least one SUP is required to enable software updates. Adding an SUP as
a role to a site system is similar to adding any ConfigMgr role to any
other site system. To do so, perform the following steps:
1. | In the ConfigMgr console, start by navigating to Site Database -> Site Management -> <Site Code> <Site Name> -> Site Settings -> Site Systems.
If
the system running WSUS is not currently a site system, right-click
Site Systems and then choose New -> Server to launch the New Site
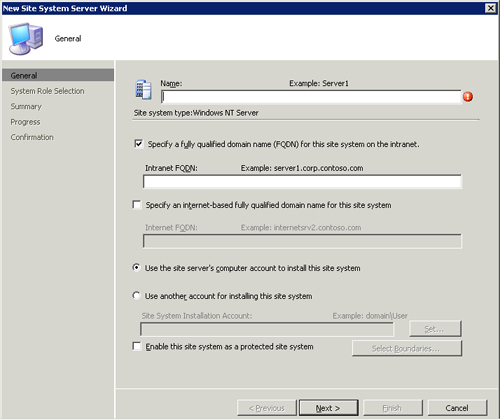
System Server Wizard, displayed in Figure 3. Enter the name of the site system and the intranet accessible Fully Qualified Domain Name (FQDN) of the WSUS server.

If
the WSUS server already is a ConfigMgr site system, right-click it and
choose New Roles. This launches the New Site Role Wizard, which looks
and acts exactly like the New Site System Server Wizard, except this
wizard fills in the site system name and intranet FQDN for you.
|
2. | For either wizard, choose Next and then choose Software update point from the list of available site roles.
|
3. | At
the Software Update Point screen, enter the applicable proxy server
information for your environment, including credentials if necessary.
WSUS uses these credentials to contact Microsoft or an upstream WSUS
server to retrieve the update catalog.
|
4. | For Active Software Update Point Properties, choose whether this SUP will be the active SUP for the site.
There can only be one active SUP per site. An active SUP is responsible
for synchronizing the updates catalog for the site from the parent
site’s SUP or from Microsoft if the site is the central site. Active
SUPs are also responsible for communication with client systems that
request the update catalog in the site where the SUP is designated
active. Although it is possible to configure nonactive SUPs in any
site, the only time you would not make an SUP the active SUP is if you
are configuring a node to be part of an NLB SUP. It is also possible to
create a nonactive SUP for redundancy purposes, although SUPs do not
store any critical data you cannot easily replace (so maintaining
nonactive SUPs may be considered excessive, based on your particular
requirements).
Configure the ports used by WSUS. If you used the default IIS site,
these should be 80 and 443; if you used a custom site, they should be
8530 and 8531.
|
5. | At the Synchronization Source screen, choose from where to synchronize the update catalog:
- Microsoft Update—
This setting is used for the active SUP that is highest in the
ConfigMgr site hierarchy; typically, this is the active SUP for the
central site.
- An upstream update server—
This setting is used for down-level child SUPs in the site hierarchy
and Internet-based SUPs. SUPs configured with this setting configure
their respective WSUS services to synchronize their updates from their
parent site.
- Do not synchronize from Microsoft Update or an upstream update server—
Configuring this setting on an SUP causes it not to synchronize
automatically with any other SUP. To add updates to an SUP configured
with this setting, you must manually export the updates from another
WSUS system and then manually import them using WSUSutil and the export
and import options.
By default, WSUSutil.exe is located at %ProgramFiles%\Update Services\Tools. The syntax for the export command is WSUSutil.exe export <exportfile> <logfile>, where <exportfile> is the name of a .cab file to export the update metadata to and <logfile> is the name of a log file to write a record of the exported metadata to. The syntax for the import command is WUSutil.exe import
<packagename> <logfile>.
Additionally, you must copy the WSUSContent folder from the source
server to the destination server. This folder, typically located at <WSUSInstallationDrive>\WSUS\WSUSContent\, contains license terms and potentially other downloaded content referenced by the transferred metadata.
The wizard also asks you to choose whether to send reporting events to
WSUS. This is generally not required and you can leave it disabled.
|
6. | At
the Synchronization Schedule screen, configure whether you want to
enable synchronization on a schedule, and if so how often and when to
update the catalog from the configured source.
The
default simple schedule of every 7 days is usually sufficient; you do
not need to change it unless there is a specific reason to do so. If
you need detailed control over the download schedule, including the
frequency and exact time of day, choose and configure a custom schedule.
|
7. | Proceed
to the Update Classifications screen. Microsoft categorizes updates in
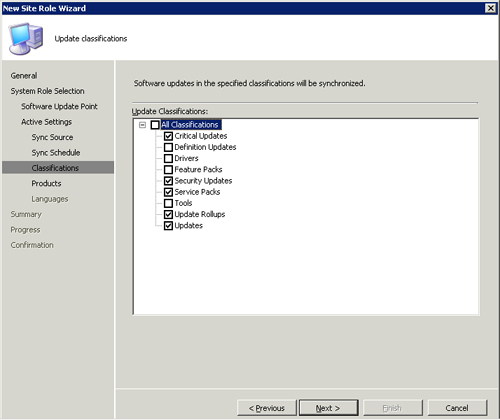
the catalog by classification. This page of the wizard, shown in Figure 4, allows you to choose all the update classifications you wish to scan for and deploy.

|
8. | At
the Products screen, choose the Microsoft products to include in the
update catalog that WSUS will download. You can specify nearly every
Microsoft server product and most Microsoft desktop products. By
default, the nodes chosen include Microsoft Office and Microsoft
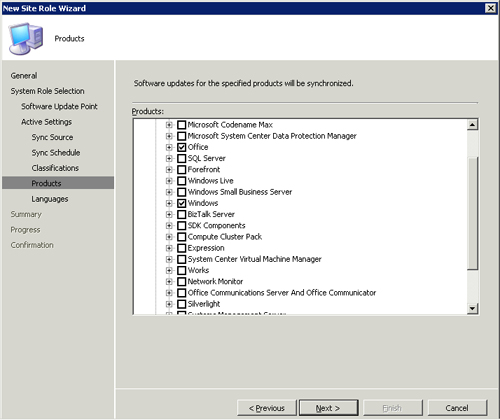
Windows products, as displayed in Figure 5. This list is not initially complete, and it is updated with additional products the first time WSUS synchronizes.

|
9. | Many
Microsoft products are available in a variety of languages and require
patches specific to their language. On the Languages page of the
wizard, choose the language(s) in which ConfigMgr will download update
files and summary details.
|
Only
steps 1–4 are applicable for child sites. ConfigMgr automatically
configures SUPs in child sites to use the SUPs in their parent site as
an upstream WSUS server. The child SUP downloads its entire
configuration from the upstream/parent SUP as well as the update
catalog. This is not configurable.
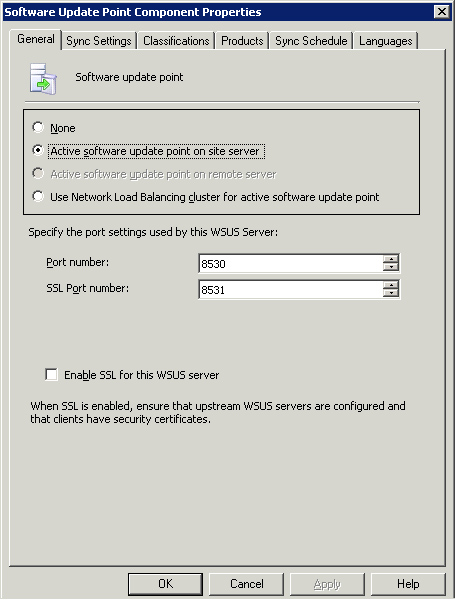
To review or change any of these settings after installing the SUP, navigate to Site Management -> <Site Code> <Site Name>
-> Site Settings -> Component Configuration in the ConfigMgr
console. Right-click Software Update Point Component in the right pane
and then choose Properties to launch the Software Update Point
Component Properties dialog box displayed in Figure 6.

After you complete the wizard, ConfigMgr installs three primary components related to WSUS, as described in Table 1. These components immediately go to work; if you configured everything correctly, the synchronization process will begin.
Table 1. WSUS Components
| Component Name | Purpose | Log Name |
|---|
| WSUS Control Manager | Controls the connection to WSUS and ensures ConfigMgr can communicate with WSUS | WSUSCtrl.log |
| WSUS Configuration Manager | Ensures WSUS is configured according to the settings you specified | WCM.log |
| WSUS Sync Manager | Monitors the synchronization status and progress of WSUS and imports the update catalog from WSUS to ConfigMgr | wsyncmgr.log |