3. Protecting Yourself Against Email Viruses
By far the most productive method for viruses to
replicate is the humble email message. The list of email viruses and
Trojan horses is a long one, but most of them operate more or less the
same way: They arrive as a message attachment, usually from someone you
know. When you open the attachment, the virus infects your computer and
then, without your knowledge, uses your email client and your address
book to ship out messages with more copies of itself attached. The
nastier versions also mess with your computer by deleting data or
corrupting files.
You can avoid infection by one of these viruses by implementing a few common sense procedures:
- Never open an attachment that comes from someone you don’t know.
- Even
if you know the sender, if the attachment isn’t something you’re
expecting, assume that the sender’s system is infected. Write back and
confirm that the sender emailed the message.
- Some
viruses come packaged as scripts hidden within messages that use the
Rich Text (HTML) format. This means that the virus can run just by your
viewing the message! If a message looks suspicious, don’t open it—just
delete it. (Note that you’ll need to turn off your email client’s
Preview pane before deleting the message. Otherwise, when you highlight
the message, it appears in the Preview pane and sets off the virus. In
Windows Mail, select View, Layout, deactivate the Show Preview Pane
check box, and click OK. If you’re using Windows Live Mail, select
View, Layout, deactivate the Show the Reading Pane check box, and click
OK.)
Caution
It’s particularly important to turn off the Preview
pane before displaying your email client’s Junk E-Mail folder. Because
many junk messages also carry a virus payload, your chances of
initiating an infection are highest when working with messages in this
folder.
- Install a top-of-the-line antivirus program,
particularly one that checks incoming email. In addition, be sure to
keep your antivirus program’s virus list up-to-date. As you read this,
there are probably dozens, maybe even hundreds, of morally challenged
scumnerds designing even nastier viruses. Regular updates will help you
keep up. Here are some security suites to check out:
Microsoft Security Essentials (http://www.microsoft.com/security_essentials/) Norton Internet Security (www.symantec.com/index.jsp) McAfee Internet Security Suite (http://mcafee.com/us) AVG Internet Security (http://free.avg.com/)
In addition to these general procedures, Windows
Mail comes with its own set of virus protection features. Here’s how to
use them:
1. | In
Windows Mail, select Tools, Options. (In Windows Live Mail, select
Menus, Safety Options, or Tools, Safety Options if you have the menu
bar displayed.)
| 2. | Display the Security tab.
| 3. | In the Virus Protection group, you have the following options:
Select the Internet Explorer Security Zone to Use— You use the security zones to determine whether to allow active content inside an HTML-format message to run:
Internet Zone—If you choose this zone, active content is allowed to run. Restricted Sites Zone—If you choose this option, active content is disabled. This is the default setting and the one I recommend.
Warn Me When Other Applications Try to Send Mail as Me—
As I mentioned earlier, it’s possible for programs and scripts to send
email messages without your knowledge. This happens by using Simple
MAPI (Messaging Application Programming Interface)
calls, which can send messages via your computer’s default mail
client—and it’s all hidden from you. With this check box activated,
Windows Mail displays a warning dialog box when a program or script
attempts to send a message using Simple MAPI.
Do Not Allow Attachments to Be Saved or Opened That Could Potentially Be a Virus—
With this check box activated, Windows Mail monitors attachments to
look for file types that could contain viruses or destructive code. If
it detects such a file, it disables your ability to open and save that
file, and it displays a note at the top of the message to let you know
about the unsafe attachment.
Note
Internet Explorer’s built-in unsafe-file list
defines the file types that Windows Mail disables. That list includes
file types associated with the following extensions: .ad, .ade, .adp, .bas, .bat, .chm, .cmd, .com, .cpl, .crt, .exe, .hlp, .hta, .inf, .ins, .isp, .js, .jse, .lnk, .mdb, .mde, .msc, .msi, .msp, .mst, .pcd, .pif, .reg, .scr, .sct, .shb, .shs, .url, .vb, .vbe, .vbs, .vsd, .vss, .vst, .vsw, .wsc, .wsf, .wsh.
Tip
What
do you do if you want to send a file that’s on the Windows Mail unsafe
file list and you want to make sure that the recipient will be able to
open it? The easiest workaround is to compress the file into a .zip file—a file type not blocked by Windows Mail, Outlook, or any other mail client that blocks file types.
| 4. | Click OK to put the new settings into effect.
|
4. Implementing Parental Controls
On your home network, there’s a good chance that you
have children who share your computer or who have their own computer.
Either way, it’s smart to take precautions regarding the content and
programs they can access. Locally, this might take the form of blocking
access to certain programs (such as your financial software), using
ratings to control which games they can play, and setting time limits
on when the computer is used. If the computer has Internet access, you
might also want to allow (or block) specific sites, block certain types
of content, and prevent file downloads.
All this sounds daunting, but the Parental Controls
in Windows 7 and Windows Vista make things a bit easier by offering an
easy-to-use interface that lets you set all the aforementioned options
and lots more. (You get Parental Controls in the Home Basic, Home
Premium, and Ultimate editions of Windows 7 and Vista.)
5. Creating Accounts for the Kids
Before you begin, be sure to create a standard user account for each child who uses the computer. Here are the steps to follow:
1. | Select
Start, Control Panel, Add or Remove User Accounts, and then enter your
UAC credentials. Windows displays the Manage Accounts window.
| 2. | Click Create a New Account. The Create New Account window appears.
| 3. | Type the name for the account. The name can be up to 20 characters and must be unique on the system.
| 4. | Make sure the Standard User option is activated.
| 5. | Click Create Account. Windows returns you to the Manage Accounts window.
| 6. | Repeat steps 2–5 to add standard user accounts for all your kids.
|
Activating Parental Controls and Activity Reporting
With the kids’ accounts in place, you get to Parental Controls using either of the following methods:
- If you still have the Manage Accounts window open, click Set Up Parental Controls.
- Select Start, Control Panel, Set Up Parental Controls.
In
Vista, enter your UAC credentials to get to the Parental Controls
window, and then click the user you want to work with to get to the
User Controls window.
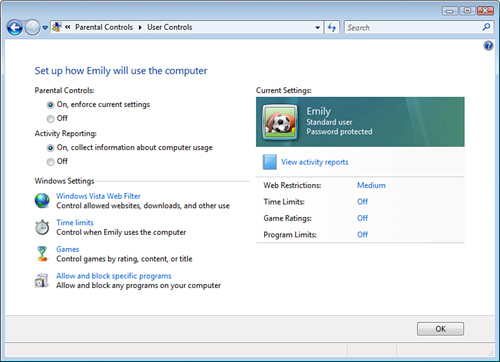
You should activate two options here (see Figure 4, which shows the Windows Vista version of the Parental Controls window):
Parental Controls—Click On, Enforce Current Settings. This enables the links in the Settings area. Activity Reporting
(Windows Vista only)—Click On, Collect Information About Computer
Usage. This tells Vista to track system events such as blocked logon
attempts and attempted changes to user accounts, the system date and
time, and system settings.

The Windows Settings section has links that you use
to set up the controls on the selected user. Two of these are security
related—Windows Vista Web Filter (available only in Windows Vista) and
Allow and Block Specific Programs—so I discuss them in the next two
sections.
Controlling Web Use
In the Windows Vista version of the User
Controls window, click Windows Vista Web Filter to display the Web
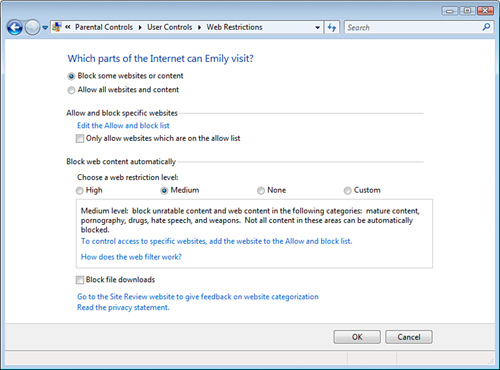
Restrictions page, shown in Figure 5. Make sure the Block Some Websites or Content option is activated.

You can control websites, web content, and file downloads:
| Allow and Block Specific Websites | Click
the Edit the Allow and Block List to open the Allow Block Webpages
window. For each safe site that the user can visit, type the website
address and click Allow to add the site to the Allowed Websites list;
for each unsafe site that the user can’t visit, type the website
address and click Block to add the site to the Blocked Websites list.
Because there are so many possible sites to block, consider activating
the Only Allow Websites Which Are on the Allow List check box. |
Tip
To make your life easier, you can import lists of
allowed or blocked sites. First, create a new text file and change the
extension to Web Allow Block List (for example, MyURLs.Web Allow Block List). Open the file and add the following text to start:
<WebAddresses>
</WebAddresses>
Between these lines, add a new line for each site using the following format:
<URL AllowBlock="n">address</URL>
Replace n with 1 for a site you want to allow, or 2 for a site you want to block, and replace address with the site URL. Here’s an example:
<WebAddresses>
<URL AllowBlock="1">http://goodcleanfun.com</URL>
<URL AllowBlock="1">http://wholesomestuff.com</URL>
<URL AllowBlock="2">http://smut.com</URL>
<URL AllowBlock="2">http://depravity.com</URL>
</WebAddresses>
| Block Web Content Automatically | Select
the option you want to use to restrict site content: High, Medium,
None, or Custom. If you select the Custom Web restriction level, Vista
adds a number of check boxes that enable you to block specific content
categories (such as Pornography, Mature Content, and Bomb Making). | | Block File Downloads | Activate this check box to prevent the user from downloading files via the web browser. |
Allowing and Blocking Programs
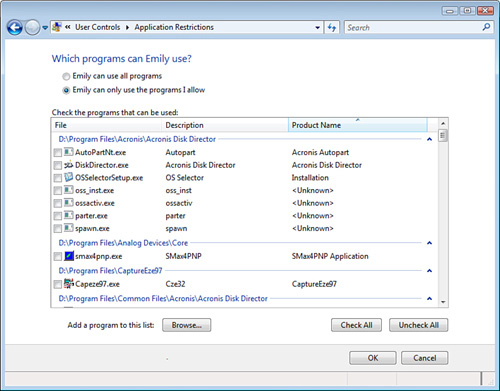
In the User Controls window, click Allow and Block Specific Programs to display the Application Restrictions page. Activate the User
Can Only Use the Programs I Allow option. Windows 7 or Vista then
populates the Check the Programs That Can Be Used list with the
applications on your computer, as shown in Figure 6. Activate the check boxes for the programs you want to allow the person to use.

|