Adding transparency
Many TV stations display logos
semi-transparently in the corner of the frame to emphasize the brand.
You’ll reduce the opacity of the ID so that it can be used this way.
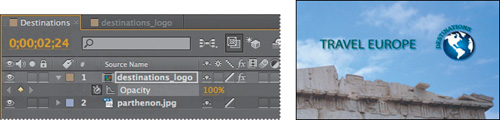
1. | Still in the Destinations Timeline panel, go to 2:24.
|
2. | Select
the destinations_logo layer, and press T to display its Opacity
property. By default, the Opacity is 100%—fully opaque. Click the
stopwatch icon ( ) to set an Opacity keyframe at this location. ) to set an Opacity keyframe at this location.
 |
3. | Press the End key or drag the current-time indicator to go to the end of the time ruler (2:29), and change the Opacity to 40%. After Effects adds a keyframe.
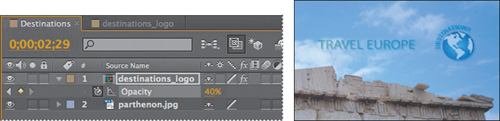 |
The logo appears, the words travel Europe fly in, and it all fades to 40% opacity.
4. | Watch
a preview of your composition by clicking the Play button in the
Preview panel, by pressing the spacebar, or by pressing 0 on your
numeric keypad. Press the spacebar to stop playback when you’re done.
|
5. | Choose File > Save to save your project. |
Rendering the composition
You’re ready to prepare your
travel show ID for output. When you create output, the layers of a
composition and each layer’s masks, effects, and properties are rendered
frame by frame into one or more output files or, in the case of an
image sequence, into a series of consecutive files.
Making a movie from your
final composition can take a few minutes or many hours, depending on the
composition’s frame size, quality, complexity, and compression method.
When you place your composition in the render queue, it becomes a render
item that uses the render settings assigned to it. While After Effects
renders the item, you are unable to work in the program.
After Effects provides a
variety of formats and compression types for rendering output; the
format you choose depends on the medium from which you’ll play your
final output or on the requirements of your hardware, such as a
video-editing system. You will prepare this animation for two formats so
that it can be used for broadcast purposes as well as on a website.
Exporting broadcast-quality output
You’ll start by rendering and exporting the composition so that it can be broadcast on television.
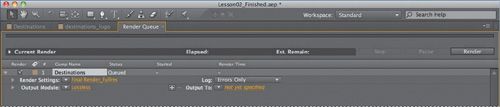
1. | Do one of the following to add the composition to the render queue:
- Select the Destinations composition in the Project panel, and
then choose Composition > Add To Render Queue. The Render Queue panel
opens automatically.
- Choose Window > Render Queue to
open the Render Queue panel, and then drag the Destinations composition
from the Project panel onto the Render Queue panel.
|
2. | Choose Maximize Frame from the Render Queue panel menu so that the panel fills the application window.
Tip
The keyboard shortcut for the
Maximize Frame command is the accent grave (`) character, which shares a
key with the tilde (~) character.
|
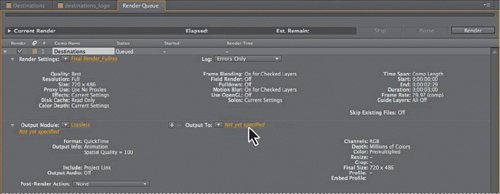
3. | Click
the triangle to expand the Render Settings options. By default, After
Effects renders compositions at the Best Quality and Full Resolution.
The default settings are fine for this project.
|
4. | Click
the triangle to expand the Output Module options. By default, After
Effects uses lossless compression to encode the rendered composition
into a movie file, which is fine for this project. But you need to
identify where to save the file.
|
5. | Click the underlined words Not Yet Specified next to the Output To pop-up menu.
 |
6. | In
the Output Movie To dialog box, accept the default movie name
(Destinations), select the AECS5_CIB/Lessons/Lesson02/Finished_Project
folder for the location, and then click Save.
|
7. | Back in the Render Queue panel, click the Render button.
 |
After Effects displays a
progress bar in the Render Queue panel as it encodes the file, and
issues an audio alert when all items in the Render Queue have been
rendered and encoded.
8. | When the movie is complete, choose Restore Frame Size from the Render Queue panel menu to restore your workspace.
|
Exporting a composition for the web
The production manager
at Destinations wants to use this travel show ID on the station’s
website as well. For that purpose, you need to render and export the
composition as a SWF file. The SWF format is a widely used vector
graphics and animation format for the web—a compact, binary format that
can contain audio and vector objects. Web browsers with the Adobe Flash
Player plug-in can play SWF files.
Before exporting to SWF, you need to adjust the composition a bit for online display.
1. | Select the Destinations composition in the Project panel, and then choose Composition > Composition Settings.
|
2. | In the Basic tab of the Composition Settings dialog box, choose Web Video, 320 x 240 from the Preset menu, and then click OK.
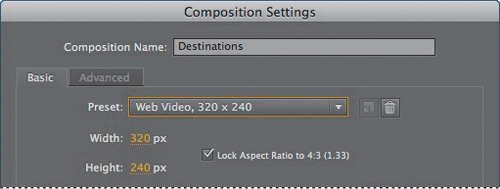 |
After
Effects applies the new web-appropriate resolution—320 x 240 pixels—to
the composition. As a result, both the parthenon and destination_logo
layers are about twice as big as the composition, which is now smaller,
has a different aspect ratio, and has a different frame rate (15 fps).
So you need to reposition and resize the layers for the new output
medium, including moving the logo to the top of the composition.
3. | Open
the Destinations Timeline panel, select the parthenon layer, and press
Ctrl+Alt+F (Windows) or Command+Option+F (Mac OS) to fit the layer to
the composition size.
|
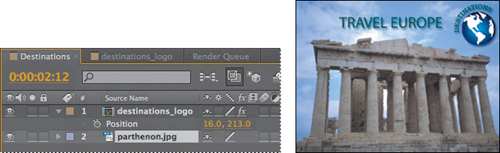
4. | Go to 2:12, which is when the logo starts to fade in at the new frame rate.
|
5. | Select the destination_logo layer in the Timeline panel, and then press P to reveal its Position property.
|
6. | Change the Position values to 50, 204 to move the logo to the top of the composition.
 |
Now, you’re ready to render and export the composition to SWF format.
Note
SWF files can be played
directly by Flash Player. You can render FLV files that can be published
online, but an FLV file must be embedded in a SWF file to be played by
Adobe Flash Player.
7. | With the Destinations composition selected in the Project panel, choose File > Export > Adobe Flash Player (SWF).
|
8. | In
the Save As dialog box, accept the default filename (Destinations.swf),
select the AECS5_CIB/Lessons/Lesson02/Finished_Project folder for the
location, and then click Save.
|
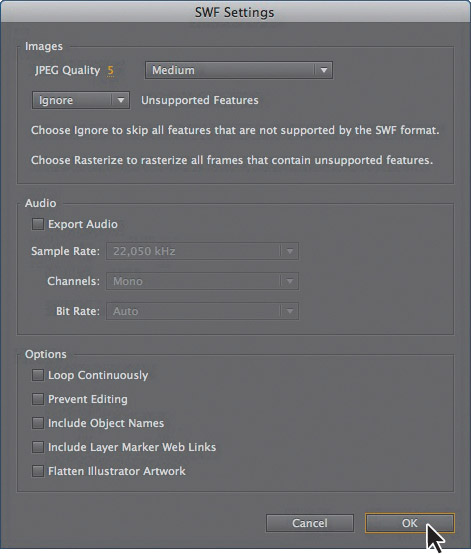
9. | In
the SWF Settings dialog box, choose Medium from the JPEG Quality menu.
This setting preserves image quality nicely but also reduces the file
size somewhat. Leave all other settings at their defaults, and then
click OK.
Note
After Effects exports text
layers to SWF as vector graphics. Some layer types and layer switches
are not supported, such as 3D Layers, 3D Cameras, and 3D Lights. Nested
layers are rasterized. For more on SWF export, see After Effects Help.
|
After Effects displays a
progress bar as it renders the file and exports it to SWF format. It
also saves a report in HTML to the same folder as the SWF file.
10. | Choose File > Save to save the final file.
|
11. | In Explorer (Windows) or the Finder (Mac OS), navigate to the AECS5_CIB/Lessons/Lesson02/Finished_Project folder.
|
12. | Double-click
the HTML file, which has an .htm or .html extension, to open it in your
default web browser, and preview the SWF file by clicking the link on
the page. This Flash animation could be used as part of a splash screen
on the TV station’s website, or as part of an ad, for example.
|
Congratulations. You’ve created a travel show ID and watermark.