4. Applying, changing, and removing a style
As noted, any HTML tags redefined as CSS styles in an
attached style sheet are automatically applied to your document.
However, any custom CSS style must be applied on a case-by-case basis.
Most Web designers use a combination of HTML and custom CSS styles. Only
custom CSS styles appear in the CSS Styles panel in Apply Styles mode
or in the Class list in the HTML tab of the Property inspector.
In Dreamweaver, you can apply a style in four main
ways: from the Property inspector, the menus, the Tag Selector, or the
CSS Styles panel.
To apply an existing custom style using the Property inspector, follow these steps:
To
apply the style to a section of the page enclosed by an HTML tag, and
select the tag from the Tag Selector; if you're applying the style to
text, you can also just place your cursor in the text without selecting
the containing tag.
To apply the style to a
section that is not enclosed by a single HTML tag, use your mouse to
highlight that section in the Document window.
Select
the custom style from the Class list in the HTML tab of the Property
inspector for class styles or from the ID list for ID selectors, if
available. Dreamweaver applies the custom style either by setting the class or id attribute of the selected tag to the custom style. If you select only text and not an enclosing tag, Dreamweaver wraps a <span> tag around the selection.
The second approach is to use the menus to apply a style to your pages. Follow these steps:
Highlight the text to which you're applying the style, either by using the Tag Selector or by using the mouse.
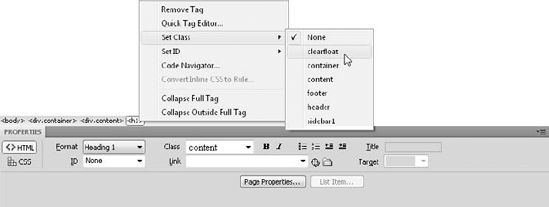
Choose Format => CSS Styles =>
Your Style. The same dynamic CSS Class list is maintained in the Set
Class entry of the context menu, accessible through a right-click
(Control+click) on the selected text, as shown in Figure 6.
The third approach is to use the Tag Selector
exclusively. Right-click (Control+click) the selected tag name in the
Tag Selector and choose the style from either the Class or ID submenus.
Finally, you can use the CSS Styles panel itself to apply a style:
Select the tag or text to which you want to apply your style.
In the CSS Styles panel, right-click (Control+click) the style and choose Apply from the context menu.
NOTE
Dreamweaver supports multiple classes for
rendering purposes, but there is no method except hand-coding to apply
more than one class to a tag.
4.1. Changing styles
Changing from one applied custom style to another is
extremely straightforward in Dreamweaver. Just place your cursor
anywhere within the styled text and select a different custom style from
the Class list on the Property inspector. Dreamweaver changes the old
style to the new instantly. You get the same results if you switch
styles from the Tag Selector or use the menus.
But what if you want to apply a new style to a text range within an existing <span> tag? Dreamweaver, by design, avoids nested <span> tags. Here's how it works. Suppose that you're working with the following code:
<span class="bodyCopy">Developing strategies to survive requires industry
insight and forward thinking in this competitive marketplace.</span>
If you apply a custom style called hype to the phrases industry insight and forward thinking by first selecting those phrases and then choosing hype from the Class list, the code looks like this:
<span class="bodyCopy">Developing strategies to survive
requires </span><span class="hype">industry insight</span>
<span class="bodyCopy"> and </span><span class="hype">forward
thinking</span><span class="bodyCopy"> in this competitive marketplace.</span>
Dreamweaver wraps each phrase in a distinct <span> tag so that nesting is entirely avoided. This behavior enables the style of each phrase to be altered more easily.
|
Although the use of the <span> tag is
unavoidable under some circumstances, be careful not to overuse it. It's
far better to apply a logical tag that makes sense in the context, such
as <em> (emphasis) or <cite>, and then to create a CSS style that formats those tags for the look you want.
|
|
4.2. Removing applied styles
Getting rid of an applied style is just as easy as
changing it. Now, just position your cursor anywhere in the stylized
text and select None from the Class list. Dreamweaver also removes the
no-longer–needed class attribute for all but the <span> tag. If you remove the class from a selection marked by <span> tags, Dreamweaver deletes the surrounding <span> tags.
NOTE
Be sure your cursor is positioned within
the styled text and not selecting any of the text. Selecting None from
the Class list on the Property inspector when just text — not tags — is
highlighted forces Dreamweaver to remove the style from the tag and
apply it to <span> tags on either side of the now unstyled text.
Styles can also be removed through the Tag Selector —
just right-click (Control+click) any styled tag on the Tag Selector and
choose Set Class  None.
None.
In this Technique, you attach an existing style sheet to a page and assign styles to various page elements.
In the Technique site, expand the 06_css folder and open css_start.htm.
If necessary, choose Window => CSS Styles to expose the CSS Styles panel.
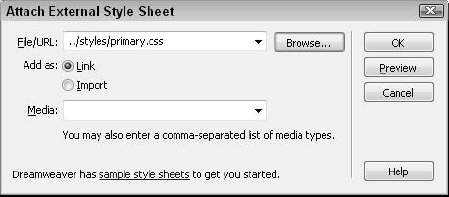
At the bottom of the CSS Styles panel, click Attach Style Sheet.
When the Attach External Style Sheet dialog box opens, click the Browse button.
In the Select Style Sheet dialog, browse to the styles folder in the root of the site and select primary.css.
From the Media list of the Attach External Style Sheet dialog box, choose All; click OK when you're ready.
You'll notice that certain parts of the page, like
the headings and paragraphs, are automatically styled because the style
sheet includes rules for those tags. Now, let's apply some styles to
specific page elements.
Place your cursor in the first heading, Coming attractions.
From the Tag Selector, choose the <div> tag to the left of the <h1> tag.
In the Property inspector, select middle from the Div ID list.
The #middle style adds an outside border and
increases the padding. Now, add a class to differentiate the first
paragraph under each heading.
Place your cursor in the first paragraph beneath the initial heading.
Right-click the <p> tag in the Tag Selector and choose Set Class => firstParagraph.
Repeat the preceding Steps 1 and 2 for each of the remaining paragraphs under the different headings.
Finally, apply classes to the images to help the page flow.
Select the first image on the page.
From the Property inspector's Class list, choose .imageLeft.
Repeat the preceding Steps 1 and 2 for the remaining images, alternating between the .imageLeft and .imageRight classes.
When you're done, save your page.

The two image-related styles align the image differently and add additional padding to complete the effect.