Knowing that you can turn your static
artwork into working applications is pretty exciting. But before you get
started, take a moment to review these best practices for preparing
your design document. The way you approach the design and organization
of your artwork has a significant impact on the structure of the project
in Flash Catalyst and the underlying code. The following ideas will
help protect the integrity of your design and minimize re-working or
re-structuring assets after bringing them into Flash Catalyst.
Choose your design application
Flash Catalyst imports files saved in the Flash XML
Graphics format (FXG). You can generate the FXG file from any document
created in Adobe Fireworks, Adobe Illustrator, or Adobe Photoshop.
In fact, if you create your design using Photoshop or
Illustrator, you can save yourself the step of exporting the FXG file.
Flash Catalyst has an import feature that makes opening PSD and AI files
a cinch! We’ll get to that in a moment.
Tip
When choosing Adobe Illustrator as your design
application for Flash Catalyst artwork, use the Illustrator Flash
Catalyst document preset. In the Create New section of the Adobe
Illustrator Welcome screen, choose Create Flash Catalyst Document.
|
When creating structured graphics for use in Adobe
Flex or Adobe Flash Catalyst, you can save your design in the Flash XML
Graphics format (FXG). FXG is a graphics file format based on a subset
of MXML, the XML-based programming language used by the Flex framework.
You can use FXG files in Adobe Flash Catalyst to develop rich Internet
applications and experiences. When saving as FXG, images must be under
6,777,216 total pixels and less than 8,192 pixels in width or height.
|
Tip
In Photoshop and Fireworks, set your design document
color mode to RGB. Spot and process colors are not supported in Flash
Catalyst. Set an image resolution of 72 pixels per inch.
Plan the structure of your application
There are different approaches to structuring your application. The two most common ways to structure the application are:
Import all artwork in the design document to a
single page state. Distribute artwork to pages in Flash Catalyst using
the Flash Catalyst Pages/States and Layers panels.
Define
the main pages of the application in your design document using Layer
Comps in Photoshop or multiple artboards in Illustrator.
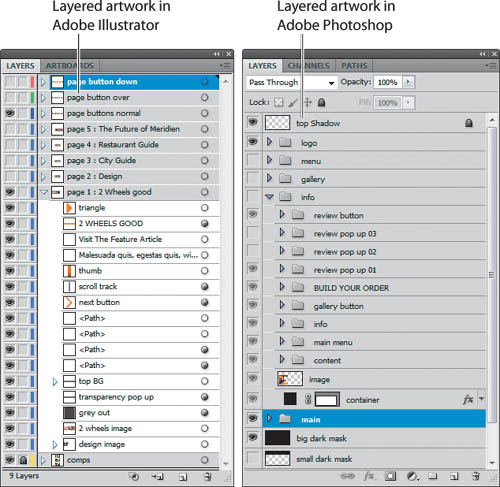
In both approaches your design document includes a
hierarchy of clearly named layers and groups to define the pages and
functional component of the application. Any layers and groups that you
define in Illustrator, Photoshop, or Fireworks are maintained when you
import the project into Flash Catalyst.
Importing all artwork to a single page state
When
you create a new Flash Catalyst document by importing an FXG file,
Photoshop document, or Illustrator document with a single artboard, your
artwork appears on one new page state in Flash Catalyst. You can then
duplicate or add pages and use the Flash Catalyst Layers panel to define
which artwork appears on each page. This is a common workflow for
structuring your application in Flash Catalyst, and that’s what we’ll be
doing in this course.
Using Photoshop Layer Comps and multiple Illustrator artboards
A Photoshop Layer Comp (composition) provides a
snapshot of which layers are turned on and off in your Photoshop
document. When preparing a document for import to Flash Catalyst, you
can use Layer Comps to represent each page state in your Flash Catalyst
application. You can then import each Layer Comp to a different state in
Flash Catalyst. To do this, you need to import each Layer Comp
separately using the advanced options in the Photoshop Import Options
dialog box. When you import artwork in a Photoshop Layer Comp, the
artwork is centered in the Flash Catalyst artboard. To preserve the
layout and positioning of your Layer Comps, include a background layer
that is the same size as the Flash Catalyst artboard.
When you import an Illustrator document with multiple
artboards, each artboard appears on a separate page state in Flash
Catalyst.
The
organization of your content is extremely important. You’ll need to
identify and select these objects when separating artwork onto different
pages and states or converting artwork into functional components in
Flash Catalyst.
Here are some tips for organizing your artwork using layers:
Use top-level layers (or Layer Groups in Photoshop) to represent the main pages or screens of the application.
Add
a layer for common objects that appear on every page. For example, you
may want a layer named “background” or a layer named “navigation.”
Use sublayers (or layers within a Layer Group in Photoshop) to represent the elements on each page.
Use sublayers to organize the building blocks or parts of individual Flash Catalyst components such as scroll bars, menus, and buttons.
Group complex objects
Much of the artwork you create is made from a
collection of complex parts, including images, shapes, lines, text,
symbols, and so on. Grouping complex objects before bringing them into
Flash Catalyst makes them easier to manage.
Flatten artwork with filters and effects
In Illustrator, Photoshop, and Fireworks, you can use
layers to apply a large selection of filters and effects to artwork and
text. Some examples include drop shadows, opacity masks, and blends. In
Photoshop these are called Adjustment layers.
By placing the effect or filter in a separate layer, you preserve the
original artwork or text. Unfortunately, not all filters and effects
import correctly into Flash Catalyst.
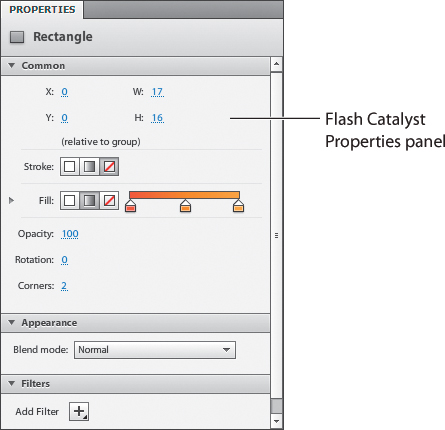
Tip
Flash Catalyst includes a small collection of
filters, including blurs, shadows, bevels, and glows. You can apply
these to objects by using the Properties panel in Flash Catalyst.
When you import a Photoshop file, Flash Catalyst
rasterizes all Layer Effects for image, shape, and text layers. Use the
following settings to help preserve the appearance of artwork created in
Photoshop:
For text layers with effects or masks, use Vector Outlines or Flatten Bitmap Image.
For masks applied at the Layer Group level, use Flatten Bitmap Image.
For opacity changes at the Layer Group level, use Flatten Bitmap Image.
The following Illustrator filters are supported in
Flash Catalyst. All other filters and effects are rasterized or expanded
during import.
Drop Shadow
Inner Glow
Outer Glow
Gaussian Blur
Name everything
The
layer names you use in the original design document are brought into
Flash Catalyst. These names are also reflected in the Flex code that
gets generated by Flash Catalyst. This is the same code that will be
used by Flex developers if the Flash Catalyst project file is imported
into Flash Builder for additional development.
Use a consistent naming strategy throughout your
design. For example, you could use “name_btn_up” and “name_btn_down” to
specify artwork that will be turned into button components. It’s a good
idea to agree on a naming convention with other designers and developers
before beginning a project.
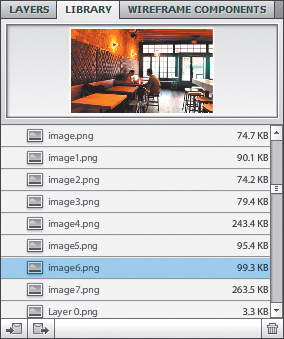
Embed images in the design document
Most rich Internet application projects involve a
team of designers and developers working together in an iterative
process. By placing images within your design file, rather than linking
to them, you can share a single file and you’ll know that everyone has
the assets they need to continue working on the project. Images and
other assets appear in the Library panel within Flash Catalyst.
Manage fonts when sharing files
When
collaborating with teams, make sure that everyone has the necessary
fonts installed. This is essential if you plan to keep your text
editable, for example if the design includes body copy that needs to
change over time. Even with the necessary fonts installed, editable text
doesn’t always look the same when brought into Flash Catalyst. Things
like kerning or leading may differ. For text objects that need to look
exactly as you’ve designed them (a logo is a good example), you can:
Identify duplicate component assets
It’s often necessary to include repeated buttons,
text input areas, and other visual elements to represent the overall
visual design of the application. In Flash Catalyst, you want to define a
single object for each unique piece of artwork, but avoid defining
objects where the artwork is the same. To make your work easier in Flash
Catalyst, you can identify any duplicate items in your design document.
There are several ways to do this. You can use a
unique naming convention for duplicate components, such as inputText
(for the master) and _inputText (for a duplicate). Another option is to
identify them visually using color or opacity.

Set component properties in Flash Catalyst
Before
you begin a design, take a few minutes to explore the available
properties for formatting text, shapes, and components in Flash
Catalyst. This will help you determine which objects and states to
define in the design document, and which to save for Flash Catalyst.
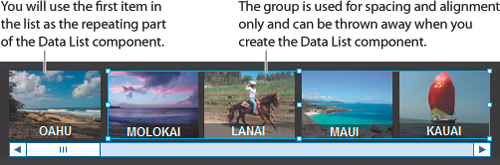
Create sample artwork for a list of images or text
When browsing the web, you may notice that lots of
applications include scrolling lists of data (images and text). In Flash
Catalyst, a Data List component is used to display a collection of data
that is stored outside the application. When designing artwork for a
Data List component that will be bound to an external data source, you
don’t need to include every item in the list, just a representative
model. A best practice when preparing your design document is to include
the first item and a separate group that serves as a guide for
alignment and spacing.
Hide, show, and lock layers
When
you import a layered design document into Flash Catalyst, the layer
structure is preserved. This includes which layers are locked or hidden.
You can save yourself a few steps by locking layers that you don’t need
to edit, such as background or border graphics. You can also hide
layers that are hidden in their initial state, such as the over and down
states for an interactive button.
Exporting an FXG file from Adobe Fireworks
Adobe Fireworks users may feel a little left out when
they first launch Flash Catalyst. One of the first things they’ll
notice is the absence of a direct Fireworks import option in the Welcome
screen. In reality, Flash Catalyst imports only FXG documents
regardless of where they originated—in Photoshop, Illustrator, or
Fireworks. Flash Catalyst just happens to have the ability to convert
your PSD and AI files into the FXG format automatically. Following are
the general steps for exporting an FXG file from Fireworks to import
into Flash Catalyst. The steps to export an FXG file from Fireworks CS4
and CS5 are different. Refer to the appropriate steps below for
instructions on exporting FXG files from your version of Fireworks.
Fireworks CS4
1. | Start Adobe Fireworks CS4 and open the design document you want to import into Flash Catalyst.
|
2. | Choose Commands > Export To FXG.
The Select Folder dialog box appears.
|
3. | Locate and select a destination folder for the FXG file.
|
4. | Enter a name for the file and click OK.
You can now import the FXG file into Flash Catalyst.
|
Fireworks CS5
1. | Start Adobe Fireworks CS5 and open the design document you want to import into Flash Catalyst.
|
2. | Choose File > Export.
The Export dialog box appears.
|
3. | Open the Export pop-up menu and choose FXG And Images.
|
4. | Open the Pages pop-up menu and select which pages to include in the FXG.
|
5. | Click Save.
You can now import the FXG file into Flash Catalyst. |