The History panel found in the Other Panels list (Ctrl+F10/ +F10)
enables you to escape the linear limitations of Undo/Redo. As you work
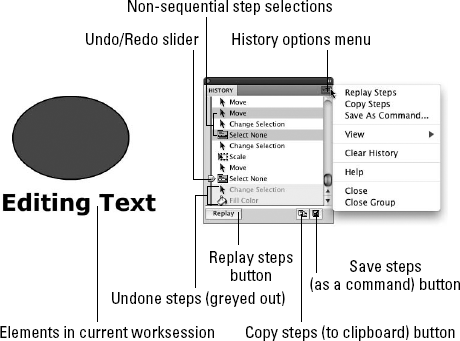
in your project file, the History panel records your editing steps in a
sequential list (see Figure 1).
The History panel stores steps taken in the active project file during
the current editing session only. It does not store steps from the last
time you had a project file open or from other files edited during the
same session. You can
save and move steps from one file or session to another, but it
requires you to use some of the special features of the History panel,
described later in this section.
+F10)
enables you to escape the linear limitations of Undo/Redo. As you work
in your project file, the History panel records your editing steps in a
sequential list (see Figure 1).
The History panel stores steps taken in the active project file during
the current editing session only. It does not store steps from the last
time you had a project file open or from other files edited during the
same session. You can
save and move steps from one file or session to another, but it
requires you to use some of the special features of the History panel,
described later in this section.
NOTE
Flash gives you the
option of using Document-level Undo (which creates one History/Undo
stack for all the items in a current session) or the legacy-style
Object-level Undo (which creates a unique History/Undo stack for key
editing areas of the Flash authoring environment: Stage, Movie Clip
timelines, and the ActionScript panel). The default is set to
Document-level Undo, but if you find it helpful to be able to step back
through Movie Clip edits individually, you can change this setting in
the General section of Flash Preferences. To access the object-level
Undo stack, you must open a Movie Clip (not an instance) in Edit mode.
|
Making changes to your Undo
style or number of saved steps in Flash Preferences clears the History
panel, deleting all the Undo steps for your current session.
|
|
You can use the History
panel as a reminder of the steps taken to create a special graphic
effect, or you can use it as a nonlinear authoring control. Should you
need to get back to a specific step in your authoring session, you can
use Undo (Ctrl+Z/+Z)
over and over and over, or you can simply open the History panel and
drag the edit pointer on the left side of the panel upward to go back in
time until you reach the point at which you want to jump back into
authoring. As long as you don't make any edits at an earlier point in
the History list, you can easily scroll forward again if you need to
redo your steps — without wearing out the Ctrl+Y/+Y
keys! However, if you undo a step (or a series of steps) and then make
changes to your project file, you can no longer redo the steps in the
History panel. This is where the History panel does behave a little like
a time machine — as long as you don't change anything, you can jump
backward and forward in time, but as soon as you change something, you
lose the option of going "back to the future."
|
Click to the left of a step in
the History panel to jump to that point without scrolling. All steps
listed after the point that you click will be undone and grayed out
until you scroll forward again (or click to the left of an item closer
to the bottom of the list).
|
|
The options menu and the
buttons along the bottom of the History panel are the keys to the more
advanced editing tasks that you can accomplish when you take your steps a
step farther. (Refer to Figure 9.49 for callouts on the location of History panel controls.)
1. Replay Steps
The Replay Steps control repeat or reapply a series of sequential or nonsequential steps in your current History list:
Select sequential items by dragging or by Shift+clicking the text labels in the list. Select nonsequential items by Ctrl+clicking/+clicking.
With
a step (or series of steps) selected, you can apply the step(s) to a
new item — by selecting the item with the Selection tool and clicking
the Replay button or choosing Replay Steps from the options menu.
All currently selected steps are
applied (in order) to the item, and a new step labeled "Replay Steps"
is listed in the History panel. You can use the Replay Steps item in the
History list to apply the same steps again without having to select the
original steps individually.
2. Copy Steps
This command enables you to move steps from one document to another. Here's how it works:
Select steps from your History panel list (as described in the previous section).
Choose Copy Steps from the options menu.
In the Flash document where you want to reuse the steps, select an item to which you want to apply the steps.
Choose Edit => Paste in Center (Ctrl+V/ +V).
The editing steps copied
from your original file are applied to the item in your current file and
a new item is added to the History panel, labeled Paste Steps.
3. Clear History
This is a helpful
command to use if you want to start from a clean slate before performing
a series of editing steps that you plan to save. Clear History deletes
all the listings in the History panel of your current document. You
can't undo this choice, but you will see a Warning dialog box that gives
you the chance to change your mind before it's too late. (Closing a
Flash document also clears the History list.) The number of steps listed
in the History panel can be limited by the Undo levels
set in the General Flash Preferences dialog box. The default setting is
100, but it can be set as high as 300 or as low as 2. Every item
recorded in the History panel eats up some memory and disk space, so
choose the lowest setting that suits your authoring style.
4. History View
You should leave this
setting on Default unless you plan to use the History panel as a tool
for helping you write new JavaScript commands. This is a very exciting
potential use of the History panel, but it is beyond the scope of this
book. If you are familiar with JavaScript, you can try different View
settings to get more information that helps you deconstruct the steps in
an editing workflow.
5. Save As Command
If you're not quite
ready to start writing your own JavaScript from scratch, this is a
terrific shortcut that makes it easy to save and reuse custom editing
workflows:
Select the step(s) from the History panel that you want to save and reuse.
Choose Save As Command from the options menu (or click the small disk icon at the bottom right of the History panel).
In the Save as Command dialog box, give the command a meaningful name. You might call the steps used to create a fancy custom-type treatment "Headline style."
By the magic of Flash, your custom command now appears in the Command menu list.
You can apply your specific editing steps in any document by selecting an item and choosing Commands => Headline style (or whatever commands you have created and named).
The options at the top of the
application Command menu give you some controls for managing your custom
commands and for using commands from other sources. The Get More
Commands menu item loads a link to the online Flash Exchange, where you
can find new commands contributed by other Flash developers (look for
JavaScript Flash or .jsfl files). If you download a custom command
script, you can use the Run Command menu option to browse to the .jsfl
file and apply it to an item in your current project. The possibilities
are wide open.