Photoshop CS5 definitely has some overlap with the
included Camera Raw 6 that comes with CS5 (and is part of Photoshop), in
that you can do a lot of the same things in Photoshop that you can do
in Camera Raw. If you shoot in RAW mode on your camera, you’re better
off doing things like lens corrections right within Camera Raw ,
because it’s faster and does less harm to your pixels. However, if for
whatever reason, you don’t want to use Camera Raw’s Lens Corrections
panel (it works for JPEGs and TIFFs, too. Hint, hint), then you can use
the vastly improved Lens Correction filter in CS5.
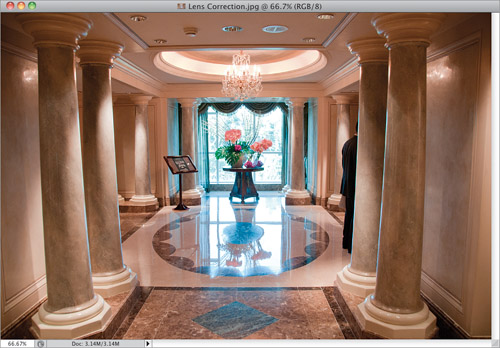
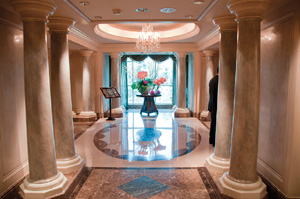
Step One. | Here’s
a problem image. Look at the columns on either side, which are bowing
outward, and leaning outward, as well. Adobe figured you’d be using this
filter a lot now (since it’s so much better than in previous versions),
so they put Lens Correction right up at the top of the Filter menu
(rather than its previous home, hidden under Distort on the Filter
menu). So, go ahead and go under the Filter menu, and choose Lens Correction now.
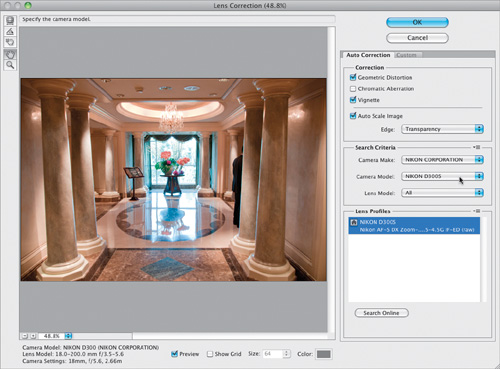
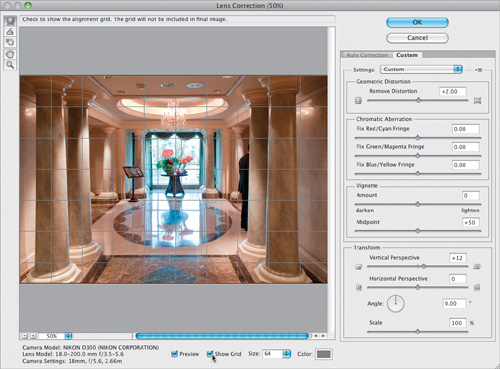
 | Step Two. | When
the dialog opens, there are two tabs on the right: Auto Correction and
Custom (Custom means “do-it-yourself”). I always try Auto Correction
first, because that way, it does all the work for you. To turn it on,
turn on the checkbox for Geometric Distortion (if I see edge vignetting
[darkening of the edges], I turn on that checkbox too, and it’ll fix
that at the same time). It looks at the embedded camera data to find out
which camera make and model, and lens you took the photo with, then it
matches that against its built-in set of correction profiles to fix the
problem (it did a pretty decent job here, as you can see). If it doesn’t
instantly come up with a profile (or the camera data is missing from
the file), you can help it along by choosing your camera’s make, model,
and even lens from the pop-up menus on the right.
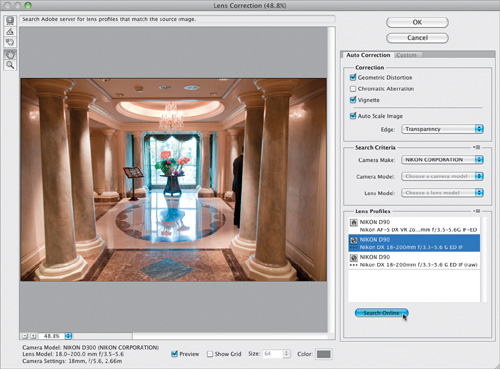
 | Step Three. | If,
after choosing your camera make and model, no profiles show up in the
Lens Profiles listing box, try clicking the Search Online button. It
will go to Adobe’s own servers, and check to see if any additional
profiles for your camera make and model have been added by end users (as
long as you’re connected to the Internet, of course). If it does find
some, they’ll be listed there, and all you have to do is click on one to
apply it. In this case, it found two additional profiles for my lens,
but with a different camera. I tried them both, but neither was better
than the original profile that was already there, so I stuck with it.
Hey, it was worth a try, right?
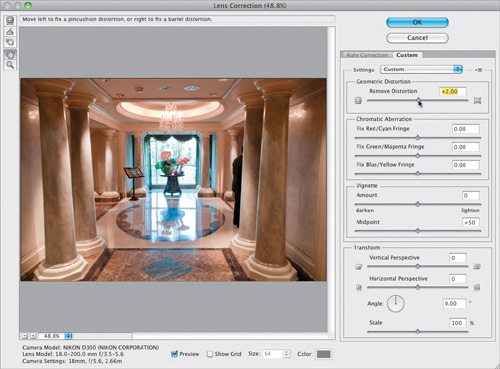
 | Step Four. | Although
it did a pretty good job of fixing the barrel distortion caused by the
lens (the bowing out of the columns), they’re still bowing out just a
tiny bit, so that’s when you switch to the Custom (manual) settings.
These settings are added to any corrections applied in the Auto
Corrections tab, so you don’t lose what Auto Corrections already did for
you. At the top, you’ll see a slider for correcting geometric
distortion, and on either end of the Remove Distortion slider is an icon
that shows how the image will be affected if you drag in that
direction. Since the photo was bowing outward, you drag toward the icon
bowing inward, so I dragged to the right just a little, until the
columns stopped bowing (in this case, I only need to increase it by +2).
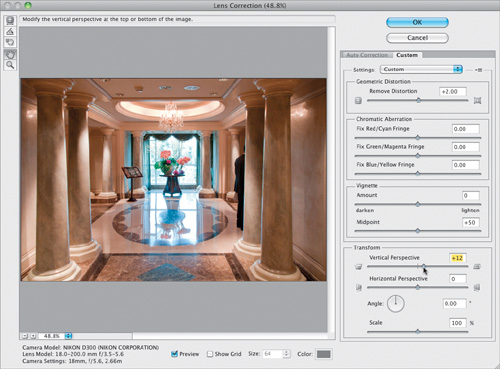
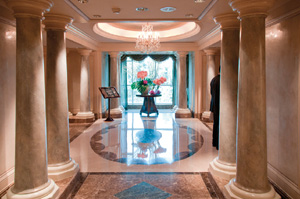
 | Step Five. | So,
at this point, the columns aren’t bowing, but they are still leaning
out too far, so now we have to fix those manually. Go down to the
Transform sliders near the bottom of the Custom tab. The Vertical
Perspective slider fixes problems where thing are leaning out or in, and
there’s a tiny icon on either side of the slider to show you what
dragging in each direction will do. In this case, we need to drag over
to the right to around +12 (this is how far I needed to drag over to
make the columns stand up straight again). Compare them to the image
back in Step Four, and you’ll see what an effect this had on the
columns.
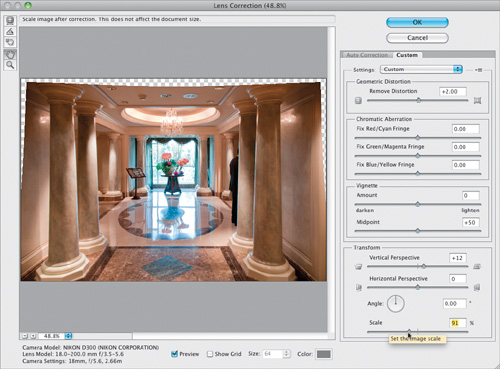
 | Step Six. | When
you make geometric corrections like this, sometimes (okay, fairly
often), you’ll see that in the process it seems to crop in a little bit
tighter on your photo. What it’s doing is automatically correcting for
the fact that when it unbowed your image, it did bow the outside edges a
bit, so it automatically scales the image up a little, and crops off
those messed-up edges. If you want to see what’s really going on, drag
the Scale slider (at the bottom of the window) to the left (to less than
100%), and you’ll see the edges (I dragged it to the left to 91%, and
you can see the gaps at the top that the image area used to fill).
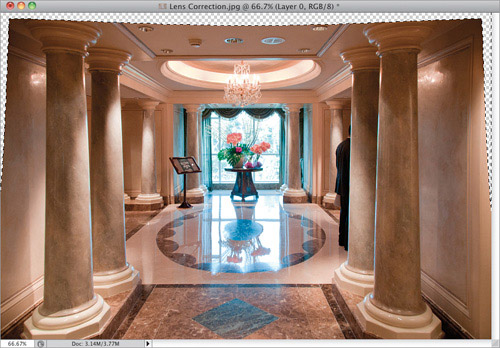
 | Step Seven. | If
you have an image where scaling it down even a tiny bit is
unacceptable, then try this—use the Scale slider to scale it down until
you see the full image (and the gaps it creates), then click OK to apply
the edits from the Lens Correction filter. Now use the Magic Wand tool
(press Shift-W until you have it) to select those gap areas (as shown here).
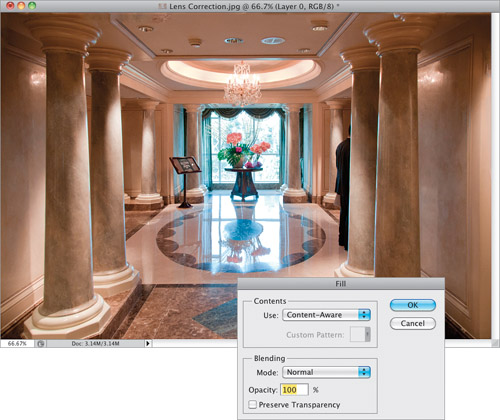
 | Step Eight. | Go under the Edit menu and choose Fill. When the Fill dialog appears, in the Use pop-up menu, choose Content-Aware
(if it’s not already selected for you), then click OK, and watch as it
fills in the gaps for you (as seen here). It’s not perfect, but it did a
lot of the work for us (for much more on Content-Aware Fill, how it
works, and what to do when it doesn’t, jump to the next project). Now,
at this point, after a little Clone Stamp retouching on the area we just
filled, we’d be done, but I want to cover a couple of other little
things they tweaked in the CS5 update of the Lens Correction filter.
 | Step Nine. | In
previous versions of the Lens Correction filter, there was a visible
grid that was on when you opened the filter. Thankfully, now it’s off by
default, but if you miss it, you can turn on the Show Grid checkbox at
the bottom of the dialog. There are two other sets of controls on the
Custom tab: You can remove/add vignetting in the Vignette section, but
it works just like it does in Camera Raw.
There are also two sliders for fixing chromatic aberrations (where you
see a red, cyan, blue, or yellow fringe around the edges of things in
your photo). Using it is a cinch—just drag the sliders toward Red to
remove red, or toward Cyan to remove cyan (and so on for Blue and Yellow
on the bottom slider). Below is a before/after, but I didn’t do the
whole Content Aware Fill thing—it’s just the filter as is.
 |
Before
After
|