We're down to just two popovers left to implement,
and they're both actually the same. What we need is a simple color
picker that lets the user set colors for either stroke or fill,
depending on which button is clicked.
NOTE
We wouldn't need to implement a color selector popover if iOS included some sort of color picker (along the lines of Mac OS X's NSColorPanel, for instance), but it currently does not.
Recall that our implementation of DudelViewController
works by checking each dismissed popover by class to see which one it
was. So, we'll implement the color selector GUI in one class, but use
two subclasses to create the popovers, so that we can tell which is
which when it's dismissed.
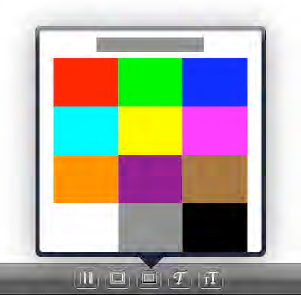
To keep things simple, we're
just going to let the user pick from a simple grid that shows 12 colors,
as shown in. An additional view at the top of the GUI will show the
currently selected color.
As for the user
interaction, it seems natural that this popover should have a
"touch-and-dismiss" policy, unlike the stroke width and font size
popovers, which hang around to let users move the slider multiple times
until they got it just right. For the color selector, we'll let the
users drag their finger around the grid, always displaying the latest
color in the view at the top, and dismiss the popover as soon as they
release their finger.
1. Creating a Simple Color Grid
Let's start by making a view
class that just knows how to display a grid of colors, and respond to
touch events by sending notifications containing the touched color.
Later, our view controller class will register as an observer for those
notifications. Create a new UIView subclass called ColorGrid, and put the following code in ColorGrid.h:
//  ColorGrid.h
#import <UIKit/UIKit.h>
// notification names
#define ColorGridTouchedOrDragged @"ColorGridTouchedOrDragged"
#define ColorGridTouchEnded @"ColorGridTouchEnded"
// key into the notification's userInfo dictionary
#define ColorGridLatestTouchedColor @"ColorGridLatestTouchedColor"
@interface ColorGrid : UIView {
  NSArray *colors;
  NSUInteger columnCount;
  NSUInteger rowCount;
}
@property (retain, nonatomic) NSArray *colors;
@property (nonatomic) NSUInteger columnCount;
@property (nonatomic) NSUInteger rowCount;
@end
This interface shows all the
elements we'll need in order to use this class: a set of properties for
specifying the colors, as well as the number of columns and rows to
display, all of which need to be set in order for the view to draw
properly. Here, we also define a pair of NSString constants that interested parties (such as our controller class) will use to register themselves as NSNotification observers, and another string that's used as a key into the userInfo
dictionary passed along with the notification for retrieving the chosen
color. It's a good idea to define strings that will be used in multiple
spots this way, instead of putting the literal strings, quotes and all,
in your code. With the defined version, Xcode will help autocomplete as
you type, and the compiler will complain if you misspell it.
Now for the implementation. Switch to ColorGrid.m, and start things off with the basics:
//  ColorGrid.m
#import "ColorGrid.h"
@implementation ColorGrid
@synthesize colors, columnCount, rowCount;
- (void)dealloc {
  self.colors = nil;
  [super dealloc];
}
Next up is the drawRect: method. This method relies on columnCount and rowCount being set to a nonzero value before being drawn. Those values determine the layout of the grid as a whole. The UIColor objects stored in the colors
array will be used to fill rectangles in the grid, row by row. If there
aren't enough colors in the array to fill the grid, the rest of the
"cells" will be filled with white.
- (void)drawRect:(CGRect)rect {
  CGRect b = self.bounds;
CGContextRef myContext = UIGraphicsGetCurrentContext();
  CGFloat columnWidth = b.size.width / columnCount;
  CGFloat rowHeight = b.size.height / rowCount;
  for (NSUInteger rowIndex = 0; rowIndex < rowCount; rowIndex++) {
    for (NSUInteger columnIndex = 0; columnIndex < columnCount; columnIndex++) {
      NSUInteger colorIndex = rowIndex * columnCount + columnIndex;
      UIColor *color = [self.colors count] > colorIndex ?
                         [self.colors objectAtIndex:colorIndex] :
                         [UIColor whiteColor];
      CGRect r = CGRectMake(b.origin.x + columnIndex * columnWidth,
                            b.origin.y + rowIndex * rowHeight,
                            columnWidth, rowHeight);
      CGContextSetFillColorWithColor(myContext, color.CGColor);
      CGContextFillRect(myContext, r);
    }
  }
}
We also need to be able to
determine the color shown at any given point, for the touch methods to
be able to report with a notification. Rather than putting that directly
into the touch methods, we split it off into a separate colorAtPoint: method that each of them can use. This is basically the inverse of what's going on in the innermost loop of the drawRect: method.
- (UIColor *)colorAtPoint:(CGPoint)point {
  if (!CGRectContainsPoint(self.bounds, point)) return nil;

  CGRect b = self.bounds;
  CGFloat columnWidth = b.size.width / columnCount;
  CGFloat rowHeight = b.size.height / rowCount;
  NSUInteger rowIndex = point.y / rowHeight;
  NSUInteger columnIndex = point.x / columnWidth;
  NSUInteger colorIndex = rowIndex * columnCount + columnIndex;
  return [self.colors count] > colorIndex ?
           [self.colors objectAtIndex:colorIndex] :
           nil;
}
Finally, we get to the touch methods themselves. This class responds to both initial touches and drags in the same way, so touchesMoved: just calls touchesBegan:. However, touchesEnded: uses a different notification name, so we'll let it have its own code.
- (void)touchesBegan:(NSSet *)touches withEvent:(UIEvent *)event {
  CGPoint location = [[touches anyObject] locationInView:self];
  UIColor *color = [self colorAtPoint:location];
  if (color) {
    NSDictionary *userDict = [NSDictionary dictionaryWithObject:color
                                           forKey:ColorGridLatestTouchedColor];
    [[NSNotificationCenter defaultCenter] postNotificationName:ColorGridTouchedOrDragged
                                          object:self userInfo:userDict];
  }
}
- (void)touchesMoved:(NSSet *)touches withEvent:(UIEvent *)event {
  [self touchesBegan:touches withEvent:event];
}
- (void)touchesEnded:(NSSet *)touches withEvent:(UIEvent *)event {
CGPoint location = [[touches anyObject] locationInView:self];
  UIColor *color = [self colorAtPoint:location];
  if (color) {
    NSDictionary *userDict = [NSDictionary dictionaryWithObject:color
                                           forKey:ColorGridLatestTouchedColor];
    [[NSNotificationCenter defaultCenter] postNotificationName:ColorGridTouchEnded
                                          object:self userInfo:userDict];
  }
}
@end