3. Rotation
Sprites also have the ability to be smoothly rotated to any angle you wish. The angle is specified by using either of the Draw calls shown in Listing 1 or 2, passing the angle for the appropriate parameter.
The angle is measured clockwise in radians, meaning
that an angle of 0 is the right way up, PI / 2 is rotated a quarter of
the way around to the right, PI is upside down, and 3 PI / 2 is rotated
three-quarters of the way around.
Personally, I find working in radians quite unnatural
and I much prefer working in degrees. XNA is here to help with this
because it offers a very useful class named MathHelper, which is full of static functions to assist with graphics-related mathematical functions. One such function is ToRadians, which converts the supplied degrees angle into radians. Using this with the Draw function's rotation parameter makes providing the angle much easier.
Just as with scaling, the point around which the image rotates can be controlled using the origin
parameter. Set this to the center of the sprite image to rotate on the
spot or provide a different origin for off-center rotation. The origin
can be completely outside the sprite area if you wish.
Listing 4 shows a call to Draw that rotates a sprite by 45 degrees around its center. The output from this call can be seen in Figure 2.
Example 4. Drawing a sprite rotated around its center
spriteBatch.Draw(_smileyTexture, new Vector2(100, 100), null, Color.White,
                MathHelper.ToRadians(45),
                new Vector2(_smileyTexture.Width / 2, _smileyTexture.Height / 2),
                1.0f, SpriteEffects.None, 0.0f);
|

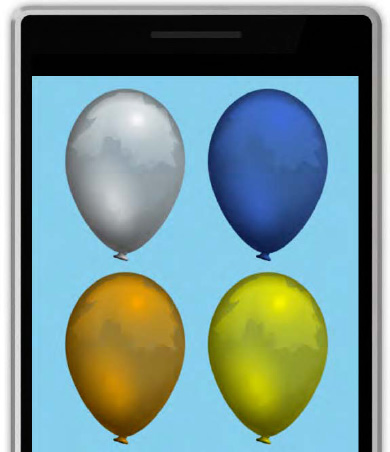
4. Tinting
Throughout all the calls to Draw, we have passed through a Color parameter, and in each case it has been Color.White. We can pass different colors instead of white to tint the graphic that is being drawn. If we pass Color.Blue, the sprite will be shaded in blue, for example.
A very useful application of this feature is to allow
a single graphic to be drawn in lots of different colors, without
having to add all the different colored graphics individually into the
Content project. If the source image is provided in grayscale, the tint
can be used to display this in whatever color we want. You can see this
in action in the TintedSprites example project, an image from which is shown in Figure 3 (though this obviously looks better in color!).
To understand just how the tinting works (and what
kind of results you can expect from it), we need to discuss how colors
are represented in computer graphics.
In XNA there are two ways that we can specify a color to use:
Using one of the named color values from Microsoft.Xna.Framework.Color
Specifying the individual levels of red, green, and blue that will make up the color
A large range of named colors is provided, from standard colors such as Black and Blue to those with more extravagant names including the sublime PapayaWhip and the unmistakable BlanchedAlmond.
This list of named colors is actually the full list of X11 colors,
which also form the predefined named colors used for HTML and Cascading
Style Sheets (CSS). For further information about these colors, see the
Wikipedia page at http://en.wikipedia.org/wiki/Web_colors where a full list and an example of each can be seen.
Alternatively, colors may be specified by providing
the levels of red, green, and blue intensity (the additive primary
colors) that are required to form the required color. Each of these is
specified independently and ranges from 0 (no intensity) to 255 (full
intensity). For example, creating a color with its red component set to
255 and its green and blue components set to 0 will result in a pure
red. By varying the intensity of each color, all the available shades
that the device is able to display can be created.
NOTE
There are various different models in which
colors can be specified. In printing, the most common model is the CMYK
model. CMYK is an abbreviation for "cyan, magenta, yellow, and
key-black." Cyan, magenta, and yellow are the primary subtractive colors—so
named because, when additional color is applied, they reduce the amount
of light that is reflected and result in a darker color. The model that
is most commonly used in computer devices is RGB, an abbreviation for
"red, green, and blue." Red, green, and blue are the primary additive colors,
which result in an increased amount of light when the colors are mixed
together (so that, in fact, mixing all three results in white light).
The .NET framework supports color specifications using the RGB model.
To create a color from red, green, and blue intensity levels, create a new Color
structure and pass the intensity levels into its constructor. There are
actually two ways in which the intensity levels can be specified:
either as integer values from 0 to 255 as described, or as float values
from 0 to 1. Exactly which of these approaches you prefer is up to you;
they are functionally equivalent. Listing 5 shows an example of creating two identical Colorstructures, one using integer values and the other using floats.
Example 5. Creating colors from red, green, and blue intensity levels
Color myColor1 = new Color(255, 128, 0);
        Color myColor2 = new Color(1.0f, 0.5f, 0.0f);
|
Because we can specify 256 levels of each of the
three color components, we can create colors from a total palette of
16,777,216 different colors (256 × 256 × 256 = 16,777,216). This is the
same color depth as used on virtually all modern desktop PC displays.
Because each of the three color components requires 8 bits of data (to
store a value from 0 to 255), this is known as 24-bit color.
So how does all this apply to tinting? In order to
apply a tint, XNA first reads the color of each pixel from the image
using the float representation, using a value between 0 and 1 for each
of the red, green, and blue components. It then obtains the tint color
using the same float representation. The corresponding values for red,
green, and blue are then multiplied together, and the resulting value is
the color that is actually displayed on the screen.
Because the color white has RGB values of (1, 1, 1),
the result of using white as a tint is that each pixel color component
is multiplied by 1—in other words it is not changed, and the image is
rendered untinted. If we used a tint color of black, which has RGB
values (0, 0, 0), all the pixel color components would be multiplied by
0, resulting in the sprite appearing totally black. By using tint colors
that have different levels of red, green, and blue—for example, orange
has the RGB value (1, 0.5, 0)—we can cause the sprite to be tinted
toward whatever color we wish.
Note that if the source image
is not grayscale, however, it may not tint in the way you necessarily
want. For example, if you have a sprite that consists of strips of red,
green, and blue color, and you tint it using a solid blue color, the
areas of red and green will turn completely black (because the intensity
levels for red and green in the blue tint are 0). This is why a
grayscale image is often the best to use when tinting.