Normally, when you edit a document, your
changes flow right into the text. When you delete something, it
disappears. When you insert text, it goes where you put it. When you
format something, it looks different.
But turn on the Track Changes feature, and Word handles your changes in a different way:
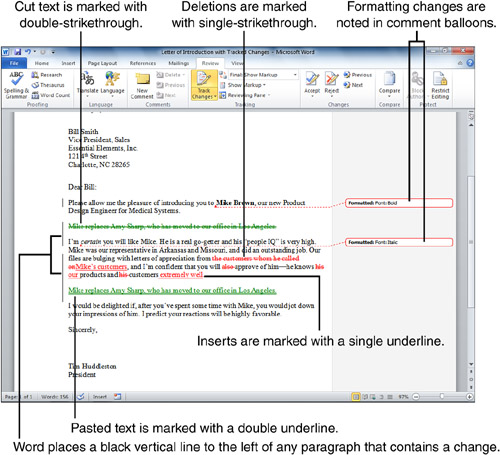
- When you
delete text, Word draws a line through the text and changes its color
but doesn’t actually remove the text from the document.
- When you insert new text, Word underlines it and makes it a different color.
- When
you move text, Word draws a double line through the text in its
original position and draws a double underline under the text in its
new position. In both places, Word changes the text’s color.
- When you make a formatting change, Word marks the change with a comment balloon.
Like comments, Track Changes is a great
collaboration tool because it lets you edit someone else’s document
without truly changing the original. You can think of Track Changes as
a way to highlight proposed changes and show where they would go.
|
Many old-school Word users, like me, still use the term “revision marks” when referring to Track Changes.
|
When the document’s creator views your proposed
changes, he can accept or reject them individually or all at the same
time. If the creator accepts a change, Word implements it just as you
set it up. If the creator rejects a change, Word removes it and leaves
the original version intact.
Tracking the Changes You Make to a Document
To activate the Track Changes feature, go to the
Review tab and click Track Changes. (If a drop-down menu opens, click
the Track Changes option.) Word begins marking every proposed change
you make.
Enter, delete, format, and move text in the
document. Make any changes you want. Word highlights each change in a
different way, as shown in Figure 1.

To stop tracking changes, click the Track Changes
button again (or click the Track Changes option from the drop-down
menu). Your proposed changes remain highlighted, but future changes are
made in the normal manner.
Be sure to save the document before closing it, especially if you’re going to give it back to the person who created it.
If Track Changes is active when you close a
document, it will be active the next time you open that document. Word
remembers whether Track Changes is active on a document-by-document
basis, so you don’t have to turn it on or off every time you start Word.
Accepting and Rejecting a Reviewer’s Revisions
If someone else edits your document with Track
Changes turned on, you can decide whether to accept or reject those
changes. Open the document and go to the Review tab; then do any or all
of the following, as needed:
- Click the Next
and Previous buttons (in the Changes group) to move from one change to
another. When Word comes to a tracked change, it highlights the text.
- To accept one or more changes, click the Accept drop-down arrow; then do the following:
- To accept the current change and jump to the next one, click Accept And Move to Next.
- To accept the current change and stay where you are, click Accept Change.
- To accept all the changes in the document at the same time, click Accept All Changes In Document.
- To reject one or more changes, click the Reject drop-down arrow; then do the following:
- To reject the current change and jump to the next one, click Reject and Move to Next.
- To reject the current change and stay where you are, click Reject Change.
- To reject all the changes in the document at the same time, click Reject All Changes in Document.
When you finish accepting and rejecting
changes, turn off Track Changes unless you want Word to highlight any
additional edits you make to the document.