|
When performing a typical server install, the account
that's used for the installation process needs to be a member of the
Schema Administrators group in Active Directory, as well as a member of
the Enterprise Administrators. This is true for an upgrade as well as a completely new installation.
To install Exchange Server 2010, just follow these steps:
Log on to the server on which you want to install Exchange Server 2010. Navigate
to the installation (DVD, local directory or a network share) and
double-click the setup.exe program. This will start the setup
splash-screen.
If
you haven't already installed the Exchange Server 2010 prerequisites,
the setup program offers the possibility to install them using the menu. Install Microsoft .NET Framework 3.5 Install Windows PowerShell V2.
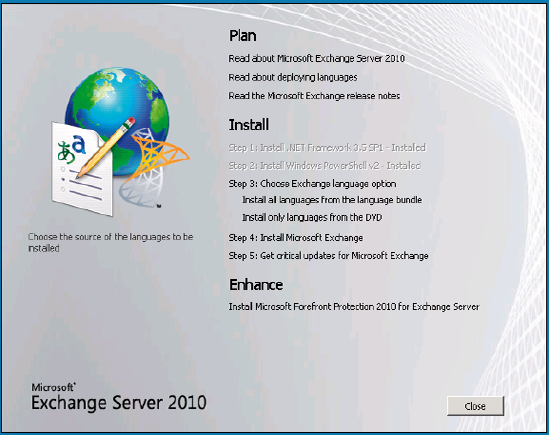
You
have to select the Language Options for Exchange Server 2010. You can
download all Language files from the Language Bundle (locally stored or
on the Internet) or continue with the Language that's on your DVD. If
you select this option, only the default language will be used. Not only
for the setup application, but also, for example, for the Outlook Web
App. When all prerequisite software is installed you can select "Step 4: Install Microsoft Exchange." On the Introduction and Confirmation Pages you can just click Next after you've read the messages. You'll need to "accept the terms in the license agreement" – select the appropriate radio button and click Next. Depending
on your company policy, select whether or not you want to enable the
Error Reporting feature and click Next to continue. The
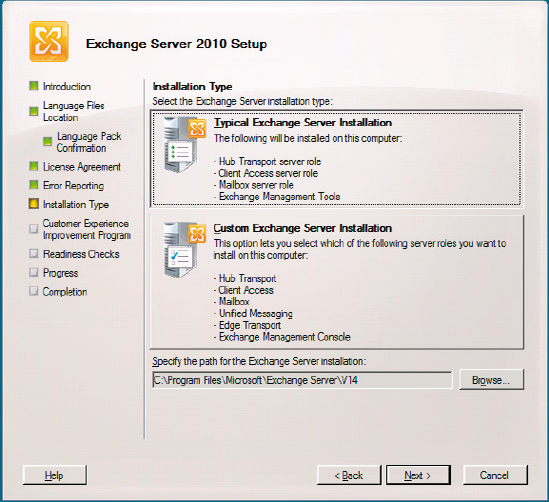
next page asks for the Installation Type. You can select a typical
Exchange Server installation, where the Hub Transport Server role,
Client Access Server role, Mailbox Server role and the Exchange
Management Tools are all installed on the same server. The second option
is a custom Exchange Server installation, where you can select which
individual roles to install. Select the Typical Exchange Server Installation and click Next to continue. Since
this is a fresh installation, an Exchange organization doesn't exist
yet, so you'll need to enter a name for the Exchange Server
organization. The default name is "First Organization," but any name can
be used as long as these are the only characters used:
Click Next once you've entered a valid organization name.
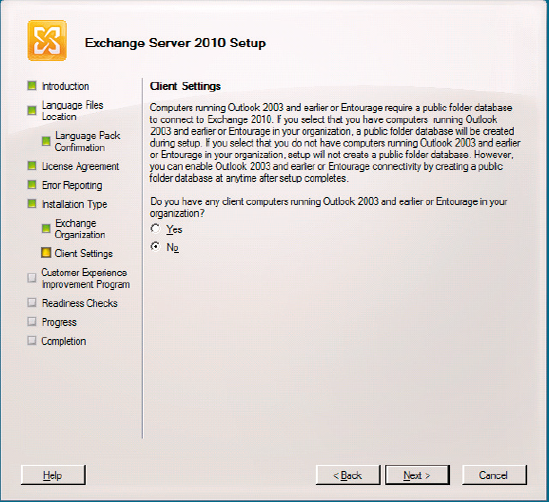
The
next window is the Client Settings window, and this is very important.
Your selection needs to be based on the email clients used in your
organization. Outlook 2003 or earlier and Entourage clients depend on
Public Folders for Free/Busy information (i.e. calendaring) and Offline
Address Book downloads. On the other hand, Outlook 2007 and Outlook 2010
can both use the Availability Services and Web-based Offline Address
Book Download features in Exchange Server 2007 and later. If you do not
install Public Folders at this time, it's always possible to install
Public Folders later to support Outlook 2003 or Entourage clients in
your Exchange environment. Click Next to continue.
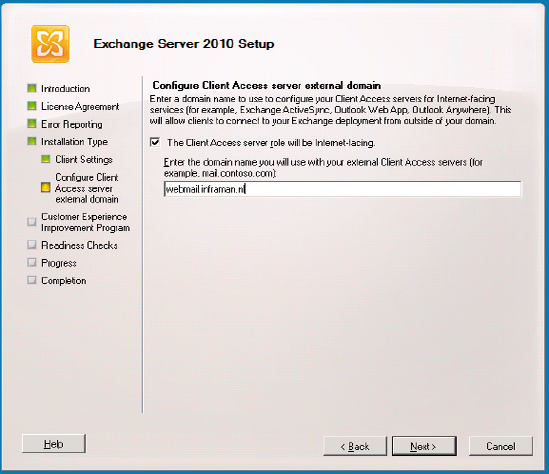
A new aspect of the Exchange Server 2010 setup process is the option to enter the external domain name. If you do
enter an external domain name, the Exchange Server 2010 Client Access
Server role will be configured smoothly and automatically with the
appropriate settings. If you do not enter an external domain name during
the setup, you'll have to configure the settings manually after the
setup has finished. Depending
on your company policy, you can choose whether or not to join the
Exchange Customer Experience Improvement Program, and then click Next.
The
next step is the Readiness Check. The setup program will run a final
check on the server's readiness for the Exchange organization, the
language packs and the server roles. If any prerequisite is missing,
it's displayed here and you'll have the option to correct the issues. If
all the checks come back OK, you can finally click that inviting
"Install" button. During
the installation, the progress is shown for each part of the process.
This whole affair can take a considerable amount of time, depending on
the hardware being used for the Exchange Server, so you'll need to be
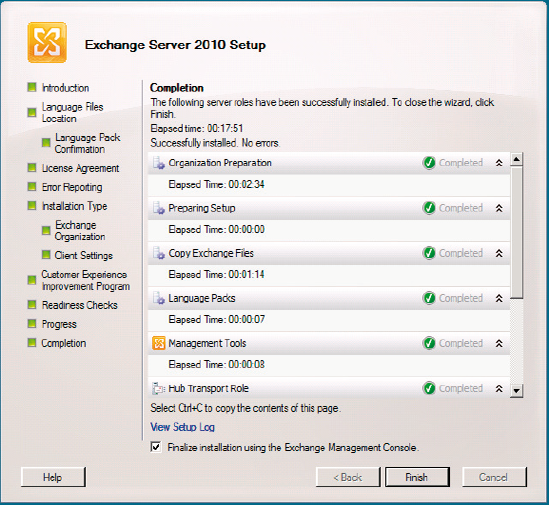
patient. Once the setup program is finished you'll have the option to
view the setup log, just in case of problems (which, if you've followed
these steps, there shouldn't be). When you click on "Finish," the setup
program is done, and the Exchange Management Console is opened to
finalize the new Exchange server.
|