This is probably one of the main reasons you bought
the CS5 upgrade—to get Content-Aware Fill, because it’s just incredibly
amazing. That being said, as amazing as it is, it’s incredibly simple to
use, so don’t let the fact that it only took four pages in the book to
cover perhaps the most famous feature in all of CS5 throw you off. What
makes the feature even more amazing is that you have to do so
little—Photoshop does all the heavy lifting. Here are a couple of
examples of ways to use it to remove distracting things you wish weren’t
in the photo:
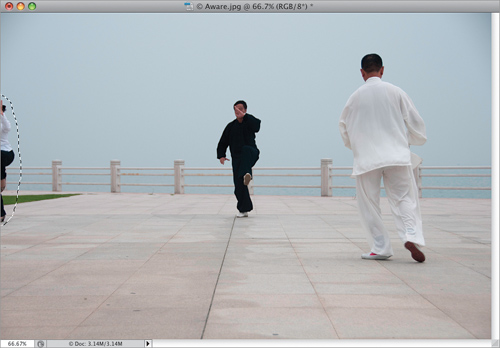
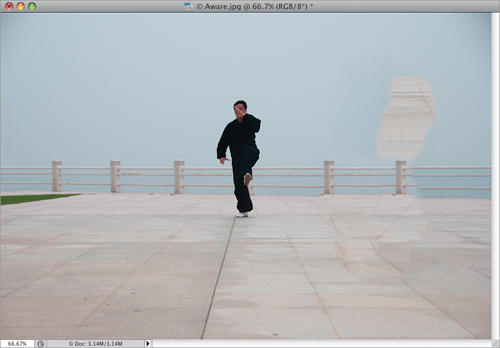
Step One. | In
this case, we have someone sneaking into the scene from the far left
side of the image, and it takes away from what’s happening in the rest
of the image. To have Content-Aware Fill remove that one-third of a
person, just get the Lasso tool (L) and draw a very loose selection around them. Don’t get too close—a loose selection, like the one you see here, is fine.
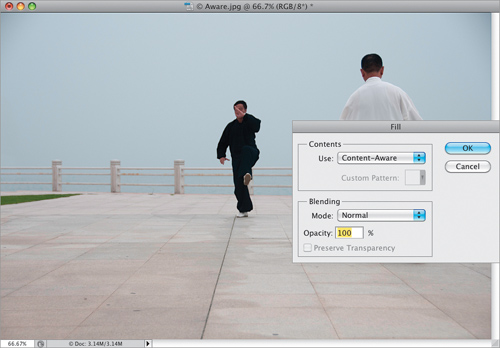
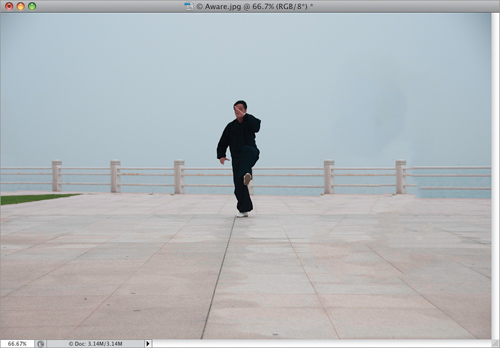
 | Step Two. | Now press the Delete (PC: Backspace) key on your keyboard, and the Fill dialog will appear, with Content-Aware
selected in the Use pop-up menu (as shown here). Just click OK, sit
back, and prepare to be amazed. (I know—it’s freaky). Go ahead and
Deselect by pressing Command-D (PC: Ctrl-D).
Look at how it replaced the missing grass in the proper perspective.
This is the essence of being “content aware” and being totally aware of
what’s around it. The more I use it, the more it amazes me, but part of
using this effectively is learning it’s weaknesses, and how to get
around them when possible.
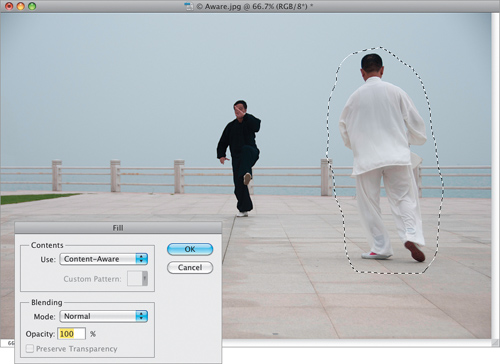
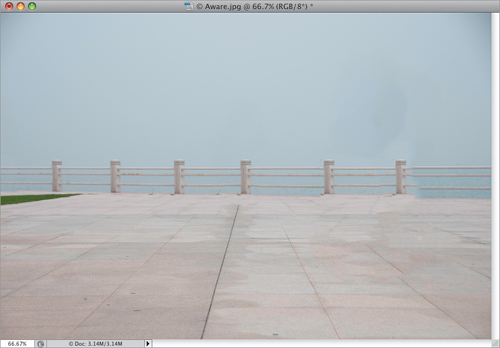
 | Step Three. | As
well as it did removing that one-third of a person on the far left,
it’s not going to do a good job if you want to remove the guy on the
right. It seems like it should work just fine, but it doesn’t. Well, at
least not at first, but we’re going to kind of make it work. Start by
putting a loose selection around him, then hit the Delete (PC:
Backspace) key, and when the Fill dialog appears, don’t touch anything,
just click OK.
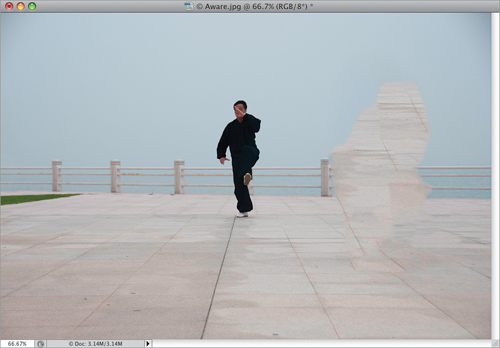
 | Step Four. | In
this case, it didn’t really work as well as we had hoped. Now, your
first inclination is to undo, and then switch to the Clone Stamp tool,
but don’t quite yet. One thing I’ve learned about Content-Aware Fill is
that it is sometimes chooses different places to sample content from, so
instead of switching to the Clone Stamp tool, try this first: press Command-Z (PC: Ctrl-Z)
to Undo the Content-Aware Fill, and then just try it again. You might
be surprised that it samples from a different area, and it might work
this time. However, it didn’t for me, but don’t worry—I’ve got a backup
plan. Go ahead and deselect.
 | Step Five. | Now,
let’s think of things differently at this point. Let’s not think,
“Content-Aware Fill didn’t work.” Let’s think, “Hey, l can use
Content-Aware Fill to fill that concrete-looking shape on the right side
of the photo.” So, make a loose Lasso selection around the
concrete-looking blob, then bring up Content-Aware Fill again, and give
it a shot.
 | Step Six. | Wow—this
is a lot better. It’s not fully there, but a lot, lot better (more on
taking it up a notch in a moment). Now, you will fall deeply in love
with Content-Aware Fill if you can come to peace with the fact that it
won’t work perfectly every time, but if it does 70% or 80% of the work
for me (in removing something I don’t want), that means I only have to
do the other 20%, and that makes it worth its weight in gold. If it does
the entire job for me, and sometimes it surely does, then it’s even
better, right? Right. Also, it helps to know that the more random the
background is behind the object you want to remove, the better job
Content-Aware Fill generally does for you. (By the way, do you think we
could pull that same scam again? The one we did in Step Five?)
 | Step Seven. | Put
a Lasso selection around the area that’s still messed up (where the guy
on the right used to be), and try the Content-Aware Fill thing on that
area, and see what happens. Well, you don’t really have to, because I’m
showing you here. It’s pretty darn close now, and just needs a little
touch-up (notice how the railings don’t quite match up?). Well, let’s
see what happens if you tried to move the guy in the black outfit—you
know what to do: Lasso, then hit Delete.
 | Step Eight. | For
some reason, it worked much better on him, first time out, than it did
on the guy on the right. If you look at the fence behind where he was,
you do have a tiny bit of touch-up with the Clone Stamp tool to make his
removal really seamless (that fence needs a tiny bit of fixing,
right?), but when you think of how much Content-Aware Fill did for you,
it makes you start to wonder how you lived without it.
Tip: Painting Using Content-Aware Fill
The method you just
learned has you making a selection, and then filling it using
Content-Aware Fill. If you’d rather paint than select, you can use the
Spot Healing Brush—just make sure the Content-Aware radio button is on
up in the Options Bar, then paint right over what you want gone.
|
|