1. Working with Compound Shapes
If you have been drawing and
modifying artwork in Flash with the Object Drawing option turned off,
you've probably noticed that Flash has a unique way of handling lines
and fills that reside on the same layer of your document. Items of the
same color merge, whereas items of a different color replace or cut out
other items where they overlap. Flash treats lines or strokes as
separate items than fills, so these can be selected and moved or
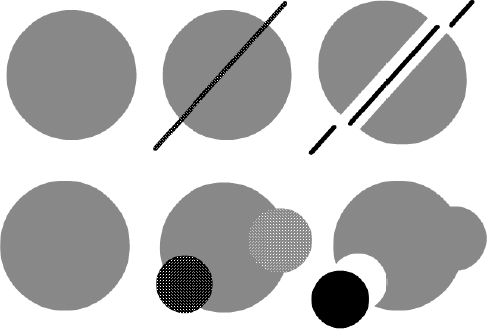
modified independently of each other, even if they are the same color. Figure 1 shows how Flash allows lines and fills to be selected individually, even if they are the same color.
|
By double-clicking an
element, you can select all the related segments. This works for
selecting the stroke and fill of a shape or for selecting connected
sections of a segmented line (such as the four sides of a rectangle).
|
|

Both lines and fills are divided into segments at points of intersection. Figure 2
shows a fill split into two independent shapes by drawing a line on top
of it (top) or modified by merging with a fill of the same color and
being cut out by a fill of a different color (bottom).

These behaviors can be
destructive or helpful to your artwork, depending on how you manage
individual elements. The key point to remember is that primitive shapes
cannot be overlapped on the same layer while deselected without
affecting each other. If items are grouped or converted into drawing
objects or symbols, they remain independent and are not compounded or
deleted by intersection with other items. Items on layers are also
autonomous and do not merge with or erase items that exist on other
layers.
You can move lines or fills
over other primitive shapes without affecting them, as long as they
remain selected. As soon as they are deselected, they intersect or merge
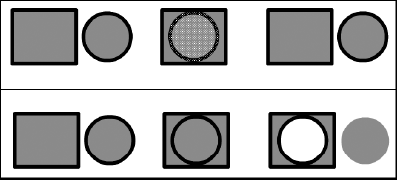
with adjacent primitive shapes on the same layer. Figure 3
illustrates the process of moving a selected shape over and then off of
another shape while keeping the two shapes independent (top), and the
result if the shape is deselected while it is overlapping another shape,
before being reselected and moved, to create a compound shape (bottom).

2. Editing with Find and Replace
Although you can use the
Movie Explorer to search for some elements in a project file so that
they can be modified, it doesn't automate updates in the same speedy way
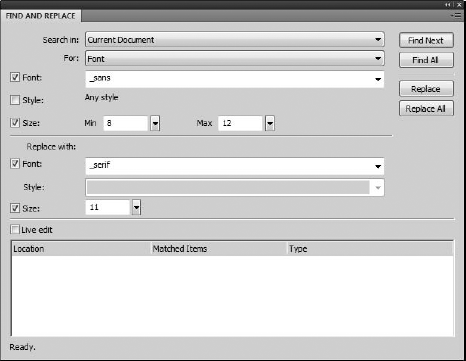
that the Find and Replace panel, shown in Figure 4, does.
NOTE
Find and Replace is
opened from the Edit window rather than from the Window menu, but it
does open a real panel and not just a dialog box. Although the Find and
Replace panel takes up a lot of room on your desktop, you could dock it
with other panels for quick access if you prefer that to using the menu
or shortcut keys.
If you have used the Find and
Replace feature in any other application (even in a basic text-editing
program), you will be familiar with the main buttons in the Find and
Replace panel (Find Next, Find All, Replace, and Replace All). Open the
Find and Replace panel by choosing Edit => Find and Replace in the application menu (Ctrl+F/ +F).
+F).

The real benefits of using this panel become clearer when you look at the items you can select to search for; these include:
Text:
Search for words, partial words, or whole paragraphs in text fields,
frames, layers, parameters, strings, or in ActionScript in your current
project or current scene.
Font: Search for fonts by name, style, and even size, within your current project or scene.
Color:
Pick a color from the popup swatches (or enter a hexadecimal value in
the field) to search for fills, strokes, or text where a specific color
is used in the current project or scene.
Symbol/Sound/Video/Bitmap:
Use the handy drop-down list that lists all symbols (or sounds, or
video, or bitmaps) used in your current project to pick a symbol to
search for and a symbol to use as a replacement.
As you select each item in the
For: drop-down list, options relevant to that item become available in
the panel. These options give you very precise control over the type of
edits that you want to make. Now that replacing a color or font, or even
a specific word in your entire project file, is as easy as making a few
quick selections in the Find and Replace panel, those dreaded
last-minute revisions might almost seem fun.
|
Although any effects
or transformations that you have applied to a symbol instance (and any
formatting you have applied to text) should be preserved if you change
it by using the Find and Replace panel, you have to verify that the
newly inserted content appears as you expect it to. If a font is much
larger, it might not fit into your layout, or if a replacement bitmap is
much larger or smaller than the original, you may have to make some
manual adjustments to get everything polished. These are the same kinds
of adjustments you would expect to make if you used the Swap symbol
feature. |