You can shoot outside all day and be getting shots
that look just great, but step indoors and everything changes. The
culprit is Auto white balance (the default setting on digital cameras,
and most people never change from this default). With Auto white
balance, shooting indoors (like the interior shot shown below) you get
what you see here—a photo that looks way too yellow (or if I had shot in
an office, where the standard is fluorescent lighting, it would be too
blue). Here are three different ways to deal with the problem:.
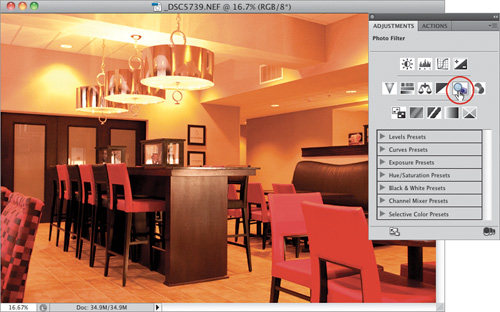
Step One. | Here’s
a photo taken in the lobby of a hotel and, of course, it has the type
of lighting you’re likely to find in a lobby (or a home), called
“tungsten lighting” (by photographers and people who sell lighting for a
living), which is why the color in the photo looks so yellow (pretty
typical for shots taken indoors when your white balance set to Auto).
The first method is to add a blue Photo Filter adjustment to offset the
yellow and make the color look more natural, so click on the Photo
Filter icon in the Adjustments panel (it’s shown circled here).
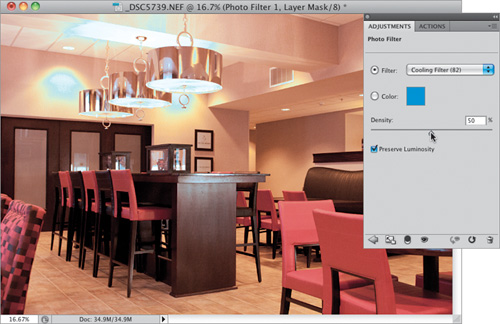
 | Step Two. | Just
a heads up: when you choose Photo Filter, the default filter is yellow,
so your photo looks even worse at first, but that’s easy to fix. From
the Filter pop-up menu, choose Cooling Filter (82),
as seen here, and then drag the Density (amount) slider to the right
until the image looks more natural. Here, I dragged it over to 50% (the
amount will be different depending on the photo, so this is a judgment
call you’ll have to make). This correction looks okay, but if you have
the original RAW image, you can get a much better correction than this
using Camera Raw.
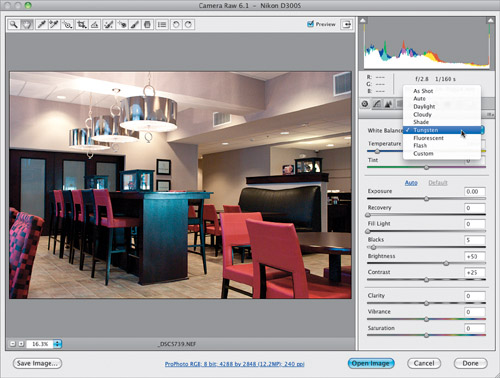
 | Step Three. | If
you took the original shot in RAW, this is the best case scenario,
because you’ll usually get much better results by opening the image in
Camera Raw and choosing one of the built-in presets in the White Balance
pop-up menu, like Tungsten (shown here), which pretty much fixes the
problem, and does it without washing out the red color in the chairs (if
you look back at the image in Step Two, the chairs lost some of the
saturation in the reds. It was a fair trade—to lose some of the red to
get the rest of the color fixed—but this method, with a RAW photo, is
much better all around). In short: you’ll get better results fixing the
white balance of RAW images in Camera Raw than you will for JPEG or TIFF
images.
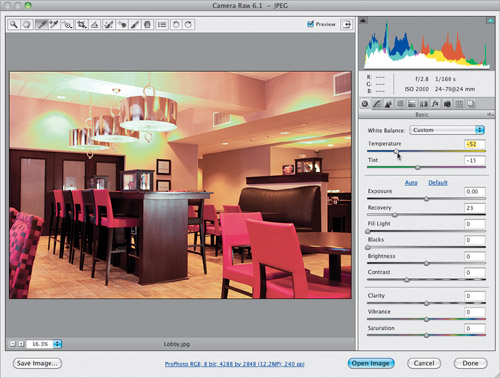
 | Step Four. | If
your original shot was taken as a JPEG or TIFF, you can still use
Camera Raw to adjust your white balance, but the results won’t be as
good as if it had been shot in RAW. Click on the photo in Mini Bridge,
then Right-click on it and choose Open in Camera Raw.
When it opens, you’ll see that something’s missing—there is no Tungsten
preset for JPEGs or TIFFs, only As Shot and Auto (Auto seems to look
okay as a starting place for this photo, but I had to drag the
Temperature slider to the left a bit to remove more of the yellow, and
it still doesn’t look as good as the simple Tungsten preset used on the
RAW image in Step Three). Your other choice is to get the White Balance
tool and click on a light gray area in the photo (I tried this, as well,
and in this case, it looked worse than the Auto preset).
 |
|