1. Drawing Multiple Text Strings
One way to make the
display more interesting is to draw different-colored versions of the
text at slightly different positions on the screen:
protected override void Draw(GameTime gameTime)
{
    graphics.GraphicsDevice.Clear(Color.CornflowerBlue);

    DateTime nowDateTime = DateTime.Now;
    string nowString = nowDateTime.ToLongTimeString();
    Vector2 nowVector = new Vector2(50, 400);

    spriteBatch.Begin();

    spriteBatch.DrawString(font, nowString, nowVector, Color.Red);

    nowVector.X = nowVector.X + 4;
    nowVector.Y = nowVector.Y + 4;

    spriteBatch.DrawString(font, nowString, nowVector, Color.Yellow);

    spriteBatch.End();

    base.Draw(gameTime);
}
This version of the Draw method is very similar to the original, except that DrawString is now called twice, first drawing in red and then in yellow. In between the draw operations, the values of the X and Y properties of the position vector are increased by 4 using the following statements:
nowVector.X = nowVector.X + 4;
nowVector.Y = nowVector.Y + 4;
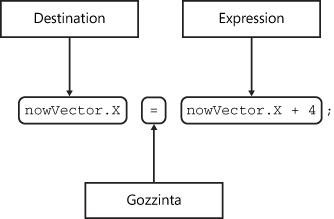
Figure 1 shows how this works. The thing on the right side of the "gozzinta" is an expression. This generates a result that is then placed in the destination.

The sequence of instructions that the compiler creates to work out the statement is as follows:
Fetch the value of the X property of nowVector.
Store the value back in the X property of nowVector.
The effect of adding 4 to the X and Y properties is to move the drawing position for the text across and down the screen. Figure 2 shows the result of these changes.

From
this, you can see that when you draw on the screen, the images are laid
on top of each other in the order they are drawn. The red version of
the time string is overwritten by the yellow one. The nice thing about
this approach is that it gives a good 3-D effect. The human eye
interprets the darker color as being in the "background," making the
letters appear to pop out of the display. However, the 3-D effect is not
quite perfect. The image in Figure 3
is an enlargement of part of the text and shows that the red part is
not actually "solid"; instead, it’s simply a layer drawn behind the
yellow one.

If you want the 3-D
effect to be perfect, you need to draw lots more red versions to "fill
in the gaps." You could do this by simply copying the code four times,
but perhaps you remember reading somewhere that computers are supposed
to make life easier, and this doesn’t feel very easy at all. What you
really want to do is perform a block of statements a given number of
times, and it turns out that C# provides a way to do this: it’s called
the for loop construction.
2. Repeating Statements with a for Loop
A program can do three
things as it runs. It can perform a single action (a statement), it can
make a choice of what to do (a condition statement), or it can repeat
something (a loop construction). It might surprise you to learn that
with these three programming constructions, you could write any program.
You’ve seen how to write statements and conditions; now you need to
discover how to create a loop. With a loop, you need to write the
drawing instructions only once, and the loop construction then performs
them as many times as you like:
spriteBatch.Begin();

int layer;
for (layer = 0; layer < 4; layer++)
{
    spriteBatch.DrawString(font, nowString, nowVector, Color.Red);
    nowVector.X++;
    nowVector.Y++;
}

spriteBatch.DrawString(font, nowString, nowVector, Color.Yellow);

spriteBatch.End();
This code performs four drawing operations with the red color. The code in the block controlled by for is repeated a given number of times. When the loop finishes, the final DrawString puts the yellow version on top of all the red ones. Note that the yellow DrawString is not repeated four times because it is not inside the block of code controlled by the for loop.
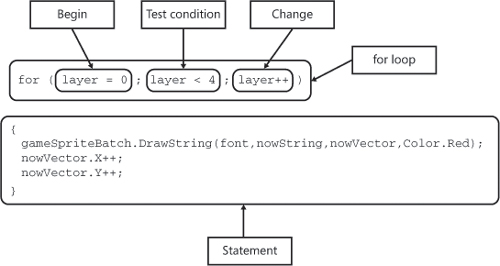
The loop itself is controlled by the three items in brackets that follow the key word for. These are shown in Figure 4. Each of the three items is used to manage the behavior of the loop.

Begin This is a statement that is obeyed when the loop starts. In this example, you’re using an integer variable called layer to count each of the layers that you’re drawing, and the loop must set this to zero at the beginning.
Test Condition The condition controls when the loop finishes. It can be either true (the loop continues) or false (the loop ends). The condition in your loop is layer < 4. You might not have seen the <
operator before; it performs a "less-than" comparison between the two
operands. If the item on the left is less than the item on the right,
the result of the comparison is true. If the item on the left is not less than the item on the right, the result of the comparison is false. C# provides a range of different comparison operators.
Change Each time the statements in the loop are completed, the change is performed. In this case, the change statement layer++ makes the value in layer
1 larger each time. After the change has been performed, the test
condition is evaluated to see whether the statements controlled by the
loop are to be executed again.
The
C# compiler has the job of producing the machine instructions that
perform the loop when the program runs. The precise sequence that’s
followed by the code that the compiler produces is as follows:
Perform the Begin statement to start the loop.
Perform the Test and finish if the test is false.
Perform the statement in the loop body.
Perform the Change statement.