To begin recording a macro,
select Record Macro from the Code group of the Developer tab. Before
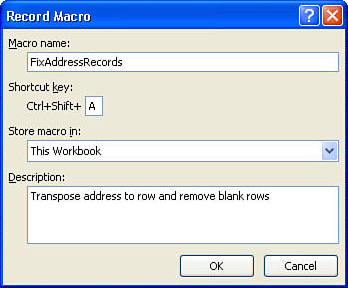
recording begins, Excel displays the Record Macro dialog box shown in Figure 1.
Filling in the Record Macro Dialog
To begin recording a macro and fill in the record macro dialog, follow these steps:
1. | Go to Developer, Code, Record Macro. The Record Macro dialog appears.
|
2. | In
the Macro Name field, type a name for the macro, making sure not to
include any spaces. Use a meaningful name for the macro, such as
FormatReport.
|
3. | The
Shortcut Key field is optional. If you type J in this field, and then
press Ctrl+J, this macro runs. Note that most of the lowercase shortcuts
from Ctrl+a through Ctrl+z already have a use in Excel. Rather than
being limited to the unassigned Ctrl+j, you can hold down the Shift key
and type Shift+A through Shift+Z in the shortcut box. This will assign
the macro to Ctrl+Shift+A.
|
4. | From
the Store Macro In drop-down, choose where you want to save the macro:
Personal Macro Workbook, New Workbook, This Workbook. It is recommended
that you store macros related to a particular workbook in This Workbook.
The Personal Macro Workbook (Personal.xlsb) is not a visible workbook;
it’s created if you choose to save the recording in the Personal Macro
Workbook. This workbook is used to save a macro in a workbook that will
open automatically when you start Excel, thereby allowing you to use the
macro. After Excel is started, the workbook is hidden.
|
5. | Enter
a description of the macro in the optional Description field. This
description is added as a comment to the beginning of your macro.
|
6. | Click OK and record your macro. When you are finished recording the macro, click the Stop Recording icon in the Developer tab. |