IT tutorials
 
Office
 

Microsoft Word 2010 : Working with Styles (part 3) - Deleting Styles, Revealing Formatting

- Free product key for windows 10
- Free Product Key for Microsoft office 365
- Product Key Free : Microsoft Office 2019 – Serial Number
2/16/2013 5:17:38 PM

Deleting Styles

In the previous section, you worked with the Manage Styles dialog box where you discovered how you can modify a style. You may have noticed a Delete button on the Manage Styles dialog. If you click the Delete button, you are only temporarily deleting the style—not permanently.

If you want to permanently delete a customized style, you must do so through the Style Organizer window. For whatever the reason, Microsoft made the Style Organizer window a little difficult to get to, but the following steps show you the way:

  1. Click the File tab and choose Options. The Word Options dialog box appears.

  2. On the left side, choose Add-Ins. The right side displays options related to Add-Ins.

  3. Click the Manage drop-down list and choose Word Add-ins. See Figure 8.

    Figure 8. Choosing Word Add-ins.
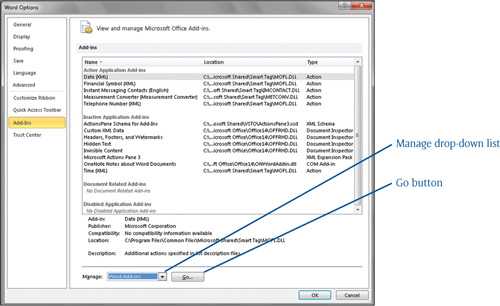
  4. Click the Go button. The Templates and Add-Ins dialog box appears.

  5. Click the Organizer button located in the lower-left corner. The Organizer dialog box appears, as shown in Figure 9.

    Figure 9. Deleting unwanted styles.
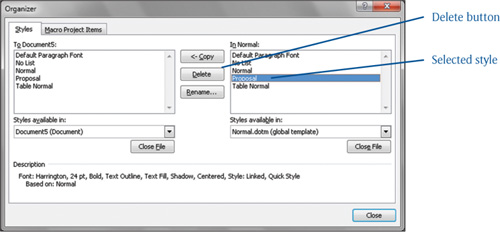
  6. From the right column (In Normal:) select the style you want to delete.

  7. Click the Delete button. A confirmation box appears.

  8. Click Yes, and then when you are finished, click the Close button.

Revealing Formatting

Word has a really cool feature that lets you quickly see all formatting applied to selected text. Called Reveal Formatting, you can review the font formatting, paragraph formatting, and section formatting all at once.

To see the text formatting, first select the text you want to inspect, then open the Style task pane by clicking the Home > Styles Dialog Box Launcher.

From the bottom of the Styles task pane, click the Style Inspector icon, which is the middle icon. The Style Inspector pane shown in Figure 10 appears.

Figure 10. The Style Inspector.

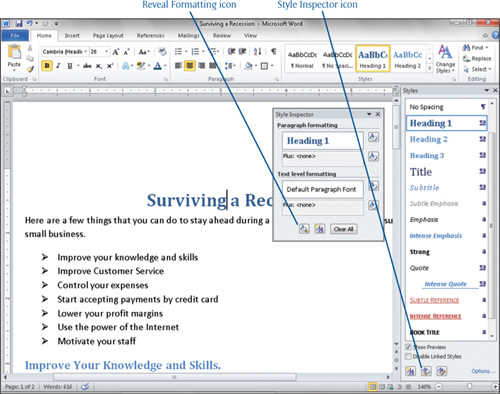
From the bottom of the Style Inspector pane, click the Reveal Formatting icon (the one on the left). The Reveal Formatting pane appears on the right side of your Word window. See Figure 11. From here you can see all formatting applied to the selected text.

Figure 11. The Reveal Formatting task pane.


If you want to change any of the options, click the applicable underlined link. A dialog box relative to that option appears where you can change the settings for the selected text.

When you are finished, click the Close box (x) on the Reveal Formatting task pane, the Styles task pane, and the Style Inspector task pane.

 
Others
 
- Microsoft Word 2010 : Working with Styles (part 2) - Creating Customized Styles, Managing Styles
- Microsoft Word 2010 : Working with Styles (part 1) - Using Quick Styles, Working in the Styles Task Pane
- Microsoft Access 2010 : Viewing the Design of a Form, The AutoForm Feature
- Microsoft Access 2010 : Sorting Records, Filtering the Data Underlying a Form
- Microsoft OneNote 2010 : Taking Notes (part 2) - Creating More Writing Space in the Middle of a Page, Creating More Writing Space at the End of a Page
- Microsoft OneNote 2010 : Taking Notes (part 1)
- Microsoft Visio 2010 : Printing Scenarios (part 4) - Printing High-Quality Materials
- Microsoft Visio 2010 : Printing Scenarios (part 3) - Printing Multiple Drawings on a Single Sheet, Printing Scaled Drawings at Reduced Size
- Microsoft Visio 2010 : Printing Scenarios (part 2) - Printing Any Size Drawing on Any Size Paper
- Microsoft Visio 2010 : Printing Scenarios (part 1) - Printing Tiled Drawings
 
 
Top 10
 
- Microsoft Visio 2013 : Adding Structure to Your Diagrams - Finding containers and lists in Visio (part 2) - Wireframes,Legends
- Microsoft Visio 2013 : Adding Structure to Your Diagrams - Finding containers and lists in Visio (part 1) - Swimlanes
- Microsoft Visio 2013 : Adding Structure to Your Diagrams - Formatting and sizing lists
- Microsoft Visio 2013 : Adding Structure to Your Diagrams - Adding shapes to lists
- Microsoft Visio 2013 : Adding Structure to Your Diagrams - Sizing containers
- Microsoft Access 2010 : Control Properties and Why to Use Them (part 3) - The Other Properties of a Control
- Microsoft Access 2010 : Control Properties and Why to Use Them (part 2) - The Data Properties of a Control
- Microsoft Access 2010 : Control Properties and Why to Use Them (part 1) - The Format Properties of a Control
- Microsoft Access 2010 : Form Properties and Why Should You Use Them - Working with the Properties Window
- Microsoft Visio 2013 : Using the Organization Chart Wizard with new data
Technology FAQ
- Is possible to just to use a wireless router to extend wireless access to wireless access points?
- Ruby - Insert Struct to MySql
- how to find my Symantec pcAnywhere serial number
- About direct X / Open GL issue
- How to determine eclipse version?
- What SAN cert Exchange 2010 for UM, OA?
- How do I populate a SQL Express table from Excel file?
- code for express check out with Paypal.
- Problem with Templated User Control
- ShellExecute SW_HIDE
programming4us programming4us